Desserts · Part 2 of 3: Instructions
Wacky Cake — Fudgy One-Pan Chocolate Cake, No Eggs Needed Step-by-step instructions
- Prep
- Cook
- Total
- Serves
- 9
Before you start
Take the butter out of the refrigerator 30 to 45 minutes before starting, so it reaches the right softness for the buttercream by the time the cake has cooled. Measure the flour, sugar, cocoa, baking soda and salt, and set the oil, vinegar, vanilla and water within reach.
Ingredients at a glance (12)
- 1 1/2 cups all-purpose flour
- 1 cup granulated sugar
- 1/4 cup unsweetened cocoa powder
- 1 tsp baking soda
- 1/2 tsp kosher salt
- 1 cup water, room temperature
- 1/3 cup vegetable oil
- 1 tbsp white vinegar
- 1 tsp vanilla extract
- 1/2 cup unsalted butter, softened to room temperature
- 2 cups confectioners' sugar, sifted if lumpy
- 2 tbsp whole milk
Instructions
Build the dry base
- Preheat the oven and prepare the dishHeat the oven to 350°F (175°C) and grease an 8x8-inch glass or metal baking dish, then line the bottom with parchment so the squares lift out cleanly later. Keep the dish near the mixing area, since the batter will be mixed directly in it. A properly prepared pan matters here, because the batter is pourable and the finished cake is very tender.Look for The oven rack sits in the center position and the oven reads a steady 350°F before any mixing begins.Tip Parchment with two overhanging tabs acts as a sling, so the whole cake can be lifted out for slicing without breaking.
- Whisk the dry base in the dishIn the baking dish itself, whisk the flour, granulated sugar, cocoa powder, baking soda and kosher salt until the color is even and no streaks of cocoa or pockets of flour remain. Mixing directly in the dish keeps this a true one-pan recipe. Take a full minute here: even distribution of the baking soda now is what produces an even, well-risen crumb later.Look for The mixture looks uniformly dusty brown, with no pale patches of flour or dark streaks of cocoa anywhere in the dish.Tip Break up any clumps of cocoa with the back of the whisk rather than sifting, and the base will stay perfectly even.
- Make three wells and add the wet trioWith the back of a spoon, press three shallow wells into the dry mix, spaced apart. Pour the vegetable oil into one well, the white vinegar into the second and the vanilla extract into the third. Keeping the vinegar separate from the baking soda until the water goes in preserves its fizz for the oven instead of spending it on the counter.Look for Three clear pockets of dry mix still separate the oil, the vinegar and the vanilla, each sitting in its own well.Tip Scrape the wells clean with a small spatula so every drop of oil and vinegar joins the batter instead of pooling underneath.
At the end of this phase, the dish holds a uniform, dusty-brown mixture with three clear wells holding the oil, vinegar and vanilla separately.
The color should be even from corner to corner, with no pale flour patches or dark cocoa streaks, and the wells should still read as distinct pockets rather than a blended batter.
Stir, bake and cool
- Pour in the water and stirPour the water over everything and stir with a spoon or small whisk until the batter is smooth and glossy, about thirty seconds, reaching all the way into the corners of the dish. A few small lumps are fine; over-stirring is not. The baking soda and vinegar will bubble lightly as they meet, and that fizz is the lift the cake will bake on.Look for A silky, pourable batter with a few tiny lumps and a light fizz spreading across the surface of the dish.Tip A silicone spatula cleans the corners better than a whisk and leaves no hidden streaks of dry cocoa behind.
- Level the batter and bakeTap the dish gently on the counter to level the surface and release any large air pockets, then bake on the center rack for 30 to 35 minutes. Rotate the dish once, halfway through, if the oven runs hot at the back. Resist opening the door during the first 25 minutes, since the rising batter is still fragile while the leavening does its work.Look for The top looks set and matte, and the edges begin to pull slightly away from the sides of the dish.Tip Oven temperatures vary, so start checking at 28 minutes rather than waiting for the full half hour to pass.
- Cool the cake completelySet the dish on a wire rack and let the cake cool completely, at least one hour, before any frosting goes near it. A warm cake melts buttercream into a slick. The resting time also lets the crumb set, so the squares slice into clean, fudgy portions instead of crumbling at the edges when the knife comes down.Look for The bottom of the dish feels fully cool to the touch and the cake no longer steams when tested gently.Tip A full hour of cooling gives the cleanest slices; two hours is even better if the schedule allows it.
The batter should look smooth, glossy and pourable, with a light fizz across its surface and only a few tiny lumps remaining.
After 30 to 35 minutes in the oven, the cake should be risen evenly, matte on top, with the edges just pulling from the dish and a toothpick emerging with moist crumbs but no wet batter. The center should spring back when pressed.
Frost and slice
- Beat the butter until pale and fluffyBeat the softened butter with an electric mixer on medium speed for 2 to 3 minutes, until it turns pale and noticeably fluffy, scraping the bowl once halfway through. This long first beat is what gives the finished buttercream its white, airy look, so do not rush it, and do not shortcut the butter softening with melted butter, which changes the texture.Look for The butter lightens several shades, looks glossy and holds a soft ridge where the beaters pass through it.Tip Butter softens in about 45 minutes at room temperature; it should bend easily but still feel cool, never greasy.
- Add sugar and milk to finish the buttercreamAdd the confectioners' sugar one cup at a time, beating on low until each addition is fully absorbed before the next goes in. Pour in the milk, add a pinch of salt if desired, then beat on medium for 2 minutes, until the buttercream is light, glossy and spreadable. Stop and scrape the bowl once so no pocket of sugar hides at the bottom.Look for The frosting holds a firm peak on the beater and spreads smoothly without tearing the crumb beneath it.Tip If it stands too stiff, add milk a teaspoon at a time; if it will not hold a peak, beat in a few more tablespoons of sugar.
- Frost, slice and serveSpread the buttercream over the cooled cake with an offset spatula, sweeping it into soft swirls that reach every corner. Slice into nine squares with a sharp knife or metal spatula, wiping the blade between cuts for clean edges. Serve straight from the dish, or lift the whole cake out with the parchment tabs and plate the squares individually.Look for Frosting sits in thick, even swirls with no bare patches of chocolate showing through anywhere on the surface.Tip A warm, damp knife wiped between cuts leaves each frosted square with sharp, bakery-clean edges.
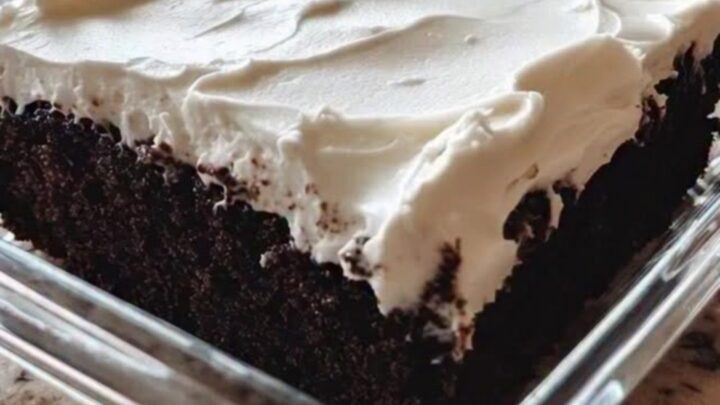
The buttercream should be pale, glossy and visibly airy, holding a firm peak on the beaters and spreading in thick swirls that cover every corner of the cake with no chocolate showing through.
When a knife or metal spatula slices down, the cut should be clean, with a defined white layer over a deep brown, fudgy crumb — no dragging, no crumbs pulled into the frosting, no slick sheen.
Common mistakes
The most common error is over-stirring the batter: once the water is in, thirty seconds of mixing is enough, and extra stirring develops gluten and toughens the crumb.
Overbaking is the second — an eggless cake dries out faster than a butter-based one, so test early and trust the toothpick. Frosting a warm cake is the mistake that ruins the finish: even slight warmth turns buttercream slick, so wait the full hour.
How to tell it’s done
The cake is done when the top looks set and matte, springs back when pressed lightly in the center, and the edges pull slightly away from the dish. A toothpick inserted in the middle should come out with moist crumbs attached but no raw batter; if batter clings, bake 3 to 5 more minutes and test again.
Up next · Part 3 of 3
4 variations · storage & make-ahead · 5 answers · printable card
Tips, FAQ & printable recipe (Part 3)← Back to the ingredients (Part 1)