Dinner · Part 2 of 3: Instructions
Shattering Crust Artisan Bread Rolls Step-by-step instructions
- Prep
- Cook
- Total
- Serves
- 8
Before you start
Before starting, make sure you have a large glass mixing bowl, a wooden spatula, a baking sheet, and parchment paper. Measure out all ingredients. Warm the water to about 110°F (43°C) — it should feel pleasantly warm on your wrist, not hot.
Set the oven rack in the middle position and have a metal pan or cast-iron skillet ready to place on the bottom rack. A spray bottle filled with water can also be handy for misting the oven.
Ingredients at a glance (7)
- 2 cups warm water (450ml)
- 1 tbsp active dry yeast (10g)
- 1 tbsp granulated sugar
- 4 1/2 cups bread flour (550g)
- 1 1/2 tsp fine sea salt
- 1 tbsp olive oil
- all-purpose flour, for dusting, to taste
Instructions
Mixing and rising
- Proof the yeastIn a large glass mixing bowl, combine the warm water, active dry yeast, and granulated sugar. Whisk gently until the yeast and sugar are dissolved. Let the mixture sit for 5 to 10 minutes until it becomes bubbly and frothy on top, indicating the yeast is active.Look for The surface is covered with small bubbles and a pleasant yeasty aroma rises.Tip If the water is too hot, it will kill the yeast; aim for 105°F to 115°F (40°C to 46°C).
- Mix the doughAdd the bread flour, fine sea salt, and olive oil to the bowl with the yeast mixture. Stir with a wooden spatula until a shaggy, wet, sticky dough forms and no dry flour remains. The dough will be loose and sticky, not a kneaded ball.Look for The dough is shaggy, sticky, and holds together but is soft and slack.Tip Do not overmix; stir just until combined. A wetter dough creates the open crumb.
- First riseCover the bowl with a damp kitchen towel or plastic wrap. Let the dough rise in a warm, draft-free place for about 1 hour, or until it has doubled in volume and is puffy and full of air bubbles.Look for The dough has doubled and looks airy, with a slightly domed top.Tip If your kitchen is cool, place the bowl in a turned-off oven with the light on.
- Shape the rollsTurn the dough out onto a lightly floured surface. Using a bench scraper or floured hands, divide the dough into 8 equal pieces. Gently shape each piece into a round by folding the edges toward the center and pinching the seams. Place the rolls seam-side down on a baking sheet lined with parchment paper, leaving space between them.Look for The rolls are smooth on top with a taut surface and a visible seam underneath.Tip Handle the dough gently to preserve the air bubbles; do not deflate it completely.
After mixing, the dough is shaggy, sticky, and full of air. It should double in volume after an hour, looking puffy and alive. The surface is dotted with small bubbles and the dough smells pleasantly yeasty. When you gently poke it, the indentation springs back slowly. This is the foundation for a light, airy crumb.
Shaping and baking
- Second riseCover the shaped rolls loosely with the damp towel and let them rise for 30 to 45 minutes, until they are puffy and almost doubled in size. The rolls should feel light and airy when gently pressed.Look for The rolls have expanded noticeably and hold a slight indentation when poked.Tip If the rolls spread too much, they may be over-proofed; bake them a bit sooner.
- Preheat the ovenAbout 30 minutes before baking, place a rack in the middle of the oven and preheat to 425°F (220°C). Place an empty metal pan or a cast-iron skillet on the bottom rack to preheat as well; this will be used to create steam.Look for The oven is fully preheated and the empty pan is hot.Tip The steam is essential for a crackly crust; it keeps the surface moist while the bread expands.
- Dust and scoreJust before baking, dust the tops of the risen rolls generously with all-purpose flour. Using a baker's razor or a sharp knife, make a single deep slash across the center of each roll, about 1/2 inch deep. This allows the bread to expand in the oven.Look for The rolls are dusted with flour and each has a clean, deep slash.Tip Slash confidently in one swift motion; a hesitant cut can deflate the dough.
- Bake with steamPlace the baking sheet on the middle rack. Carefully pour about 1 cup of hot water into the preheated pan on the bottom rack to create steam. Close the oven door immediately. Bake the rolls for 22 minutes, until the crust is deeply browned and blistered.Look for The crust is deeply golden brown with blisters and cracks; the rolls sound hollow when tapped.Tip Use oven mitts when pouring water to avoid burns from the burst of steam.
The shaped rolls are smooth and taut, with a dusting of flour and a deep slash across the top. As they bake, the rolls puff up dramatically, the crust turns deep golden brown, and blisters form on the surface.
The kitchen fills with the aroma of fresh bread. When tapped, the bottom sounds hollow—a sign the interior is fully baked.
Cooling and serving
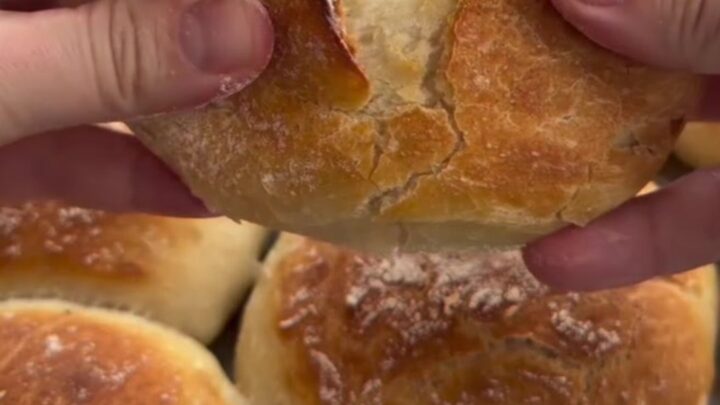
- Cool and crackleRemove the baking sheet from the oven and transfer the rolls to a wire rack. Let them cool for at least 10 minutes before serving. Press the crust gently between your hands to hear the shattering crackle.Look for The crust crackles audibly when pressed and the crumb is soft and steamy inside.Tip For maximum crunch, serve the rolls warm but not piping hot; the crust sets as it cools slightly.
The rolls cool on a wire rack, and the crust crackles audibly as it contracts. Pressing the sides produces a satisfying shattering sound. The interior is pillowy and steamy, with a honeycomb crumb that's soft and tender. Serve warm for the best contrast between the crisp crust and the airy center.
Common mistakes
One common mistake is using water that's too hot, which kills the yeast and prevents the dough from rising. Another is over-flouring the work surface, which can make the dough too stiff and dense.
When shaping, handle the dough gently to preserve the air bubbles; rough handling will deflate it and result in a tighter crumb. Also, don't skip the steam—it's essential for the crackly crust. If the crust is too pale, increase the oven temperature or bake a few minutes longer.
How to tell it’s done
The rolls are done when the crust is deeply browned, blistered, and sounds hollow when tapped on the bottom. An instant-read thermometer inserted into the center of a roll should read 190°F to 200°F (88°C to 93°C) for fully baked bread.
The internal temperature is more reliable than visual cues alone, especially if the rolls are larger or smaller. Let them cool on a wire rack for at least 10 minutes before serving so the crumb sets and the crust stays crisp.
Up next · Part 3 of 3
4 variations · storage & make-ahead · 5 answers · printable card
Tips, FAQ & printable recipe (Part 3)← Back to the ingredients (Part 1)