Dinner · Part 2 of 3: Instructions
Seared Tomahawk Ribeye with a Crackling Crust Step-by-step instructions
- Prep
- Cook
- Total
- Serves
- 2
Before you start
Take the steak out of its packaging and blot every surface with paper towels, then let it sit on a rack or plate at room temperature for no more than 30 minutes before cooking; longer than that is unnecessary and unsafe.
Set out the salt and pepper, the oil, a large cutting board, a sharp chef's knife, the metal spatula and the thermometer so nothing is hunted for mid-sear. Put the cast iron skillet on the burner and make sure the range hood is clear and ready, because a real sear at high heat produces smoke.
Ingredients at a glance (4)
- 2 lb tomahawk ribeye steak (one 2-inch-thick steak)
- Coarse kosher salt, to taste
- Coarsely ground black pepper, to taste
- 2 tbsp neutral high-heat oil, such as avocado or canola
Instructions
Dry, temper and season
- Dry and temper the steakPat the tomahawk ribeye completely dry on every side with paper towels. Set it on a rack or plate and leave it on the counter for no more than 30 minutes so the surface dries and the chill fades. A dry surface is the single biggest factor in a dark, even crust.Look for The paper towels come away dry and the surface feels tacky, not damp or cold to the touch.Tip Blot again right before it hits the pan; any surface moisture flashes to steam and sabotages the sear.
- Season generouslySeason all surfaces of the steak, including the bone edge, with coarse kosher salt and a heavy dusting of coarsely ground black pepper. Press the seasoning in gently with your hand so it adheres. Do not season until shortly before cooking, so the salt draws moisture outward but the meat does not sit in it.Look for The steak looks evenly frosted with salt and pepper, with no bare patches of red showing through.Tip Coarse salt seasons more evenly than fine salt and gives the crust a subtle texture.
At the end of this phase the steak should look uniformly frosted with salt and pepper on every face, including the bone edge, with no damp or glossy patches. The surface should feel cool rather than refrigerator-cold, and the paper towels used for the final blot should come away dry. If the meat still looks wet, blot again before the pan phase; moisture is the enemy of the crust. Nothing should be cooking yet, and the pan should still be cold on the burner, ready for its oil and its long preheat.
Sear hard and check the temperature
- Heat the pan hardAdd the oil to a 12-inch cast iron skillet and set it over high heat. Let it heat for 4 to 5 minutes, until the oil shimmers and thins out and the first faint wisps of smoke appear. Cast iron needs this long preheat to hold enough heat for a sear that does not drop in temperature.Look for The oil shimmers, moves like water across the pan and releases a few thin wisps of smoke.Tip If the oil smokes heavily and turns dark, pour it off, wipe the pan and start again with fresh oil.
- Sear the first sideLay the steak in the pan away from you, then press it flat with the metal spatula for a few seconds so the entire surface makes contact. Leave it completely undisturbed for 3 to 4 minutes. Moving it early tears the forming crust; patience here is what builds the deep mahogany color.Look for The underside releases easily when nudged and shows a deep, even brown crust.Tip Turn on the range hood; a proper sear at this heat always produces some smoke.
- Flip and sear all sidesFlip the steak and sear the second side for 3 to 4 minutes. Then use tongs to turn it on its edge and sear the narrow fat rim all around, about 1 minute per side, tilting the pan so the fat renders against the hot metal. The goal is color on every square inch.Look for All sides are browned, the fat cap is golden and rendered, and the pan smells toasty, not burnt.Tip Sear the fat rim last so any rendered fat in the pan keeps the lean faces from scorching.
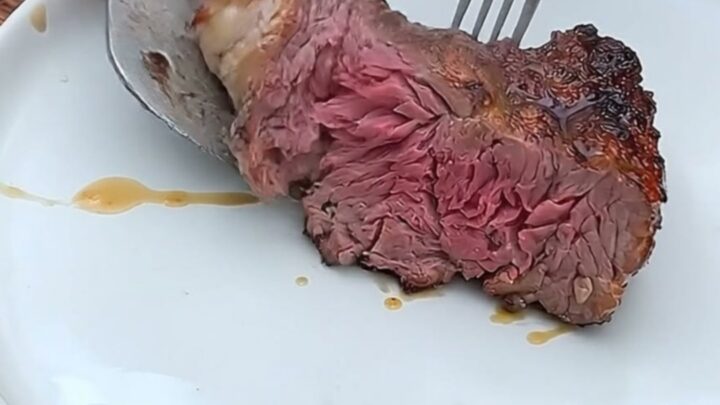
- Check the temperatureInsert an instant-read thermometer into the thickest part of the meat, away from the bone. For a fully cooked steak, take it to at least 145°F (63°C) and let it rest at least 3 minutes. For the rosy pink medium-rare finish shown here, pull it earlier, at 130 to 135°F (54 to 57°C), and still rest it fully.Look for The thermometer reads the target temperature and the crust feels firm but springy under light pressure.Safe temperature 145°F (63°C) internal temperature (steaks, chops and roasts)Tip Check in two spots; the area near the bone always runs a few degrees cooler than the center.
The steak should now be deep mahogany brown on both broad faces and golden along the entire fat rim, with the pan smelling toasty rather than acrid. The crust should release cleanly from the pan when nudged.
An instant-read thermometer in the thickest part, away from the bone, gives the true number: 130 to 135°F (54 to 57°C) for the pink finish, or at least 145°F (63°C) for a fully cooked steak followed by a 3-minute rest. If the crust is done but the center is far below target, lower the heat slightly and continue, turning every minute.
Rest, carve and plate
- Rest the steakTransfer the steak to a large cutting board and let it rest for 8 to 10 minutes, uncovered. The heat inside evens out and the juices redistribute through the meat instead of spilling out at the first cut. Skipping this rest is the fastest way to lose everything the sear locked in.Look for The steak stops sizzling, its surface relaxes and a few clear juices begin to bead on the board.Tip Resting on a board rather than in the hot pan keeps the underside from steaming and losing its crust.
- Carve and plateHold the bone with the carving fork and cut the thick eye of meat away from it in one long strip. Slice the strip against the grain into thick, generous slices, then cut one slice crosswise to show the pink interior. Arrange the slices on a warm plate and bring them to the table right away, while steam still rises.Look for The interior is evenly pink with a thin browned edge, and juices gloss the cutting board lightly.Tip Cutting against the grain shortens the muscle fibers, which is what makes each bite fork-tender.
After the rest, the steak should have stopped sizzling entirely and a few clear juices should have beaded on the board. When carved, the eye of meat should come off the bone in one clean strip, and the slices should show an even pink interior with a thin browned edge and no gray band. The grain should be visible and cut across, not along. Plate the slices on a warm plate while steam still rises, and serve immediately; a properly rested steak should not flood the board with juice at the first cut.
Common mistakes
The most common failure is a wet steak: skip the paper towels and the surface steams instead of browning, no matter how hot the pan. The second is a cold pan; if the oil does not shimmer and smoke faintly before the beef goes in, the crust will be pale and patchy.
Crowding matters less with one steak, but moving it too early tears the crust and costs color. Oversalting is easy with a cut this large, so season with a light hand and taste the trimmed edge after carving. Finally, do not skip the rest; cutting straight off the heat spills the juices you spent fifteen minutes sealing in.
How to tell it’s done
A two-inch tomahawk needs about 7 to 9 minutes of total searing for a rosy medium-rare center, but thickness varies, so trust the thermometer rather than the clock. Pulled at 130 to 135°F (54 to 57°C) and rested, the interior will be pink from edge to edge with a thin browned band.
For a steak cooked through to the recommended safe temperature, take it to at least 145°F (63°C) and rest it at least 3 minutes; it will be blush to barely pink in the center. Either way, the finished steak should feel firm at the surface with a slight spring beneath, and the first slice should release a little clear juice, never a flood.
- Steaks, chops and roasts: 145°F (63°C) in the thickest part, then a 3-minute rest
Up next · Part 3 of 3
4 variations · storage & make-ahead · 5 answers · printable card
Tips, FAQ & printable recipe (Part 3)← Back to the ingredients (Part 1)