Dinner · Part 2 of 3: Instructions
Open-Crumb Sourdough Bread with a Crackling Crust Step-by-step instructions
- Prep
- Cook
- Total
- Serves
- 12
Before you start
Before you start, make sure your sourdough starter is active and bubbly. Feed it 4-6 hours before you plan to mix the dough, and it should be at its peak. Weigh all your ingredients using a kitchen scale for accuracy — this is crucial in bread baking.
Have your Dutch oven and lid ready, along with a piece of parchment paper. Preheat your oven to 240°C (465°F) with the Dutch oven inside at least 30 minutes before you're ready to bake. This ensures the pot is screaming hot, which gives the bread its initial burst of oven spring.
Ingredients at a glance (5)
- 520 g unbleached bread flour
- 350 ml warm water
- 100 g bubbly active sourdough starter
- 12 g fine sea salt
- 1 ice cube
Instructions
Mix and Autolyse
- Mix the dough and autolyseIn a large mixing bowl, combine the unbleached bread flour and warm water. Stir with a spatula or your hand until no dry flour remains. Cover the bowl with plastic wrap or a damp towel and let it rest for 45 minutes. This autolyse step hydrates the flour and starts gluten development naturally.Look for The dough will look shaggy and rough at first, then become smoother as it rests.Tip Use water that feels warm to the touch, about 90°F (32°C), to encourage fermentation.
- Add starter and saltAfter the autolyse, add the bubbly active sourdough starter and fine sea salt to the dough. Use wet hands to pinch and squeeze the ingredients into the dough until fully incorporated. The dough will be sticky and loose at this point; that's expected.Look for The dough becomes smoother and slightly more elastic as you mix in the starter and salt.Tip Wet your hands before handling the dough to prevent sticking.
After the autolyse, the dough should look shaggy but hydrated, with no dry flour visible. It will be sticky and loose, but that's fine.
When you add the starter and salt, the dough will come together into a cohesive mass, though it will still be quite sticky. This is the foundation for the gluten development that will happen during the stretch-and-fold phase.
Stretch and Fold
- Perform stretch and foldsOver the next 2 hours, perform 4 sets of stretch-and-folds. To do one set, reach under one side of the dough, stretch it up and over to the opposite side, then repeat for all four sides. Cover the bowl between sets. This builds gluten tension and creates a smooth, glossy surface.Look for After each set, the dough becomes tighter and more elastic. It should feel pillowy and hold its shape better.Tip Space the sets about 30 minutes apart. Keep the dough covered to prevent a skin from forming.
- Bulk ferment until puffyAfter the final stretch-and-fold, let the dough rest at room temperature until it has increased in volume by about 30-50% and shows small bubbles on the surface. This bulk fermentation usually takes 1-2 hours, depending on your kitchen temperature and starter strength.Look for The dough should look puffy, with a few small bubbles visible under the surface. It should feel airy and alive.Tip If your kitchen is cool, place the bowl in a warm spot or extend the fermentation time.
- Shape the loafTurn the dough out onto a lightly floured surface. Gently shape it into a round or oval loaf by folding the edges toward the center and then rolling it over to create surface tension. Place the shaped dough on a piece of parchment paper, seam side down.Look for The dough should hold its shape without spreading too much. The surface should be smooth and taut.Tip Use minimal flour on the surface; too much can prevent the dough from sticking to itself.
After the four sets of stretch-and-folds, the dough should feel noticeably stronger and smoother. It should hold its shape better and have a glossy, elastic surface. When you perform the final shaping, the dough should be puffy and airy, with small bubbles visible under the surface. It should not spread too much when placed on the parchment.
Bake and Finish
- Score the doughUsing a razor blade or a lame, score a dramatic curved ear across the top of the loaf. Make one deep, confident slash at about a 30-degree angle. This allows the dough to expand in the oven and creates the classic sourdough ear.Look for The score should be about 1/2 inch deep and run from one side of the loaf to the other.Tip Hold the blade at a shallow angle to create a flap that lifts up during baking.
- Bake covered in Dutch ovenPlace the scored loaf, still on the parchment, into a screaming hot Dutch oven preheated to 240°C (465°F). Add one ice cube to the side of the pot (not on top of the dough). Cover with the lid and bake for 25 minutes. The ice cube creates steam, which keeps the crust supple and promotes oven spring.Look for After 25 minutes, the loaf will be pale but risen. The crust will be set but not yet deeply browned.Tip Carefully place the ice cube to avoid burning yourself. The steam will escape when you open the lid.
- Uncover and bake until mahoganyRemove the lid and continue baking for 15 more minutes, until the crust is a deep mahogany brown and blistered in spots. The internal temperature of the bread should read at least 200°F (93°C) if you want to check. The crust will feel hard and sound hollow when tapped on the bottom.Look for The crust will crackle and sing as it cools. The color should be a rich, dark brown, almost burnt in places.Tip If the crust is browning too quickly, lower the oven to 220°C (425°F) for the last few minutes.
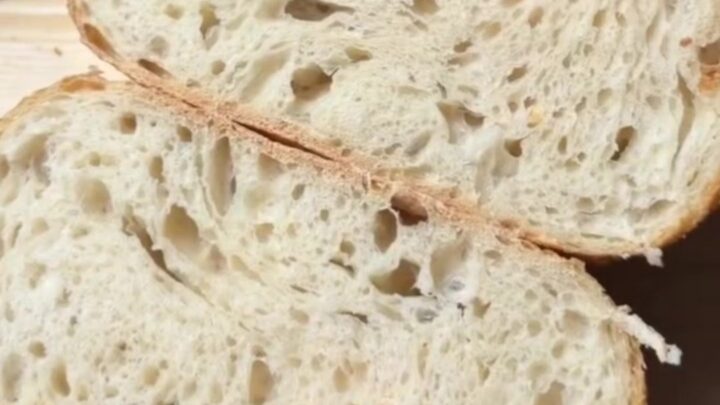
- Cool completely before slicingTransfer the baked loaf to a wire rack and let it cool completely, at least 1 hour, before slicing. This allows the crumb to set and the moisture to redistribute. Slicing too early will result in a gummy, sticky crumb.Look for The crust will crackle as it cools. The loaf should feel light and sound hollow when tapped on the bottom.Tip Resist the urge to slice while warm. The wait is worth it for a perfect open crumb.
After the covered bake, the loaf should have risen significantly and be pale but set. After the uncovered bake, the crust should be a deep mahogany brown with blistered spots. The loaf should feel light and sound hollow when tapped. The crackling sound as it cools is the hallmark of a perfect crust.
Common mistakes
One common mistake is not letting the dough ferment long enough. If the dough hasn't increased in volume by 30-50% during bulk fermentation, the crumb will be dense. Another is over-flouring the work surface when shaping, which can prevent the dough from sticking to itself and creating surface tension.
When scoring, make sure your blade is sharp and you cut at a shallow angle — a dull blade can drag the dough. Finally, don't skip the preheating of the Dutch oven; a cold pot won't give you the same oven spring.
How to tell it’s done
The bread is done when the crust is a deep mahogany brown and blistered in spots. If you have an instant-read thermometer, the internal temperature should read at least 200°F (93°C). Tap the bottom of the loaf — it should sound hollow, indicating that the crumb is fully baked and not gummy.
The crust will be hard and crackle as it cools, which is a good sign. Let the bread cool completely on a wire rack before slicing, at least 1 hour. This allows the crumb to set and prevents a gummy texture.
Up next · Part 3 of 3
4 variations · storage & make-ahead · 5 answers · printable card
Tips, FAQ & printable recipe (Part 3)← Back to the ingredients (Part 1)