Desserts · Part 2 of 3: Instructions
Decadent No-Bake Peanut Butter Cup Lush Dessert Step-by-step instructions
- Prep
- Cook
- Total
- Serves
- 12
Before you start
Before beginning the assembly of the lush, ensure that all ingredients are measured and ready for use. Have the glass baking dish clean and dry, as any moisture on the bottom can interfere with the adherence of the peanut butter layer.
Additionally, prepare the chopped peanut butter cups by cutting them into uniform pieces, which ensures an even distribution of flavor and texture across the entire top surface of the dessert once it is ready for the final garnish.
Ingredients at a glance (4)
- 1 1/2 cups creamy peanut butter
- 1 1/2 cups chocolate ganache
- 2 cups whipped cream
- 10 peanut butter cups, chopped
Instructions
Base Layer Assembly
- Spread the peanut butter foundationSpread the creamy peanut butter evenly across the bottom of the clear 9x13 inch glass dish. Work carefully from the center toward the corners to ensure a smooth, stable, and completely uniform foundation for the dessert.Look for The peanut butter layer is level and reaches the edges of the dish.Tip Warm the peanut butter slightly at room temperature to make spreading smoother.
The peanut butter layer should be spread smoothly across the bottom of the glass dish. Check that there are no gaps or uneven ridges, as this layer provides the foundation for the entire dessert.
It should appear uniform and level, ready to accept the chocolate layer without any shifting or disruption of the base surface.
Chocolate Layering
- Add the rich chocolate layerCarefully pour the chocolate ganache directly over the smoothed peanut butter layer. Use an offset spatula to gently spread the chocolate across the entire surface, taking care not to disturb the base to keep both tiers completely distinct.Look for The chocolate completely blankets the base in a glossy, even layer.Tip Use a light hand when smoothing to prevent mixing the two fillings.
The chocolate layer should form a distinct, flat sheet across the peanut butter. Inspect the clear sides of the glass dish to confirm that the dark chocolate and peanut butter remain completely separated into two clean tiers with no muddling along the boundary line before continuing.
Final Garnishing and Chilling
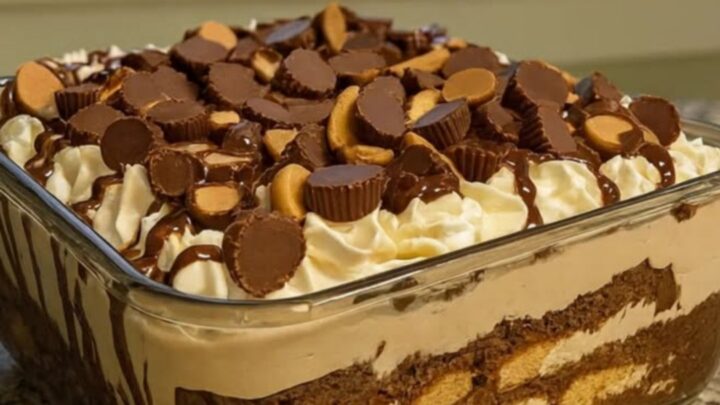
- Top with whipped cream and garnishSpread the whipped cream over the chocolate layer, smoothing it out to the edges. Sprinkle the chopped peanut butter cups evenly over the top surface, then chill the dish in the refrigerator for at least two hours before slicing.Look for The whipped cream is pillowy and the chopped cups are evenly scattered.Tip Refrigerate thoroughly so the slices hold sharp, clean edges when cut.
The whipped cream should be spread in an even, fluffy layer that covers the chocolate completely. The chopped peanut butter cups should be scattered uniformly across the top. The entire dessert should look cohesive and inviting, ready to be placed in the refrigerator to firm up before the final service and portioning.
Common mistakes
A common mistake is attempting to slice the dessert before it has fully chilled, which can result in the layers sliding or bleeding into one another. Ensure that the refrigerator is set to the proper temperature to facilitate a firm set.
Another error is over-mixing the layers; use a light hand when spreading the ganache over the peanut butter to maintain the clean, distinct lines that define this classic dessert's signature aesthetic.
How to tell it’s done
The dessert is considered done when the layers have chilled sufficiently in the refrigerator to become firm and set. This typically requires at least two hours of refrigeration.
When checking for doneness, the surface should feel stable to the touch, and a sharp knife should be able to glide through the layers without significant resistance, indicating that the ganache and peanut butter have reached the proper consistency for clean slicing.
Up next · Part 3 of 3
2 variations · storage & make-ahead · 3 answers · printable card
Tips, FAQ & printable recipe (Part 3)← Back to the ingredients (Part 1)