Dinner · Part 2 of 3: Instructions
Grilled Bone-In Ribeye Steak with a Perfect Charred Crust Step-by-step instructions
- Prep
- Cook
- Total
- Serves
- 2
Before you start
Fifteen minutes before the grill lights, set everything in place. Pull the steak from the refrigerator, blot it thoroughly dry with paper towels, and season it on every surface, edges and bone included. Check the propane level or fill the charcoal chimney, and scrape the grates clean — old residue burns and sticks.
Set out tongs, an instant-read thermometer, a clean cutting board, a sharp chef's knife and the serving plate. Preheat the grill with two zones established: burners or coals high on one side, low or off on the other, with the lid closed for at least ten minutes so the grates reach full temperature.
Ingredients at a glance (4)
- 2 lb bone-in ribeye steak (1 large or 2 smaller), about 1 1/2 inches thick
- 2 tsp kosher salt
- 1 tsp coarsely ground black pepper
- 1 tbsp vegetable oil
Instructions
Season and temper
- Blot the steak dryBlot the steak on every side with paper towels until the surface feels completely dry to the touch. Surface moisture steams instead of sears, so take a full minute here. Leave the steak on a cutting board while the grill heats, and keep extra towels nearby for the fat cap.Look for The paper towels come away nearly dry, with no wet sheen left on the fat cap.Tip Dry meat browns faster, which keeps the interior from overcooking while the crust builds.
- Season every surfaceSeason all surfaces — top, bottom and both edges — with kosher salt and coarsely ground black pepper, pressing gently so the seasoning adheres. Coat the bone side too. Sprinkle from a few inches above for even coverage rather than dumping the salt in a single spot on the meat.Look for An even, visible sparkle of salt across every face of the steak, edges included.Tip Coarse salt seasons more evenly than fine table salt and resists dissolving before the sear.
- Temper briefly and heat the grillLet the steak stand at room temperature for no more than 30 minutes while the grill heats to two zones: one side over high direct heat, the other over low or off. Gas grills run burners high on one side; for charcoal, bank the hot coals to one edge of the kettle.Look for Grates over direct heat read about 450–500°F; the lid holds its heat steadily.Tip A short temper helps the center cook evenly; food safety guidance caps the time out of the refrigerator at 30 minutes.
At the end of this phase the steak sits at room temperature — no more than 30 minutes out of the refrigerator — with a dry, evenly seasoned surface that looks faintly glossy where the salt has drawn moisture. The grill is fully preheated: grates over direct heat read around 450–500°F, the lid holds its heat, and the cooler zone is established and clear of flare-up fuel.
Check three things before the steak goes on: the surface passes the paper-towel test one last time, the thermometer reads accurately, and the tongs and resting board are within reach. If the grill is not yet at temperature, wait — a lukewarm grate steals crust.
Build the crust
- Oil the steak and gratesJust before grilling, brush the steak lightly on both sides with vegetable oil and oil the grates with a folded paper towel held in tongs. The thin film of oil improves contact between meat and grate, deepening the char and preventing the crust from tearing and sticking.Look for The grates smoke faintly and the oil on the steak glistens without pooling anywhere.Tip Use a neutral, high-heat oil; delicate olive oil burns and turns bitter over direct flame.
- Sear over direct heatLay the steak over direct heat and leave it alone for 4 to 5 minutes — resist the urge to move it. The meat releases naturally once a dark crust forms underneath. If fat flares steadily, slide the steak briefly to the cool side, let the flames die, then return it.Look for Deep golden-brown edges creeping up the sides and a hard, crackling surface underneath.Tip Moving the steak too soon tears the crust; patience is what produces the steakhouse look.
- Flip and finish to temperatureFlip with tongs and sear the second side 4 to 5 minutes more. Start checking with an instant-read thermometer inserted into the thickest part of the muscle, away from the bone, and pull the steak at 145°F (63°C). Let it rest for at least 3 minutes before carving; move it to indirect heat if the crust darkens too quickly.Look for The thermometer reads 145°F (63°C) at the thickest point of the muscle.Safe temperature 145°F (63°C) internal temperature (steaks, chops and roasts)Tip Bone conducts heat slowly, so probe the center of the meat, never against the bone itself.
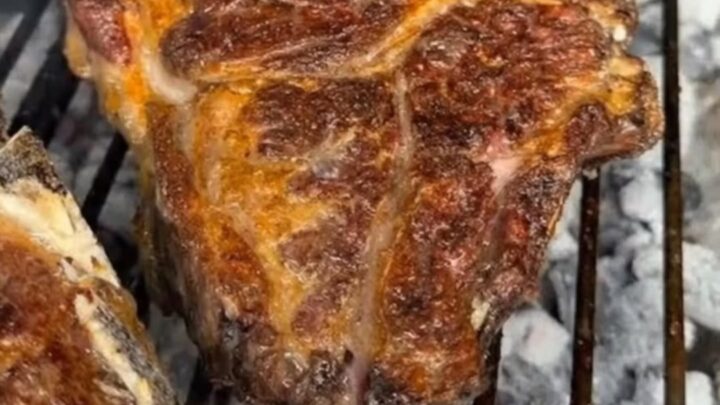
This phase ends with a steak that looks like the cover of a steakhouse menu: deep mahogany crust on both faces, crisp rendered edges, fat cap browned and slightly blistered, and juices just beginning to bead at the surface. The instant-read thermometer reads 145°F (63°C) in the thickest part of the muscle, away from the bone. The grill should smell of browned beef and a whisper of smoke — not burning fat. If the crust is dark but the temperature reads low, slide the steak to the cool side, close the lid, and give it a few more minutes before checking again.
Rest and carve
- Rest the steakTransfer the steak to a clean cutting board and let it rest for at least 3 minutes — 5 is better for a steak this thick. Carryover heat nudges the interior a few degrees higher while the juices that rushed toward the surface settle back into the muscle, ready to stay put when carved.Look for The sizzle fades and the surface relaxes; juices begin to bead gently on top.Tip Cutting earlier spills juice onto the board instead of into every bite.
- Carve against the grainCarve the meat from the bone in one long stroke, then slice the muscle against the grain into 1/2-inch-thick slices. Arrange them on a warm plate, laying the bone alongside for anyone who enjoys the crust near it, and bring the steak to the table right away.Look for Rosy, juicy interior with a dark band of crust framing every single slice.Tip Slicing against the grain shortens the muscle fibers, making each bite noticeably more tender.
After the rest, the steak no longer hisses and its surface has relaxed; a light press leaves a slight spring rather than a squish. Slices cut cleanly with a sharp knife, showing a rosy, evenly cooked interior framed by a dark band of crust, with juices held inside the meat rather than pooled on the board. Serve straight away on warm plates — the crust softens as the steak sits, so timing matters more here than anywhere else in the recipe. Anything that waits more than ten minutes loses the crackle that makes a grilled ribeye special.
Common mistakes
The most frequent error is moving the steak too early. Meat releases naturally from hot grates once a crust forms; lifting before that tears the browning surface and leaves half of it behind. The second mistake is trusting time over temperature — thickness, starting temperature and grill character vary too much for a clock to be reliable.
Skipping the rest is third: it costs nothing and protects every drop of juice. Finally, avoid slicing with the grain; long muscle fibers read as chewy no matter how perfectly the steak cooked. Watch the fat cap, too — it flares, so keep tongs and a cooler zone nearby.
How to tell it’s done
The only dependable test is an instant-read thermometer inserted into the thickest part of the muscle, away from the bone. Pull the steak at 145°F (63°C): after a five-minute rest, the interior lands rosy and juicy at medium, with a warm pink center and fully rendered fat.
At 150°F (66°C) the meat trends toward medium-well and the fat crisps more fully. Visually, look for a dark mahogany crust, juices beginning to bead on the surface during the rest, and slices that show a gradient from charred edge to rosy center. If the reading sits below target, return the steak to indirect heat for a few minutes and check again.
- Steaks, chops and roasts: 145°F (63°C) in the thickest part, then a 3-minute rest
Up next · Part 3 of 3
4 variations · storage & make-ahead · 5 answers · printable card
Tips, FAQ & printable recipe (Part 3)← Back to the ingredients (Part 1)