Desserts · Part 2 of 3: Instructions
Slow Cooker Candied Yams: Easy Southern Classic Step-by-step instructions
- Prep
- Cook
- Total
- Serves
- 8
Before you start
Before starting, peel the yams and slice them into uniform 1/2-inch rounds. Measure the brown sugar, cube the butter, and have the cinnamon sticks, nutmeg, and vanilla bean paste ready. A 6-quart slow cooker is ideal; if using a smaller one, reduce the ingredients proportionally.
No need to grease the insert—the butter and sugar will create enough moisture. Set out a serving dish and a slotted spoon for later. This recipe is truly dump-and-go, but a little prep makes the layering quick and effortless.
Ingredients at a glance (6)
- 4 lb garnet yams, peeled and sliced 1/2-inch thick
- 1 cup dark brown sugar, packed
- 1 stick unsalted butter, cubed
- 2 cinnamon sticks
- 1/2 tsp ground nutmeg
- 1 tbsp vanilla bean paste
Instructions
Layer and Set
- Layer the YamsPeel the garnet yams and slice them into 1/2-inch thick rounds. Place half of the sliced yams in the bottom of a 6-quart slow cooker. Sprinkle with half of the dark brown sugar, dot with half of the cubed butter, and add one cinnamon stick. Repeat with the remaining yams, brown sugar, butter, and cinnamon stick. Sprinkle the ground nutmeg over the top and drizzle with the vanilla bean paste.Look for The yams are layered with sugar and butter; the sugar will melt during cooking.Tip For even cooking, try to slice the yams uniformly so they soften at the same rate.
- Cover and SetCover the slow cooker with its glass lid. Set the temperature to LOW. Do not add any liquid—the yams will release their own moisture as they cook, creating a rich syrup.Look for The lid is sealed; the slow cooker is set to LOW.Tip Resist the urge to peek often; each time the lid is lifted, heat escapes and cooking time may increase.
After layering the yams with sugar, butter, and spices, the slow cooker is filled with vibrant orange slices and pale cubes of butter. The sugar is still granular, and the cinnamon sticks rest between layers.
The vanilla bean paste drizzles darkly over the top. Everything looks neat and ready to cook. The lid is on, and the slow cooker is set to low. No liquid has been added, and the kitchen is quiet, waiting for the transformation to begin.
Slow Cook to Tender
- Slow Cook on LowCook the yams on LOW for 4 1/2 hours, undisturbed. The yams will become tender and translucent at the edges, and the sugar, butter, and spices will meld into a thick, bubbling caramel syrup. The aroma of cinnamon and nutmeg will fill the kitchen.Look for After 4 1/2 hours, the yams are fork-tender and the syrup is thick and glossy.Tip If your slow cooker runs hot, check at 4 hours; the yams should be easily pierced with a fork.
- Check for DonenessAfter 4 1/2 hours, gently test a yam slice with a fork. It should be tender but still hold its shape. The syrup should coat the back of a spoon. If the yams are not quite tender, continue cooking in 15-minute increments until they are.Look for The yams are translucent at the edges and the syrup has thickened.Tip Do not stir vigorously; the yams are delicate and can break apart.
As the hours pass, the aroma of cinnamon and nutmeg fills the kitchen. The butter melts into the sugar, creating a bubbling syrup that turns deep amber. The yams soften and become translucent at the edges, absorbing the spiced sweetness. The syrup thickens and clings to the slices. The slow cooker hums gently, and the glass lid steams. At 4 1/2 hours, the yams are fork-tender, and the syrup is glossy and rich, ready for serving.
Serve and Glaze
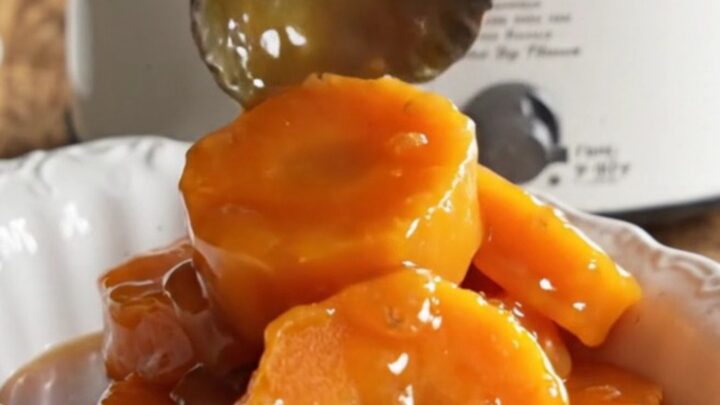
- Serve the Glazed YamsUsing a slotted spoon, carefully transfer the candied yams to a warm serving dish. Spoon the remaining brown sugar glaze generously over the top. Serve immediately, while the syrup is still bubbling and warm.Look for The yams are glistening with syrup and ready to serve.Tip Warm the serving dish in the oven or with hot water to keep the syrup from cooling too quickly.
The yams are lifted gently with a slotted spoon and arranged in a warm serving dish. The syrup is spooned generously over the top, coating each slice with a shiny glaze. The dish glistens under the light, and the scent of warm spices wafts upward. The yams are tender but intact, their edges translucent and caramelized. A final spoonful of syrup is drizzled over the top, and the dish is ready to be brought to the table.
Common mistakes
One common mistake is adding extra liquid, which dilutes the syrup and makes the yams waterlogged. Trust the moisture in the yams and the melting butter to create the glaze. Another pitfall is stirring the yams too early or too vigorously—they become delicate as they cook and can break apart.
Let them cook undisturbed for the full time. Also, avoid using the high setting to speed things up; it can cause the sugar to scorch and the yams to cook unevenly. Stick to low and be patient.
How to tell it’s done
The candied yams are done when they are tender all the way through—a fork should slide in with little resistance, but the slices should still hold their shape. The edges will look translucent, and the syrup will have thickened to a glossy, caramel-like consistency that coats the back of a spoon.
If the syrup seems thin, continue cooking uncovered for 15-20 minutes to reduce. If the yams are still firm, cover and cook in 15-minute increments until tender. Since there are no raw proteins, no internal temperature check is needed.
Up next · Part 3 of 3
4 variations · storage & make-ahead · 5 answers · printable card
Tips, FAQ & printable recipe (Part 3)← Back to the ingredients (Part 1)