Dinner · Part 2 of 3: Instructions
Crusty No-Knead Dutch Oven Sourdough Bread Step-by-step instructions
- Prep
- Cook
- Total
- Serves
- 12
Before you start
Before you start, make sure your sourdough starter is active and bubbly. Feed it 4 to 8 hours before mixing the dough, and it should be at its peak when you're ready. Gather all your ingredients and equipment: a large mixing bowl, a Dutch oven, parchment paper, and a razor blade or lame. Have a proofing basket or a bowl lined with a floured kitchen towel ready for shaping.
It's also helpful to have a digital scale for accurate measurements, as baking is a science. The dough will need at least 8 hours to cold proof in the refrigerator, so plan accordingly. This is a perfect weekend project: mix the dough in the morning, shape it in the evening, and bake it the next day.
Ingredients at a glance (5)
- 100 g active sourdough starter
- 350 g warm water
- 500 g bread flour
- 10 g sea salt
- salted butter, for serving
Instructions
Mix and ferment
- Mix the doughIn a large mixing bowl, combine the active sourdough starter and warm water. Stir until the starter is mostly dissolved. Add the bread flour and sea salt. Mix with a spatula or your hand until a shaggy dough forms and no dry flour remains. Cover the bowl with a damp cloth or plastic wrap and let it rest for 30 minutes.Look for The dough is shaggy, sticky, and all flour is hydrated.Tip Use warm water (about 90°F/32°C) to help the fermentation start.
- Bulk fermentPerform a series of stretch and folds every 30 minutes for the first 2 hours. To stretch and fold, reach under one side of the dough, pull it up and over to the opposite side, then rotate the bowl and repeat. Do this 4 times around the bowl. Then let the dough rest, covered, at room temperature for 4 to 6 hours, until it is puffy, has increased in volume by about 50%, and shows bubbles on the surface.Look for The dough is airy, slightly domed, and has visible bubbles.Tip The dough is ready when it feels aerated and holds a slight indentation when poked.
- Shape the loafTurn the dough out onto a lightly floured surface. Gently shape it into a round boule by folding the edges toward the center, then flipping it seam-side down and rotating it against the counter with cupped hands to create surface tension. Place the dough seam-side up into a floured proofing basket or a bowl lined with a floured kitchen towel. Cover and refrigerate for at least 8 hours, or up to 24 hours.Look for The dough is smooth and holds its shape.Tip Cold proofing develops flavor and makes the dough easier to score.
The dough is shaggy, sticky, and all the flour is hydrated. After the stretch and folds, it becomes smoother, more elastic, and increases in volume. It should feel airy and puffy, with small bubbles visible on the surface and sides.
When you gently poke it, the indentation slowly springs back, leaving a slight mark. The dough should smell pleasantly sour and yeasty, not sharply acidic. If it feels dense or doesn't show signs of life, give it more time at room temperature before refrigerating.
Shape and bake
- Preheat the oven and Dutch ovenPlace a Dutch oven with its lid on in the oven. Preheat the oven to 450°F (232°C). Let the Dutch oven heat for at least 30 minutes so it is screaming hot. Meanwhile, remove the dough from the refrigerator and let it sit at room temperature while the oven heats.Look for The Dutch oven is extremely hot, and the dough is slightly chilled.Tip Heating the Dutch oven thoroughly ensures a dramatic oven spring.
- Turn out and scoreCarefully remove the hot Dutch oven lid. Place a sheet of parchment paper over the dough, then invert the proofing basket to release the dough onto the parchment. Score the dough with a sharp razor blade or lame: make a single long slash about 1/2 inch deep along the top, or create a cross or ear pattern. The score should be confident and decisive.Look for The dough holds its shape and the score opens slightly.Tip Hold the blade at a 30-degree angle to create a pronounced ear.
- Bake coveredUse the parchment paper to carefully lift the scored dough and lower it into the hot Dutch oven. Place the lid on and bake at 450°F (232°C) for 20 minutes. The steam trapped inside the pot will help the bread rise and form a glossy, crackly crust.Look for The loaf is pale and puffed after the covered bake.Tip Don't peek! Keeping the lid on retains the steam.
- Bake uncoveredRemove the lid and continue baking for 25 to 30 minutes, until the crust is deeply caramelized, dark golden brown, and blistered. The internal temperature of the bread should register 205°F (96°C) to 210°F (99°C) on an instant-read thermometer. If the crust is browning too quickly, tent loosely with foil.Look for The crust is dark, blistered, and sounds hollow when tapped.Tip Bake until the crust is almost dark mahogany for maximum flavor.
The shaped loaf is smooth and taut on the surface, holding its round form. After the cold proof, the dough is firm and slightly puffed. When you score it, the blade cuts cleanly, and the dough doesn't deflate. During the covered bake, the loaf rises dramatically, becoming pale and puffed. After the uncovered bake, the crust is dark golden brown, blistered, and crackling. The kitchen smells intensely of toasted bread, and the loaf sounds hollow when tapped on the bottom.
Cool and serve
- Cool and sliceCarefully lift the bread out of the Dutch oven using the parchment paper and transfer to a cooling rack. Let cool for at least 1 hour before slicing. This allows the crumb to set; slicing too early will result in a gummy interior. When ready to serve, slice thick or thin, and spread with salted butter while the bread is still warm.Look for The loaf is completely cool and the crust crackles when squeezed.Tip Resist the urge to cut into it immediately—the crumb needs time to firm up.
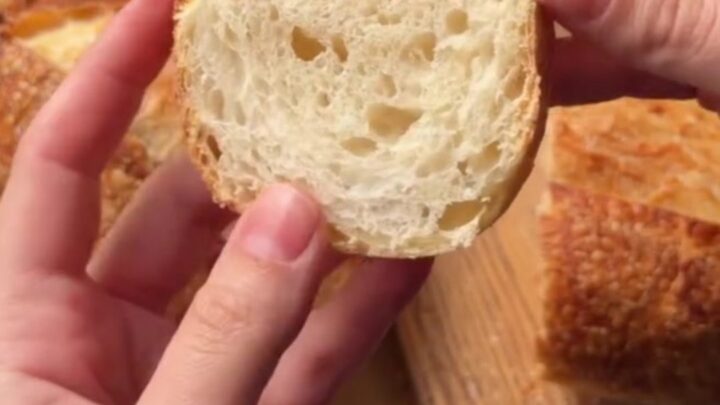
The loaf is fully cooled, and the crust is hard and crackly. When you press on it, it crackles softly. Slicing reveals an open, airy crumb with irregular holes and a glossy, moist interior. The crust shatters audibly as the knife cuts through, and the slices are sturdy enough to hold a thick pat of butter. The aroma is deeply toasty and slightly tangy, inviting you to take a bite immediately.
Common mistakes
One of the most common mistakes is under-proofing the dough. If the dough doesn't have enough time to ferment, it will be dense and flat. Look for a puffy, aerated dough with visible bubbles on the surface. Another pitfall is over-proofing, which can cause the dough to collapse and spread.
If the dough feels overly slack and doesn't hold its shape when turned out, it may be over-proofed. Scoring too shallowly can prevent the bread from expanding properly, so make a confident slash at least 1/2 inch deep. Also, be careful when transferring the dough to the hot Dutch oven—use the parchment paper as a sling to avoid burns.
How to tell it’s done
The bread is done when the crust is deeply caramelized and dark golden brown, almost mahogany in places, and blistered with small bubbles. The loaf should sound hollow when tapped on the bottom. For the most reliable check, insert an instant-read thermometer into the center of the loaf; it should register 205°F (96°C) to 210°F (99°C).
The internal temperature ensures the crumb is fully set and not gummy. If the crust is browning too quickly while the inside is still under, tent the loaf loosely with foil and continue baking. Once done, let the bread cool completely on a rack before slicing to allow the crumb to set properly.
Up next · Part 3 of 3
4 variations · storage & make-ahead · 5 answers · printable card
Tips, FAQ & printable recipe (Part 3)← Back to the ingredients (Part 1)