Dinner · Part 2 of 3: Instructions
Crusty Artisan Sourdough Bread with Open Crumb Step-by-step instructions
- Prep
- Cook
- Total
- Serves
- 1
Before you start
Before starting, ensure the sourdough starter is bubbly and at peak activity. Warm the water to about 90°F (32°C) to help the dough ferment. Have all ingredients and equipment ready: a large mixing bowl, a banneton basket, a Dutch oven, and a razor blade or lame.
The night before baking, plan for the cold ferment. The dough will need 14 hours in the refrigerator, so time the mixing and folding accordingly. Preheat the oven and Dutch oven at least 30 minutes before baking to ensure even heat distribution.
Ingredients at a glance (5)
- 3 1/2 cups unbleached bread flour
- 1 1/2 cups warm water
- 1/2 cup bubbly active sourdough starter
- 2 tsp fine sea salt
- rice flour for dusting, to taste
Instructions
Preparing the Dough
- Mix and AutolyseIn a large bowl, combine the bread flour and warm water. Mix with a spatula until no dry flour remains. Cover the bowl with plastic wrap or a damp towel and let rest for 45 minutes. This autolyse step hydrates the flour and starts gluten development.Look for The dough will be shaggy and slightly sticky with no dry bits.Tip Use water at about 90°F (32°C) to keep the dough warm during autolyse.
- Add Starter and SaltAdd the bubbly active sourdough starter and fine sea salt to the dough. Use wet hands to work them in thoroughly, squeezing and folding until the dough is smooth and elastic. The dough will tighten as you mix.Look for The dough should feel stronger and less sticky after mixing.Tip Wet hands prevent sticking and make mixing easier.
- Stretch and FoldPerform 4 sets of stretch-and-folds over 2 hours, spacing them 30 minutes apart. To stretch and fold, grab one side of the dough, lift it up, and fold it over the center. Repeat on all four sides. This builds gluten strength without kneading.Look for The dough becomes smooth, glossy, and holds its shape when pulled.Tip Keep the dough covered between folds to prevent drying.
At the end of this phase, the dough is smooth, glossy, and elastic. It should feel alive and springy when touched. The stretch-and-folds have developed enough strength that the dough holds its shape when pulled.
It should not be overly sticky or slack. The dough has increased in volume by about 20-30% and shows small bubbles on the surface. This is the foundation for a beautiful open crumb.
Shaping and Cold Ferment
- Pre-shapeTurn the dough out onto a lightly floured surface. Gently shape it into a round boule by folding the edges into the center and then flipping it over. Let it rest for 20 minutes uncovered.Look for The dough should hold a round shape and feel slightly puffy.Tip Use minimal flour to avoid dry spots.
- Shape and BasketAfter the rest, shape the dough into a tight boule by pulling the surface taut. Dust a banneton basket generously with rice flour. Place the dough seam-side up in the basket. Cover and refrigerate for 14 hours.Look for The dough should be smooth and taut on the outside.Tip Rice flour prevents sticking better than wheat flour.
The dough is shaped into a tight boule and placed seam-side up in the banneton. After 14 hours in the refrigerator, it should be firm and hold its shape when turned out. The surface should be smooth and slightly puffy. The cold ferment develops a complex, tangy aroma. The dough is ready to score and bake when it retains a slight indentation when pressed gently.
Baking the Loaf
- Preheat and ScorePlace a Dutch oven in the oven and preheat to 465°F (240°C) for at least 30 minutes. Carefully invert the cold dough onto a piece of parchment paper. Using a razor blade or lame, score a deep crescent ear along one side of the dough.Look for The dough should be cold and firm, holding its shape.Tip Score at a shallow angle for a dramatic ear.
- Bake CoveredLift the parchment with the dough into the hot Dutch oven. Add one ice cube beside the dough, then cover with the lid. Bake for 25 minutes covered. The ice cube creates steam, helping the crust stay supple and rise.Look for The dough will rise and become pale golden after covered baking.Tip Handle the hot Dutch oven with care.
- Bake UncoveredRemove the lid and continue baking for 15 more minutes until the crust is deep mahogany brown and blistered. The internal temperature should reach 205°F (96°C) for a fully baked loaf. Carefully transfer the bread to a wire rack.Look for The crust is dark, crackling, and sounds hollow when tapped.Tip Let the bread cool completely before slicing to set the crumb.
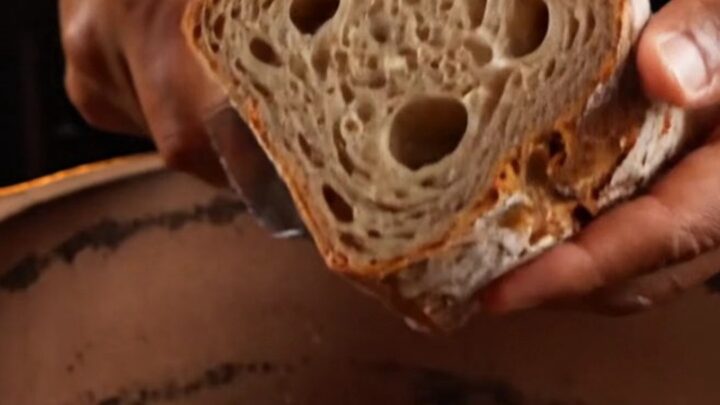
The bread emerges from the oven with a deep mahogany crust, blistered and crackling. The aroma is intensely toasty and sour. When tapped, the bottom sounds hollow, indicating a fully baked interior. The crust is hard and crisp, while the crumb inside is open, glossy, and moist. The bread should cool completely before slicing to fully set the crumb and achieve clean, beautiful slices.
Common mistakes
A common mistake is using a young or weak starter, which leads to a dense loaf. Ensure the starter doubles in volume within 4 to 6 hours of feeding. Over-proofing can cause the dough to collapse in the oven; the dough should be puffy but not overly loose when you score it.
Under-baking results in a gummy crumb—always check the internal temperature. Skipping the ice cube can yield a thick, tough crust; the steam is essential for oven spring. Finally, handle the dough gently during shaping to preserve the gas bubbles.
How to tell it’s done
The bread is done when the crust is deep mahogany brown and blistered, and the loaf sounds hollow when tapped on the bottom. An instant-read thermometer inserted into the center should read at least 205°F (96°C).
This internal temperature ensures the crumb is fully set and not gummy. Let the bread cool completely on a wire rack before slicing. Cutting too early can compress the crumb and make it seem underdone. The crackling sound as it cools is a sign of a perfect crust.
Up next · Part 3 of 3
4 variations · storage & make-ahead · 5 answers · printable card
Tips, FAQ & printable recipe (Part 3)← Back to the ingredients (Part 1)