Dinner · Part 2 of 3: Instructions
Crispy Turkish Kıymalı Pide with Melted Butter Step-by-step instructions
- Prep
- Cook
- Total
- Serves
- 4
Before you start
Before starting, make sure the butter is cold and cut into a block or thick slices. Grate the onion and dice the tomato and green pepper, and have the ground beef measured. The dough needs to rest for 1 hour, so plan accordingly.
Preheat the oven with the baking stone inside at least 30 minutes before baking. Have a floured peel or inverted sheet pan ready for transferring the shaped pide. Keep the parsley chopped and ready for garnishing.
Ingredients at a glance (13)
- 2 1/4 cups bread flour
- 1 tsp active dry yeast
- 1 tsp salt
- 1 cup warm water
- 10 1/2 oz ground beef
- 1 grated onion
- 1 diced tomato
- 1 green pepper, finely chopped
- 1 tbsp tomato paste
- 1 tsp pul biber (Turkish red pepper flakes)
- 1 tsp salt
- 1.75 oz village butter (or high-fat butter), cold
- Fresh flat-leaf parsley, chopped, for serving
Instructions
Dough and Filling
- Make the DoughIn a large bowl, combine the bread flour, yeast, and salt. Add the warm water and stir until a shaggy dough forms. Turn the dough onto a lightly floured surface and knead for 8 to 10 minutes, until smooth and elastic. Place the dough in a lightly oiled bowl, cover with a damp towel, and let rest in a warm spot for 1 hour, or until doubled in size.Look for The dough should be soft, smooth, and spring back when pressed.Tip If the dough is too sticky, add a little flour; if too dry, add a teaspoon of water.
- Prepare the FillingWhile the dough rests, make the filling. In a medium bowl, combine the ground beef, grated onion, diced tomato, chopped green pepper, tomato paste, pul biber, and salt. Mix with your hands or a spoon until everything is evenly distributed. Cover and refrigerate until ready to use.Look for The filling should be well combined and slightly pasty, not watery.Tip Grate the onion on a box grater to release its juices, which keep the beef moist.
After mixing and kneading, the dough should be smooth, elastic, and doubled in size after the rest. The filling should be well combined, slightly pasty, and refrigerated. The onions and tomatoes will release some liquid, but the mixture should not be watery. If it is, drain off excess liquid before using. The dough should be soft and pliable, not sticky, and easy to roll into long ovals.
Shaping and Baking
- Shape the PideTurn the rested dough onto a lightly floured surface. Divide into 4 equal pieces. Roll each piece into a long oval about 1/4 inch thick, roughly 12 by 6 inches. Spread a quarter of the filling lengthwise down the center of each oval, leaving a 1-inch border at the top and bottom. Pinch the two long edges together at the top and bottom to form a pointed boat shape, leaving the center open.Look for The boats should be sealed at the ends and the filling visible in the middle.Tip Keep the dough covered with a towel while shaping to prevent drying.
- Preheat the Oven and StonePlace a baking stone or a heavy sheet pan on the middle rack of the oven. Preheat the oven to 480°F (250°C) for at least 30 minutes, so the stone gets screaming hot. If using a sheet pan, let it heat empty.Look for The stone should be hot enough that a drop of water sizzles instantly.Tip A hot stone mimics a professional pizza oven and gives the pide a blistered bottom.
- Transfer and BakeCarefully transfer the shaped pide boats to a floured peel or an inverted sheet pan. Slide them onto the hot baking stone. Bake for 10 minutes, or until the edges are deeply browned, blistered, and crisp. The filling should be cooked through and the beef fully browned.Look for The crust will be golden with charred spots; the beef should be sizzling.Safe temperature 160°F (71°C) internal temperature (ground meat)Tip Bake in batches if needed; overcrowding lowers the heat and steams the crust.
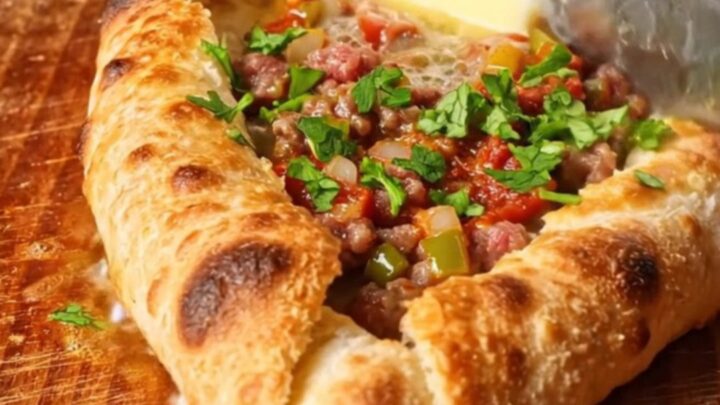
The shaped pide boats should be neat, with sealed pointed ends and the filling visible in the center. When baked, the crust should be deep golden brown with charred blisters, and the edges should look crisp and slightly puffed. The filling should be sizzling and the beef browned. The kitchen will smell of toasted bread and spiced meat. The pide should be firm enough to lift with tongs without bending.
Butter and Serve
- Brush with ButterRemove the pide from the oven and immediately rub the cold butter over the hot crust, letting it melt and soak into the crispy edges. The butter should sizzle and bubble as it hits the hot surface.Look for The butter melts into the crust, creating a glossy, fragrant finish.Tip Use the whole butter block and rub it generously; the crust will absorb it all.
- Slice and GarnishUsing a rocker knife or a sharp chef's knife, slice the pide into strips crosswise. The crust should crunch loudly as you cut. Scatter fresh parsley over the top and serve hot.Look for The strips are crisp, the filling juicy, and the parsley adds a fresh bite.Tip Cutting with a rocking motion gives clean, even strips without crushing the crust.
The butter should melt instantly when rubbed over the hot crust, creating a glossy, fragrant sheen. The pide should slice with a loud crunch, revealing a crisp crust and a moist, savory filling.
The parsley adds a fresh, green contrast. Serve immediately, while the crust is still crackling and the butter is warm and liquid. The pide should be eaten hot, with the juices from the beef soaking into the bread.
Common mistakes
A common mistake is not preheating the stone long enough, resulting in a pale, doughy crust. Give the stone at least 30 minutes at 480°F (250°C). Another issue is overfilling the pide — too much filling makes the dough soggy and hard to seal.
Use a thin, even layer. Also, don't skip the rest: under-risen dough is hard to shape and won't crisp properly. Finally, brush the butter while the pide is hot; if it cools, the butter won't melt into the crust.
How to tell it’s done
The pide is done when the crust is deeply browned, blistered in spots, and crisp to the touch. The edges should look charred in places, and the filling should be bubbling and the beef fully cooked.
To be sure the ground beef is safe, insert an instant-read thermometer into the thickest part of the filling; it should read at least 160°F (71°C). The crust should sound hollow when tapped, and the butter should melt immediately when brushed on.
- Ground meat: 160°F (71°C) in the thickest part
Up next · Part 3 of 3
4 variations · storage & make-ahead · 5 answers · printable card
Tips, FAQ & printable recipe (Part 3)← Back to the ingredients (Part 1)