Dinner · Part 2 of 3: Instructions
Crispy Homemade Cane’s-Style Chicken Fingers with Iconic Sauce Step-by-step instructions
- Prep
- Cook
- Total
- Serves
- 4
Before you start
Before starting, ensure the chicken is trimmed and cut into uniform strips if needed. Measure all ingredients and set up your dredging station: one bowl for the marinade, one for the flour mixture, and a wire rack for the coated tenders.
Prepare the sauce and refrigerate it. Heat the oil to 350°F (175°C) just before you begin frying, and have a clean wire rack ready for the cooked tenders.
Ingredients at a glance (17)
- 2 lb chicken breast tenders
- 2 cups buttermilk
- 2 tbsp garlic powder
- 1 tbsp black pepper
- 1 tbsp smoked paprika
- salt, to taste
- 2 cups all-purpose flour
- 3 tbsp cornstarch
- 2 tsp garlic powder
- 1 tsp smoked paprika
- 1 tsp salt
- 1 tsp black pepper
- 1 cup mayonnaise
- 4 tbsp ketchup
- 2 tbsp Worcestershire sauce
- 1 tsp garlic powder
- 1/2 tsp black pepper
Instructions
Marinate and Sauce
- Marinate the ChickenIn a large bowl, whisk together the buttermilk, 2 tablespoons garlic powder, 1 tablespoon black pepper, 1 tablespoon smoked paprika, and salt to taste. Add the chicken tenders and turn to coat thoroughly. Cover and refrigerate for at least 30 minutes, or up to 4 hours.Look for The marinade should be thick and well combined, coating each tender completely.Tip For deeper flavor, marinate overnight. Always keep chicken refrigerated while marinating.
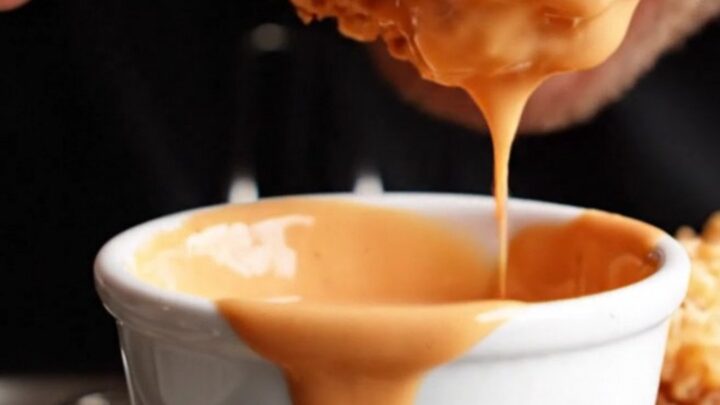
- Make the Cane's SauceIn a small bowl, stir together the mayonnaise, ketchup, Worcestershire sauce, 1 teaspoon garlic powder, and 1/2 teaspoon black pepper until smooth. Cover and refrigerate until ready to serve.Look for The sauce should be a uniform pink-orange color with a creamy consistency.Tip Let the sauce sit for at least 30 minutes to allow flavors to meld.
The chicken should be fully coated in the buttermilk mixture, and the sauce should be smooth and well blended. The marinade will look slightly thickened and the chicken will be evenly coated. The sauce will be a uniform pink-orange color with a creamy consistency and a tangy, peppery aroma.
Dredge and Fry
- Set Up the Dredging StationIn a shallow dish, whisk together the flour, cornstarch, 2 teaspoons garlic powder, 1 teaspoon smoked paprika, 1 teaspoon salt, and 1 teaspoon black pepper. Place a wire rack over a baking sheet nearby.Look for The dredge should be well blended with no lumps.Tip Use one hand for wet ingredients and the other for dry to avoid clumping.
- Dredge the ChickenRemove the chicken from the buttermilk marinade, letting excess drip off. Dredge each tender in the flour mixture, pressing gently to adhere. Shake off any excess and place on the wire rack. Repeat with all tenders.Look for Each tender should be evenly coated with a thin, craggy layer of flour.Tip Let the coated tenders sit for 10 minutes before frying to help the coating adhere.
- Heat the OilPour about 2 inches of oil into a deep skillet or Dutch oven. Heat over medium-high until a deep-fry thermometer registers 350°F (175°C).Look for The oil should shimmer and a pinch of flour should sizzle immediately.Tip Use a neutral oil with a high smoke point, like peanut or canola.
- Fry the Chicken in BatchesCarefully place a few dredged tenders into the hot oil, without crowding. Fry for 4-5 minutes per side, until deep golden brown and cooked through. Transfer to a clean wire rack and repeat with remaining tenders.Look for The crust should be craggy, dark golden, and shatteringly crisp; the chicken should register 165°F (74°C).Safe temperature 165°F (74°C) internal temperature (poultry)Tip Maintain the oil temperature between 325°F and 350°F for even cooking.
The coated tenders should have a thick, craggy layer of flour that clings well. The oil should be shimmering but not smoking.
As the chicken fries, the crust will turn golden brown and bubble vigorously. The kitchen will smell of savory spices and fried chicken, and the tenders will sound crisply when moved.
Rest and Serve
- Rest and ServeLet the fried chicken fingers rest on the wire rack for 2-3 minutes. Serve hot with the Cane's sauce on the side for dipping.Look for The fingers should be juicy inside with a crispy crust that cracks when bitten.Tip Do not rest longer than 5 minutes, or the crust will soften.
The fried tenders should rest for a few minutes, allowing the crust to firm up. They should be deep golden and crisp to the touch, with no soft spots. The sauce should be chilled and ready for dipping. Serve immediately for the best crunch.
Common mistakes
One common mistake is overcrowding the pan, which drops the oil temperature and leads to soggy, greasy chicken. Fry in small batches and allow the oil to return to 350°F between batches.
Another mistake is using wet hands to handle the dredged chicken, which can cause the coating to clump; use tongs or one hand for wet and one for dry. Finally, don't skip the resting time after frying—it allows the crust to set and stay crisp.
How to tell it’s done
The chicken is done when the internal temperature reaches 165°F (74°C) on an instant-read thermometer inserted into the thickest part of the tender.
The crust should be deep golden brown and crisp, and the juices should run clear. If you don't have a thermometer, cut into the thickest tender—the meat should be opaque and no longer pink in the center.
- Poultry: 165°F (74°C) in the thickest part
Up next · Part 3 of 3
4 variations · storage & make-ahead · 5 answers · printable card
Tips, FAQ & printable recipe (Part 3)← Back to the ingredients (Part 1)