Appetizers · Part 2 of 3: Instructions
Crispy Beef and Cheddar Tortilla Cones in 20 Minutes Step-by-step instructions
- Prep
- Cook
- Total
- Serves
- 4
Before you start
Preheat the oven to 400°F (200°C) and set a rack in the center position. Have a standard muffin tin ready with nothing in the cups, since the cones stand on their own. Shred the cheddar if it is not already shredded, dice the tomatoes, slice the scallions and crush the tortilla strips, keeping each garnish in its own small bowl.
Warm the jalapeño queso blanco gently just before the cones come out of the oven so it pours smoothly. Brown the seasoned beef in a small skillet first, drain it well and keep it hot, then brush and roll the tortillas into cones. Everything needs to be within arm's reach, because filling and baking move quickly once the shells are shaped.
Ingredients at a glance (9)
- 4 oz ground beef
- 1 tbsp taco seasoning
- 4 6-inch flour tortillas
- 1 tbsp melted garlic butter
- 1/2 cup shredded sharp cheddar
- 3 tbsp warm jalapeño queso blanco, store-bought or made ahead
- 1/2 cup diced tomatoes, for garnish
- 2 scallions, sliced, for garnish
- 1/4 cup crushed tortilla strips, for garnish
Instructions
Brown the beef, shape the shells
- Brown and season the beefSet a small skillet over medium heat and add the ground beef, breaking it up with a spoon as it cooks. Sprinkle the taco seasoning over the meat and stir so every crumb is coated. Cook until no pink remains, about 4 to 5 minutes, then drain off any fat.Look for The beef is uniformly browned with no pink bits and the pan smells of toasted chili and cumin.Safe temperature 160°F (71°C) internal temperature (ground meat)Tip Drain the fat well; a greasy filling softens the tortilla cone from the inside.
- Shape the tortilla conesBrush each flour tortilla on one side with the melted garlic butter. Roll each one into a loose cone, overlapping the seam and pinching the pointed tip so it holds its shape. Keep the opening wide enough to pack in the filling later.Look for Each cone stands on its own when set down, with a neat overlapping seam and no splits at the tip.Tip Warm the tortillas for ten seconds first; pliable tortillas roll into cones without cracking.
By the end of this phase the kitchen smells like a taco night: toasted chili and cumin from the skillet, garlic butter from the brushed tortillas. The beef should be crumbly, deeply browned and completely drained, with no pink anywhere and no fat pooling in the pan.
Each tortilla should hold a cone shape on its own, seam overlapped and tip pinched shut, opening wide and even. If a cone springs open when released, roll it again with a wider overlap while the tortilla is still warm and pliable. Only move on once every cone stands upright in the muffin tin without leaning or splitting.
Fill and bake
- Fill the conesStand each cone upright in a cup of a muffin tin. Spoon the hot seasoned beef into the opening, filling each cone about two-thirds full, then divide the shredded sharp cheddar over the top of the beef so it settles into the cone.Look for Each cone is filled to just below the rim, with cheese mounded right at the opening.Tip Fill while the beef is hot so the cheese starts melting before the cones reach the oven.
- Bake until golden and bubblingBake the muffin tin in a 400°F (200°C) oven for 8 minutes, until the tortilla shells are deeply golden and crisp at the edges and the cheese is bubbling hot. Pull the tin from the oven and let the cones sit for one minute before lifting them out.Look for The tortillas are browned at the tips and rims and the cheese visibly bubbles at the mouth of each cone.Tip Baking upright keeps the cones open and the shells crisp on every side at once.
After eight minutes at 400°F (200°C), the cones should rattle slightly when the tin is nudged, a sign the shells have dried and crisped. Look for deep golden color at the tips and rims, a few darker brown blisters along the seam, and cheese bubbling at each opening. The shells must feel rigid, not leathered or pale; if any cone still bends under a light touch, give the tin two more minutes. The cheese should be molten through the filling, not just at the top. Let the cones rest one minute in the tin so the shells firm up before lifting them out.
Queso, garnish and serve
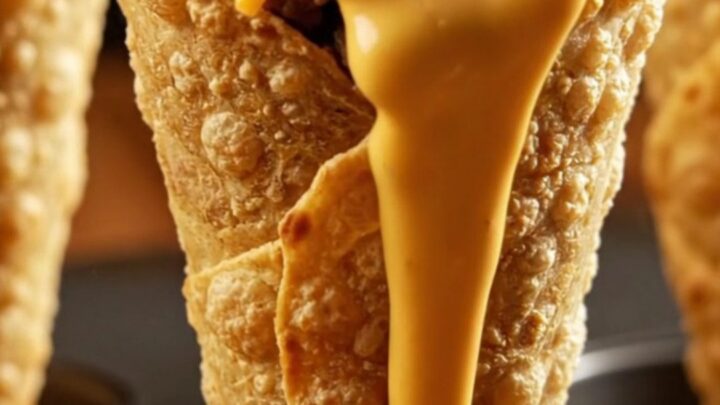
- Add the warm quesoSpoon the warm jalapeño queso blanco over the top of each cone, letting it cascade down over the beef and cheese. Warm the queso gently on the stove or in short bursts in the microwave first so it pours in a smooth ribbon.Look for The queso flows slowly over the filling and pools slightly at the rim without gushing off the cone.Tip Pour just before serving; queso that sits on a hot cone too long softens the shell beneath it.
- Garnish and serve hotScatter the diced tomatoes and sliced scallions over the queso, then finish each cone with a pinch of crushed tortilla strips for extra crunch. Serve the cones immediately, straight from the tin or transferred to a platter while they are still crisp.Look for Each cone is glossy with queso, flecked with red and green, and audibly crisp when tapped.Tip Hold the cones by the tip; the mouth stays clean for dipping straight into the filling.
The finished cone should look glossy where the queso has run down the filling, with the white ribbon clearly visible against the golden shell and the orange cheddar. The garnish should sit on top, not sink: bright red tomato, green scallion rings and a scatter of pale tortilla strips. Tap a shell; it should crackle, not thud. Serve within minutes, because the queso starts wicking into the crust as soon as it lands. A cone served at its peak snaps audibly, releases steam and a stretch of cheese, and holds its shape through the last bite.
Common mistakes
The most common failure is a greasy filling: fat from the beef soaks into the tortilla and the cone loses its snap, so drain the skillet thoroughly before stuffing. Underfilling leaves the cone hollow and floppy, while overfilling past the rim makes the opening collapse as the cheese melts, so aim for two-thirds full with cheese right at the top.
Cold queso is another trap; it seizes instead of flowing and drags the heat out of the filling, so warm it until it pours in a ribbon. Finally, garnishing too early lets the tomatoes and queso steam the shell soft; add them seconds before the cones hit the table.
How to tell it’s done
The cones are done when the tortilla shells are deeply golden and sound hollow and crisp when tapped, with browned tips and no pale, flexible patches at the seam. The cheddar at the mouth of each cone should be visibly bubbling, which confirms the filling is heated through.
Because the beef is fully browned before it goes into the shells, the safe internal temperature of 160°F (71°C) is reached in the skillet; if there is any doubt, check the center of a cone with an instant-read thermometer before serving. The finished cone should stand upright, feel rigid to a light squeeze and release a clean snap when bitten, with molten cheese and queso flowing from the opening.
- Ground meat: 160°F (71°C) in the thickest part
Up next · Part 3 of 3
4 variations · storage & make-ahead · 5 answers · printable card
Tips, FAQ & printable recipe (Part 3)← Back to the ingredients (Part 1)