Appetizers · Part 1 of 3: Ingredients
Crispy Beef and Cheddar Tortilla Cones in 20 Minutes
- Prep
- Cook
- Total
- Serves
- 4
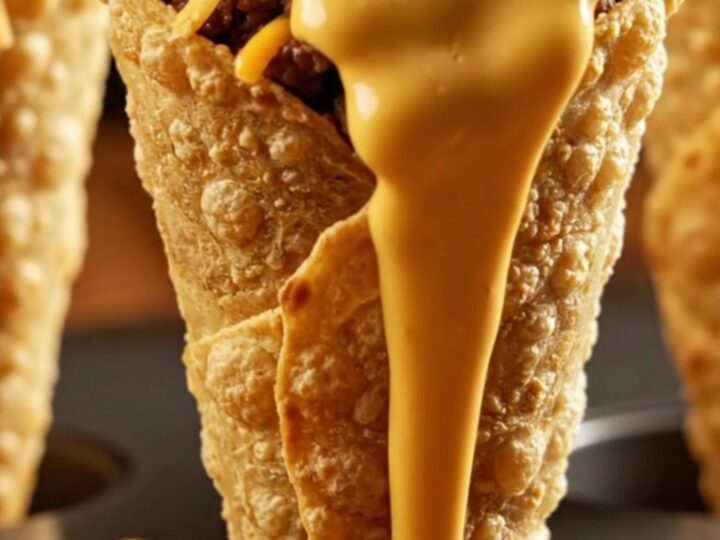
Crispy tortilla cones are pure party magic. A buttered flour tortilla is rolled into a tall cone, packed with taco-seasoned ground beef and sharp cheddar, then baked upright in a muffin tin until the shell shatters at first bite. A warm ribbon of jalapeño queso blanco pours over the top, and diced tomatoes, scallions and crushed tortilla strips finish the cone. Eight minutes in the oven is all it takes.
These beef and cheddar tortilla cones turn four pantry staples into a hand-held appetizer that looks far more impressive than the effort behind it. The idea is simple: instead of folding a tortilla flat, roll it into a cone so it becomes its own edible serving vessel. Brushed with garlic butter and baked upright in a muffin tin, each cone crisps on every side while the cheddar inside melts into the spiced beef.
The finishing touch is a warm pour of jalapeño queso blanco that runs down into the filling, followed by fresh diced tomatoes, scallions and a scatter of crushed tortilla strips. From skillet to table in about twenty minutes, they are built for game day, movie night or any gathering where napkins matter more than forks.
Ingredients
- 4 oz ground beef
- 1 tbsp taco seasoning
- 4 6-inch flour tortillas
- 1 tbsp melted garlic butter
- 1/2 cup shredded sharp cheddar
Topping
- 3 tbsp warm jalapeño queso blanco, store-bought or made ahead
- 1/2 cup diced tomatoes, for garnish
- 2 scallions, sliced, for garnish
- 1/4 cup crushed tortilla strips, for garnish
Why this recipe works
The muffin tin is what makes this method work. Standing each cone upright in a cup means the tortilla holds its shape without skewers or foil balls, and hot oven air circulates around the entire surface so the shell crisps evenly instead of steaming against a flat pan.
Rolling rather than folding also gives the tortilla several layers at the seam, which bake into a sturdy, cracker-like wall that supports the filling without going soggy.
Layering the filling in the right order keeps the contrast that makes these cones addictive. The beef goes in hot and seasoned through, so the cheddar begins melting on contact and binds the meat into a gooey core.
Baking the filled cones rather than assembling them cold means the cheese bubbles at the opening, sealing the top while the shell below stays dry and crisp. The queso arrives last, already warm, so it flows instead of soaking, and the crunchy garnish goes on at the table.
Notes and substitutions
Use standard six-inch flour tortillas; they are the right size to roll into four-inch cones that fit muffin cups. Fresher, more pliable tortillas roll cleanly, so warm them briefly if they feel stiff. Sharp cheddar matters here: its bite cuts through the rich queso, and pre-shredded cheese melts fine in this short bake. Any store-bought jalapeño queso blanco works, or use a batch made ahead and gently reheated until pourable.
A standard twelve-cup muffin tin is the only special equipment, and a pastry brush makes the garlic butter coat quick and even. If the tortillas resist holding a cone, overlap the seam generously and set the seam side against the cup wall.
For a lighter color, brush a little less butter; for deeper browning, brush the outside seam too. Prep the garnishes first, because the final assembly moves fast once the cones come out of the oven.
- ground beef: Ground turkey or chicken works the same way; cook it to 165°F (74°C) instead of 160°F (71°C) and season generously, since leaner meat needs more spice to carry the cone.
- sharp cheddar: Monterey Jack or a Mexican-style shredded blend melts just as smoothly and keeps the filling gooey under the beef.
- jalapeño queso blanco: Plain queso, thinned with a splash of milk until pourable, or warmed nacho cheese sauce both work; keep it warm so it flows over the filling.
- crushed tortilla strips: Crushed corn chips give the same salty snap if tortilla strips are not on the shelf.
Equipment
- muffin tin
- pastry brush
- small skillet
- oven
- cutting board
- sharp knife
Up next · Part 2 of 3
6 steps · 8 min of cooking · what to look for at each stage
Step-by-step instructions (Part 2)