Desserts · Part 2 of 3: Instructions
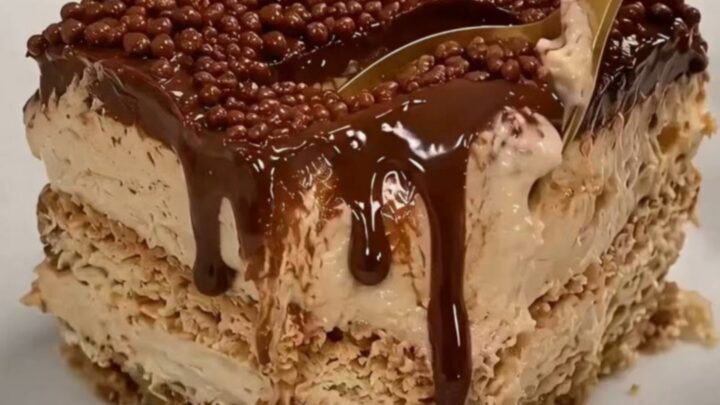
Creamy No-Bake Chocolate Biscuit Icebox Cake Step-by-step instructions
- Prep
- Cook
- Total
- Serves
- 8
Before you start
Before beginning the assembly, ensure the chocolate ganache is at a spreadable room temperature. If it is too cold, it will be difficult to spread without damaging the fragile biscuits.
Have all ingredients measured and ready, and clear adequate space in the refrigerator to hold the 8-inch glass dish level. Lining the dish with parchment paper can assist in lifting the finished cake out, although it can be served directly from the glass dish to maintain the integrity of the layers.
Ingredients at a glance (3)
- 1 package tea biscuits
- 2 cups chocolate ganache, prepared
- 1/2 cup crunchy chocolate pearls
Instructions
Base assembly
- Prepare the baseArrange a single layer of tea biscuits at the bottom of an 8-inch square glass dish, breaking them to fit snugly if necessary to ensure even coverage.Look for The dish bottom is fully covered with biscuits.Tip Ensure there are no large gaps between the biscuits to prevent the ganache from sinking to the bottom.
The base layer of biscuits should be flat and cover the bottom of the dish completely. Check that no large gaps remain, as these will cause the ganache to pool at the bottom rather than between the layers. The biscuits should be dry and crisp before the first application of the chocolate filling.
Layering process
- Layering the cakeSpread a thin, even layer of chocolate ganache over the biscuits using an offset spatula. Repeat the process of alternating biscuit layers and ganache until the ingredients are used, finishing with a smooth ganache top.Look for The cake layers are level and the top is smooth.Tip Work quickly to keep the ganache at a spreadable consistency.
The cake should show uniform layers of biscuit and ganache. Ensure each layer of ganache is spread thinly and evenly to the edges of the dish. The height of the cake should be consistent, and the final layer of ganache should be smoothed perfectly to prepare for the addition of the decorative chocolate pearls.
Setting and finishing
- Setting and finishingSprinkle the crunchy chocolate pearls over the top of the cake. Place the dish in the refrigerator to set for at least four hours before slicing and serving.Look for The cake is firm to the touch and chilled.Tip Chilling longer allows the biscuits to soften completely into a cake-like texture.
After the refrigeration period, the cake should feel solid and firm. The chocolate pearls should be evenly distributed across the top.
When a knife is pressed against the side, it should encounter resistance consistent with a set, creamy dessert, indicating that the hydration process is complete and the cake is ready for slicing.
Common mistakes
A common mistake is rushing the chilling process, which prevents the biscuits from softening properly and leads to a cake that falls apart when sliced. Another error is applying too much pressure while spreading the ganache, which can cause the biscuits to slide out of alignment.
Always use a gentle, light touch with the offset spatula to maintain the structure of the layers. Finally, ensure the ganache is not too hot during assembly, as excessive heat will dissolve the biscuits entirely.
How to tell it’s done
The cake is done when it is fully chilled and firm to the touch, typically requiring at least four hours in the refrigerator. When sliced with a warm knife, the layers should be distinct and soft, with the biscuits having absorbed enough ganache to yield easily under a spoon.
The chocolate pearls should remain crunchy on the surface, providing a textural contrast to the creamy interior, which is the hallmark of a perfectly set icebox cake.
Up next · Part 3 of 3
2 variations · storage & make-ahead · 3 answers · printable card
Tips, FAQ & printable recipe (Part 3)← Back to the ingredients (Part 1)