Desserts · Part 2 of 3: Instructions
Butterscotch Pecan Layer Cake with Brown Butter Praline Buttercream Step-by-step instructions
- Prep
- Cook
- Total
- Serves
- 12
Before you start
Gather all of your ingredients and equipment before you begin, since the buttercream and sauce need to be ready when the layers are built. Make sure the cake layers are completely cool and level, and that they are wrapped or covered to keep them from drying out. Toast the pecans and let them cool fully before chopping.
Soften the butter at cool room temperature until it is pliable but still holds its shape, and sift the confectioners' sugar so the buttercream stays smooth. Warm the butterscotch sauce gently, just enough to pour from a squeeze bottle. Chill the butterscotch block until firm so it grates cleanly into fine shavings. Set up a turntable on a cake board, fit the acetate collar around the base, and keep a clean offset spatula, a box grater and a long knife within reach.
Ingredients at a glance (12)
- 3 butterscotch layer cake layers, store-bought or made ahead
- 1 cup pecan halves, toasted and chopped, plus extra whole toasted pecans for the top
- 1 cup packed brown sugar
- 1/2 cup butterscotch candy pieces
- 1 cup (2 sticks) unsalted butter, softened
- 3 cups confectioners' sugar, sifted
- 2 tbsp heavy cream
- 1 tsp vanilla extract
- 1/4 tsp kosher salt
- 2 oz block of butterscotch, chilled, for grating
- 1 cup butterscotch sauce, warm, plus more for the top
- flaky sea salt for serving
Instructions
Build and sauce the cake
- Toast and chop the pecansToast the pecans in a dry skillet over medium heat until fragrant and shades darker, then let them cool. Chop about half of them finely, and set the whole pecans aside for the crown. Keep the chopped pecans with the brown sugar and candy pieces for the praline.Look for Pecans smell toasty and nutty, with a slightly deeper golden color.Tip Stir the pecans constantly so they toast evenly and do not scorch.
- Make the praline buttercreamCombine the chopped pecans, brown sugar and butterscotch candy pieces in a food processor and pulse until finely ground. Beat the softened butter until creamy, then add the praline mixture, confectioners' sugar, cream, vanilla and salt. Beat until smooth and pale brown.Look for The buttercream is smooth, fluffy and an even pale brown without grit.Tip Add cream a teaspoon at a time if the frosting feels stiff.
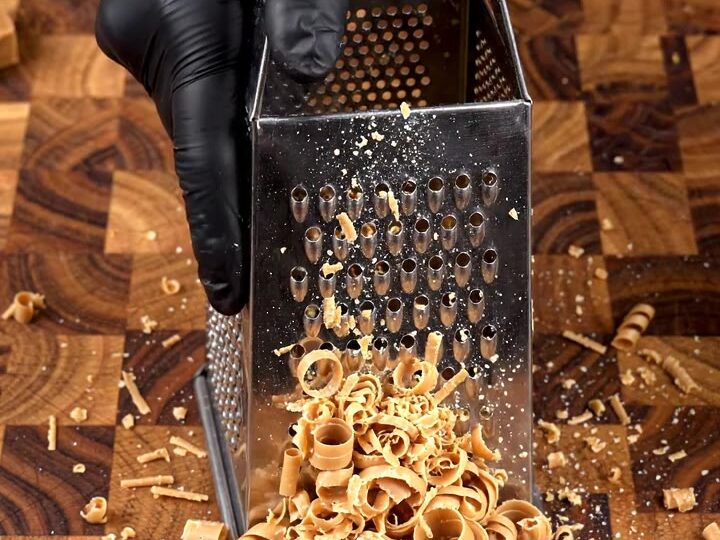
- Grate the butterscotchChill the block of butterscotch until firm. Hold it over a sheet of parchment on the cutting board and grate it with a box grater, producing fine curls and shavings. Keep the shavings chilled until you are ready to decorate the cake.Look for Fine, curly shavings collect on the board without melting into paste.Tip Chill the block well so the shavings hold their shape.
At the end of this phase the three layers should be stacked level inside the acetate collar, with an even crumb coat of praline buttercream covering the top and sides. The buttercream should look smooth, pale brown and firm enough to hold its shape when you touch the surface gently. The butterscotch sauce should be poured over the top and should run toward the edge in a glossy amber layer without pooling.
Before moving on, check that the sauce has spread evenly and that the collar is secure, then chill the cake briefly so the layers and sauce set firmly. A cake that is too soft at this stage will smear when the collar is removed, so take a moment to make sure it is cold and steady before you decorate.
Decorate with pecans and shavings
- Build the layersPlace the first cake layer on a turntable inside an acetate collar set on a cake board. Spread a thin, even layer of praline buttercream over it. Repeat with the second layer, then top with the third layer and cover the top and sides with a thin crumb coat of buttercream.Look for Each layer sits level and the buttercream spreads smoothly to the edge.Tip Chill the stacked cake for 15 minutes so the crumb coat sets firm.
- Add the butterscotch sauceWarm the butterscotch sauce until pourable. Pour it from a squeeze bottle over the top of the buttercream, letting it spread to the edge and run down the sides of the collar in a glossy amber layer. Chill briefly so the sauce sets.Look for The sauce is glossy and amber, spreading evenly without pooling.Tip Warm the sauce gently; too hot it will thin and slide off the sides.
At the end of this phase the cake should have a neat ring of whole toasted pecans across the top, with extra butterscotch sauce spooned between them. The caramel drips should cascade down the sides in an even line, and the grated shavings should be scattered lightly over the top with a pinch of flaky sea salt. Look for a surface that is glossy and tidy, with the pecans held firmly in place. Before you chill the cake for the final time, check that the drips are not running into the pecans and that the shavings are not clumped together, since clean edges give the cake its finished look.
Chill and slice the cake
- Remove the collar and decorateCarefully remove the acetate collar so the caramel drips cascade down the sides. Arrange the whole toasted pecans in a ring across the top. Spoon additional butterscotch sauce between the pecans, sprinkle flaky sea salt over the top, and scatter the grated shavings.Look for The drips are even and the pecan ring is neat, with shavings scattered on top.Tip Run a thin knife around the collar before lifting it away.
- Chill, slice and serveRefrigerate the finished cake for about 30 minutes so the drips and buttercream firm up. Bring it back to cool room temperature before slicing with a long, warm knife. Lift each slice with a cake server to serve.Look for Drips look set and the slices cut cleanly with a neat, moist crumb.Tip Wipe the knife between cuts for clean slices.
At the end of this phase the cake should be fully set, with firm drips, a glossy top and a cool, neat exterior. Before slicing, let the cake rest in the refrigerator until the buttercream feels firm to a light touch, then bring it closer to cool room temperature so the crumb is tender rather than cold and hard. Dip a long knife in hot water and wipe it dry between cuts. The slices should hold their shape and show distinct layers of cake, buttercream and sauce. If the sauce looks soft, return the cake to the refrigerator for a few minutes before cutting again, which keeps the slices clean and the drips intact.
Common mistakes
The most common mistake is working with buttercream or sauce that is too warm. When the buttercream softens, the layers slide, and when the sauce is too hot it runs off the sides instead of forming a glossy band. Chill the cake between steps, and warm the sauce only enough to pour. Another frequent problem is spreading the buttercream unevenly, which leaves thin spots that can show through the sauce.
Use an offset spatula and turn the turntable slowly. Chopping the pecans too coarsely or too finely also affects the texture, so aim for a consistent, medium-fine chop for the praline. Finally, do not remove the collar while the sauce is still soft, because it will drag down the sides. Wait until the cake is set and then lift the collar straight up with a steady hand.
How to tell it’s done
The cake is ready when the layers are set and the buttercream feels firm to a light touch, without sliding or softening at the edges. The butterscotch sauce should look glossy and hold its drip shape, and the pecans should sit firmly on the top. A cake that is ready to slice gives a clean cut and shows distinct, moist layers.
Because this cake contains eggs and dairy but no raw meat or poultry, it has no protein safe-temperature check. Instead, judge doneness by the texture of the layers when they were baked: they should spring back gently when lightly pressed and feel moist, tender and fully set. Avoid cutting the cake while the buttercream is still soft, and give it time to chill so the slices stay tidy and attractive when served.
Up next · Part 3 of 3
4 variations · storage & make-ahead · 5 answers · printable card
Tips, FAQ & printable recipe (Part 3)← Back to the ingredients (Part 1)