Breakfast · Part 2 of 3: Instructions
Blistered Sourdough Boule with Crackling Crust Step-by-step instructions
- Prep
- Cook
- Total
- Serves
- 10
Before you start
Before starting, make sure your sourdough starter is at its peak: bubbly, active, and recently fed. Measure all ingredients by weight for accuracy. Warm the water to about 90°F (32°C). Prepare a clean work surface and have a large mixing bowl ready.
If you plan to bake the next day, shape the dough and place it in the refrigerator for the overnight proof. When ready to bake, preheat the Dutch oven in the oven for at least 45 minutes. Cut a piece of parchment paper large enough to line the pot with overhang.
Ingredients at a glance (5)
- 100 g active bubbly sourdough starter
- 350 g warm water
- 500 g bread flour
- 10 g sea salt
- salted butter, softened, for serving
Instructions
Mix and Ferment
- Mix the doughIn a large mixing bowl, combine the active bubbly sourdough starter and warm water. Stir gently with a spoon or your hand until the starter disperses and the liquid looks milky. Add the bread flour and sea salt. Mix with a spatula or your hand until no dry flour remains and a shaggy, sticky dough forms. Cover the bowl with a damp kitchen towel and let it rest for 30 minutes.Look for The dough will be sticky and rough, with no dry bits.Tip Use warm water (about 90°F/32°C) to help the starter activate, but not hot—it should feel like a warm bath.
- Bulk ferment with foldsOver the next 2 hours, perform a series of stretch-and-folds. Every 30 minutes, wet your hand, reach under one side of the dough, stretch it up and over the center, then rotate the bowl a quarter turn and repeat. Do this 4 to 6 times total. The dough will become smoother, stronger, and more elastic with each fold. Cover and let it rest at room temperature between folds.Look for The dough should feel airy, hold its shape better, and show visible bubbles.Tip Keep the dough covered between folds to prevent a skin from forming.
- Shape the bouleAfter the bulk ferment, turn the dough out onto a lightly floured surface. Gently shape it into a round by folding the edges toward the center, then flipping it seam-side down and rotating it with cupped hands to build surface tension. Place the shaped dough seam-side up into a floured proofing basket or a bowl lined with a floured kitchen towel. Cover and refrigerate for at least 12 hours, or up to 24 hours, for a deeper flavor and easier handling.Look for The dough should be puffy, slightly domed, and hold a round shape.Tip A cold proof makes scoring easier and gives a more open crumb.
After mixing, the dough is shaggy and sticky. During the bulk ferment, it transforms into a smooth, elastic mass with visible bubbles. The dough should feel airy and hold its shape when shaped. The stretch-and-folds build strength, so do not skip them.
The dough should roughly double in volume by the end of the bulk ferment. When you shape the boule, it should hold a round shape without spreading too much. If it spreads excessively, it needs more folds or a shorter proof.
Bake in Dutch Oven
- Preheat the Dutch ovenAbout 45 minutes before baking, place a Dutch oven with its lid in the oven and preheat to 450°F (230°C). Let the pot heat for at least 45 minutes so it is screaming hot. Meanwhile, cut a piece of parchment paper large enough to line the pot with overhang.Look for The Dutch oven should be very hot; a drop of water sizzles instantly.Tip Preheating the pot thoroughly is key to a blistered crust.
- Score the doughRemove the dough from the refrigerator. Carefully turn it out onto the parchment paper, seam-side down. Using a razor blade or a very sharp knife, score the top with a single swift slash at a 45-degree angle, about 1/4 inch deep. The slash should run across the top, slightly off-center, to allow the dough to expand in the oven.Look for The cut should be clean and the dough should not deflate.Tip Hold the blade at a shallow angle to create a 'blistering ear'—a dramatic, crispy lip.
- Bake coveredCarefully lift the parchment paper with the dough and lower it into the preheated Dutch oven. Put the lid on and bake for 20 minutes. The covered environment traps steam, which helps the crust stay pliable and the crumb become open and airy.Look for After 20 minutes, the bread will be pale but puffed.Tip Use oven mitts—the pot is extremely hot.
- Bake uncoveredRemove the lid and continue baking for 25 to 30 minutes, until the crust is deep golden brown and blistered. The internal temperature should reach 200°F (93°C) for a fully baked loaf. The crust will feel hard and sound hollow when tapped on the bottom.Look for The crust should be dark, blistered, and crackling as it cools.Tip If the crust browns too quickly, lower the oven to 425°F (220°C) for the last 10 minutes.
The dough should be cold and firm from the refrigerator, making it easy to score. The Dutch oven must be screaming hot before the dough goes in. After the covered bake, the bread should be pale but puffed. After the uncovered bake, the crust should be deep golden brown and blistered, and the loaf should sound hollow when tapped. The kitchen should smell intensely of toasted bread. Let the bread cool completely before slicing to hear that satisfying crackle.
Cool and Serve
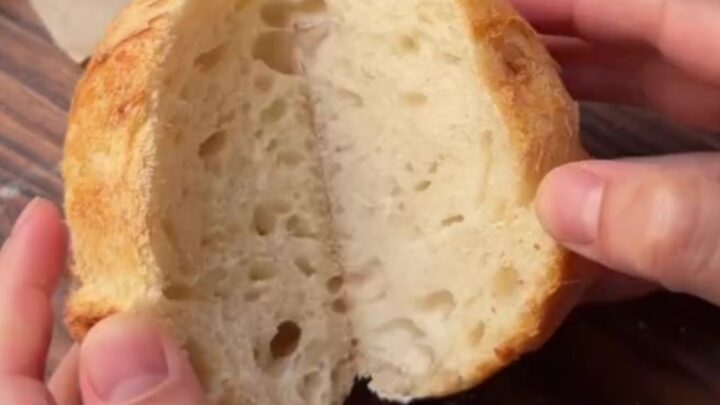
- Cool and sliceTransfer the bread to a cooling rack. Let it cool for at least 1 hour before slicing—this allows the crumb to set and the crust to crisp. When ready to serve, slice with a serrated knife and spread with salted butter while still warm, if desired.Look for The crust crackles as you slice, and the crumb is airy with a honeycomb structure.Tip Resist cutting into the bread too soon; a fully cooled loaf slices cleanly.
The bread should cool on a wire rack for at least an hour. When you slice it, the crust should shatter and the crumb should be airy with a honeycomb structure. The interior should be moist but not gummy. Spread with salted butter and listen to the crust crackle as you bite into it. The bread should be crisp on the outside and tender on the inside, with a tangy, complex flavor from the long fermentation.
Common mistakes
One common mistake is using a starter that is not active enough, which leads to a dense loaf. Another is over-flouring the work surface, which can make the dough tough and dry. When scoring, a dull blade can tear the dough and ruin the rise.
Also, resist the urge to open the oven during the covered bake—this releases steam and can prevent the crust from blistering. Finally, slicing the bread too soon while it is still hot will compress the crumb and make it gummy. Patience is key.
How to tell it’s done
The bread is done when the crust is deep golden brown and blistered, and the internal temperature reaches at least 200°F (93°C) when measured with an instant-read thermometer inserted into the center. The bottom should sound hollow when tapped.
If you are unsure, you can also check that the loaf feels light for its size and the crust is hard to the touch. Let the bread cool completely on a wire rack before slicing to allow the crumb to set; cutting too early can result in a gummy texture.
Up next · Part 3 of 3
4 variations · storage & make-ahead · 5 answers · printable card
Tips, FAQ & printable recipe (Part 3)← Back to the ingredients (Part 1)