Dinner · Part 2 of 3: Instructions
Artisan Sourdough Mini Loaves with Crackly Crust Step-by-step instructions
- Prep
- Cook
- Total
- Serves
- 6
Before you start
Before starting, make sure your sourdough starter is active and bubbly. Feed it 4 to 6 hours before you plan to mix the dough. Gather all your ingredients and equipment. Have a large bowl, a spatula, a bench scraper, and proofing baskets ready.
If you don’t have proofing baskets, line small bowls with clean kitchen towels and dust them generously with rice flour or all-purpose flour. Preheat your oven with the baking stone and cast iron pan at least 45 minutes before baking. The oven needs to be extremely hot to achieve a good oven spring.
Ingredients at a glance (4)
- 510 g bread flour
- 350 ml water
- 100 g active bubbly sourdough starter
- 10 g fine sea salt
Instructions
Mix, Autolyse, and Stretch and Fold
- Mix the Dough and AutolyseIn a large bowl, combine the bread flour and water. Mix with a spatula until no dry flour remains. Cover the bowl and let rest for 1 hour. This autolyse step hydrates the flour and starts gluten development. After the rest, add the active sourdough starter and fine sea salt. Mix with wet hands or a dough whisk until the starter and salt are fully incorporated. The dough will be shaggy and sticky.Look for The dough becomes smooth and slightly elastic after mixing, though still sticky.Tip Wet your hands before mixing to prevent the dough from sticking to your skin.
- Stretch and FoldOver the next 2 hours, perform a series of stretch and folds. Every 30 minutes, lift one side of the dough and fold it over the center, then repeat with the other three sides. This builds strength without kneading. After each fold, the dough becomes smoother and more elastic. Let the dough rest between folds. After the final fold, cover the bowl and let the dough ferment at room temperature until it has increased in volume by about 50% and shows bubbles on the surface.Look for The dough is silky, aerated, and holds its shape when pulled.Tip Use a bench scraper to help lift the dough if it sticks to the bowl.
- Divide and Pre-shapeTurn the dough out onto a lightly floured work surface. Using a bench scraper, divide the dough into 6 equal pieces, about 160 g each. Gently shape each piece into a rough ball by folding the edges into the center and flipping it seam-side down. Let the dough balls rest, covered, for 20 minutes. This relaxes the gluten and makes final shaping easier.Look for The dough balls are smooth on top and hold a round shape.Tip Keep the dough pieces covered with a damp towel to prevent a skin from forming.
At the end of this phase, the dough should be smooth, elastic, and aerated. It will have increased in volume and show small bubbles on the surface. When you lift a corner, the dough should stretch without tearing. It will be sticky but manageable. The dough should feel alive and full of air. If it seems slack or overly sticky, give it a few more folds or a longer rest. This is the foundation for a great crumb.
Divide, Shape, and Proof
- Shape the Mini BatardsAfter the rest, flip each dough ball seam-side up. Gently press it into a rectangle, then fold the top third down and the bottom third up. Press the seam to seal. Starting from the top, roll the dough into a tight cylinder. Pinch the seam and taper the ends to form a batard shape. Place each shaped loaf seam-side up into a floured proofing basket or a bowl lined with a floured kitchen towel.Look for The shaped loaves are taut and smooth on the surface.Tip Use minimal flour on the work surface to avoid dry pockets in the dough.
- Proof the LoavesCover the proofing baskets with a damp towel or plastic wrap. Let the loaves proof at room temperature for 1 to 2 hours, or until they have puffed up and feel airy when gently pressed. For a more developed flavor, refrigerate the covered baskets overnight for a cold proof. The loaves are ready to bake when they have increased in volume and a finger pressed into the dough leaves a slight indentation that slowly springs back.Look for The dough is pillowy and has visibly expanded in the basket.Tip If proofing in the fridge, let the loaves sit at room temperature for 30 minutes before baking.
- Preheat the Oven and StonePlace a baking stone or heavy sheet pan on the middle rack of the oven. Place a cast iron pan on the bottom rack. Preheat the oven to 250°C (480°F) for at least 45 minutes. The stone needs to be thoroughly hot to give the loaves a strong oven spring. Just before baking, carefully pour about 1 cup of hot water into the cast iron pan to create steam.Look for The oven is roaring hot and steam fills the oven chamber.Tip Use an oven thermometer to ensure the oven reaches the correct temperature.
The shaped loaves should be taut and smooth. When you press a finger gently into the dough, it should leave a slight indent that slowly springs back. If the indent stays, the dough is over-proofed.
If it springs back immediately, it needs more time. The loaves should feel airy and light. After proofing, they should have increased in volume by about 50% and look pillowy. This is the moment to get them into the oven.
Score, Bake, and Cool
- Score and BakeTurn the proofed loaves out onto a piece of parchment paper. Using a razor blade or bread lame, score each loaf down the center with a quick, confident slash. The cut should be about 1/2 inch deep. Working quickly, transfer the loaves onto the hot baking stone using the parchment as a sling. Close the oven door and bake for 20 to 25 minutes, until the crust is deep golden brown and the loaves sound hollow when tapped on the bottom.Look for The loaves bloom open with blistered golden ears and the crust crackles as it cools.Tip Spray the loaves with water before baking if you want an extra crispy crust.
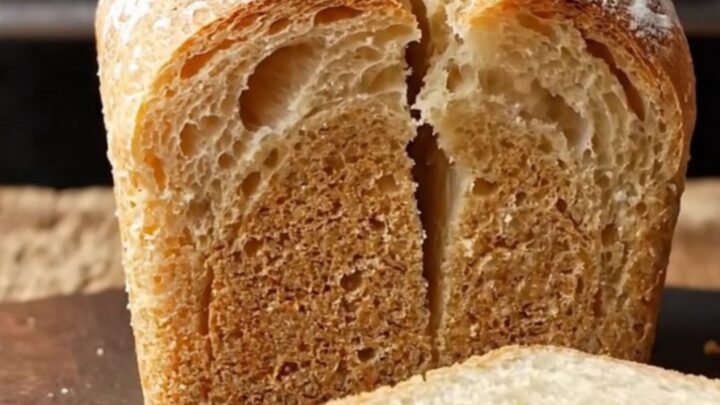
- Cool and SliceTransfer the baked loaves to a wire rack. Let them cool for at least 30 minutes before slicing. This allows the crumb to set and prevents it from becoming gummy. When ready to serve, use a serrated knife to slice the loaves. The crust should crackle loudly as you cut, revealing the open, glossy crumb inside.Look for The crust is crisp and the interior is moist and airy with a pleasant tang.Tip For the best texture, store the loaves in a paper bag for up to 2 days.
The baked loaves should be deep golden brown with blistered, crackly crusts. When you tap the bottom, they should sound hollow. The scoring should have opened up into beautiful ears, and the crumb should be open and glossy. Let them cool completely before slicing. The crust should crackle as you cut. The interior should be moist but not gummy, with a pleasant sourdough tang. Enjoy the fruits of your labor!
Common mistakes
One common mistake is over-proofing the dough. If the loaves spread out instead of rising in the oven, they may have proofed too long. Under-proofing is also a problem; the crumb will be dense and the loaves won't have as much oven spring. Another issue is not getting enough steam in the oven.
Without steam, the crust forms too quickly and prevents the loaves from expanding. Make sure to add water to the cast iron pan right before baking and keep the oven door closed as much as possible. Finally, don't skip the cooling time—slicing too early makes the crumb gummy.
How to tell it’s done
The loaves are done when they are deep golden brown and sound hollow when tapped on the bottom. The internal temperature should be around 205°F (96°C). If you have a digital thermometer, insert it into the center of a loaf; it should read at least 205°F.
The crust should be firm and crackly, and the loaves should have a good oven spring with blistered ears from the scoring. Let them cool completely on a wire rack before slicing to ensure the crumb is set.
Up next · Part 3 of 3
4 variations · storage & make-ahead · 5 answers · printable card
Tips, FAQ & printable recipe (Part 3)← Back to the ingredients (Part 1)