Breakfast · Part 2 of 3: Instructions
Two-Tone Chocolate Croissant Buns: Quick Pull-Apart Pastry Step-by-step instructions
- Prep
- Cook
- Total
- Serves
- 12
Before you start
Before starting, measure all ingredients and have them at room temperature. Warm the milk and water to about 110°F (43°C)—it should feel warm but not hot to the touch. If using active dry yeast, dissolve it in the warm liquid with a pinch of sugar and let it sit until frothy.
Prepare a clean, floured surface for kneading and rolling. Line a baking sheet with parchment paper. Have the melted butter and sugar syrup ready for the final steps. The dough will need about 45 minutes to rise, so plan accordingly.
Ingredients at a glance (11)
- 1 cup warm milk
- 1 cup warm water
- 1/2 cup vegetable oil
- 2 1/4 tsp active dry yeast (one packet)
- 3 tbsp granulated sugar
- 4 cups all-purpose flour, plus more for dusting
- 1/2 tsp salt
- 3 tbsp Dutch cocoa powder
- 2 tbsp milk
- 3 tbsp unsalted butter, melted
- 1/4 cup simple sugar syrup (for brushing)
Instructions
Mixing and Rising
- Make the DoughIn a large bowl, whisk together the warm milk, warm water, oil, yeast, and sugar. Let sit for 5 minutes until frothy. Add the flour and salt, and stir until a soft dough forms. Turn out onto a floured surface and knead for 5–7 minutes until smooth and elastic. Place in a greased bowl, cover, and let rise in a warm spot for 45 minutes, or until doubled in size.Look for The dough should be soft, not sticky, and spring back when pressed.Tip If the dough is too sticky, add flour a tablespoon at a time. If too dry, add a splash of warm water.
- Divide and Color the DoughPunch down the risen dough. Remove one-third of the dough and place it in a separate bowl. Add the Dutch cocoa powder and the 2 tablespoons of milk to this portion, and knead until the cocoa is fully incorporated and the dough is a deep chocolate color. Keep the remaining two-thirds plain.Look for The chocolate dough should be uniform in color with no white streaks.Tip Add the milk slowly; you may not need all of it if the dough is already soft.
The dough should be smooth, elastic, and doubled in size after the first rise. It should feel soft and springy when pressed. The chocolate dough should be uniform in color and the same consistency as the plain dough. If the dough is too sticky to handle, dust with a little flour. This phase is complete when both doughs are ready for shaping.
Shaping the Spiral
- Layer and Roll the DoughOn a lightly floured surface, roll out the plain dough into a large rectangle about 1/4-inch thick. Roll out the chocolate dough to a similar rectangle. Place the chocolate dough on top of the plain dough, then gently roll them together into a single sheet. Fold the stacked dough in half, then roll out again to a rectangle. Repeat folding and rolling 3–4 times to create a marbled spiral effect.Look for The dough should show distinct swirls of chocolate and vanilla.Tip Work quickly so the dough doesn't warm too much; chill briefly if it becomes sticky.
- Cut and Shape the BunsUsing a pizza cutter or sharp knife, slice the layered dough into long, slender triangles, about 4 inches wide at the base. Starting from the wide end, roll each triangle up toward the point, forming a crescent shape. Place the shaped buns on a parchment-lined baking sheet, leaving space between each. Cover and let proof for 20–30 minutes, until puffy and doubled in size.Look for The buns should be light and airy, with the spiral pattern visible on the outside.Tip For a more pronounced spiral, roll the dough tightly but not too tight—leave room for expansion.
After rolling and folding, the dough should show distinct swirls of chocolate and vanilla. The triangles should be uniform in size, and the rolled crescents should hold their shape.
The buns should be puffy and light after the second proof, with the spiral pattern visible on the surface. If they've spread too much, they may have over-proofed; bake them anyway—they'll still taste good.
Baking and Glazing
- Brush with Butter and BakePreheat the oven to 360°F (182°C). Brush the proofed buns with the melted butter. Bake for 22 minutes, until the buns are golden brown and puffed, and the internal temperature of the thickest part reaches 190°F (88°C) if checked with a thermometer.Look for The buns should be deeply golden and sound hollow when tapped on the bottom.Tip Oven temperatures vary; start checking at 20 minutes to avoid over-browning.
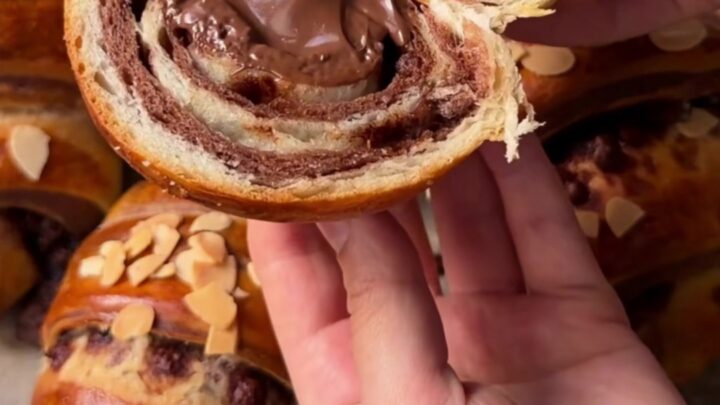
- Brush with Syrup and CoolRemove the buns from the oven and immediately brush them with the simple sugar syrup. This gives them a beautiful mirror shine. Let the buns cool on the baking sheet for 5 minutes, then transfer to a wire rack. Serve warm, pulling the buns apart to reveal the zebra spiral.Look for The syrup should create a glossy, sticky sheen on the surface.Tip Brush the syrup generously while the buns are still hot so it soaks in slightly.
The buns should be golden brown and puffed, with a slightly crisp exterior and a soft, airy interior. The sugar syrup should create a glossy, sticky shine. When you pull a bun apart, you should see the zebra spiral clearly, with steam rising from the warm layers. The buns are ready to serve warm.
Common mistakes
A common mistake is not letting the dough rise long enough, resulting in dense buns. Make sure the dough doubles in size during the first rise and the shaped buns puff up during the second proof. Another issue is over-flouring the dough, which makes it dry and tough.
Add flour only as needed. When rolling and folding, if the dough becomes too sticky, chill it for 10 minutes. Also, avoid rolling the triangles too tightly—they need room to expand in the oven. Finally, don't skip the sugar syrup; it adds moisture and shine.
How to tell it’s done
The buns are done when they are deeply golden brown on top and sound hollow when tapped on the bottom. If you have an instant-read thermometer, the internal temperature should be around 190°F (88°C).
The buns should have puffed up significantly and the spiral pattern should be clearly visible. Overbaking will dry them out, so start checking at the 20-minute mark. The sugar syrup should be brushed on immediately after baking, while the buns are still hot, to create a glossy shine.
Up next · Part 3 of 3
4 variations · storage & make-ahead · 5 answers · printable card
Tips, FAQ & printable recipe (Part 3)← Back to the ingredients (Part 1)