Desserts · Part 2 of 3: Instructions
Turkish Kadayıflı Muhallebi: Crispy & Creamy Pudding Step-by-step instructions
- Prep
- Cook
- Total
- Serves
- 8
Before you start
Before starting, measure all ingredients and have the baking dish ready. Toast the kadayıf in a large skillet so it browns evenly, then set it aside to cool completely.
For the pudding, whisk the dry ingredients with the milk before heating to avoid lumps. Chill the pudding thoroughly, as a warm pudding will melt the whipped cream and make the layers blur. Whip the cream only when the pudding is fully cold.
Ingredients at a glance (11)
- 200 g shredded kadayıf pastry
- 3 tbsp butter
- 3 tbsp sugar
- 1/2 cup crushed walnuts
- 4 cups whole milk
- 3/4 cup sugar
- 1/2 cup all-purpose flour
- 3 tbsp cornstarch
- 1 large egg yolk
- 1 tbsp vanilla extract
- 1 cup cold heavy cream
Instructions
Toast and Cool the Kadayıf
- Toast the KadayıfMelt the butter in a large skillet over medium heat. Add the shredded kadayıf pastry and sugar, then cook, stirring constantly, for 10 minutes until deeply golden brown and crisp. Stir in the crushed walnuts and cook for 1 more minute. Remove from heat and let cool completely.Look for The kadayıf turns golden brown and sounds shatteringly crisp when stirred.Tip Keep stirring to prevent burning; the sugar can scorch quickly.
- Cool the KadayıfSpread the toasted kadayıf mixture on a plate or baking sheet in an even layer. Let it cool completely at room temperature. This keeps it crunchy when layered.Look for The mixture is cool to the touch and no longer steaming.Tip Cooling prevents condensation from making the pastry soggy.
The kadayıf should be deeply golden, with a nutty, caramelized aroma. When you stir it, you’ll hear a dry, crackling sound. The walnuts are lightly toasted and fragrant.
Let the mixture cool completely before using; if it’s warm, it will soften in the dessert. The texture should be brittle and shatter when pinched.
Cook and Chill the Pudding
- Cook the PuddingIn a medium saucepan, whisk together the milk, sugar, flour, cornstarch, and egg yolk until smooth. Place over medium heat and cook, whisking constantly, until the mixture thickens and begins to bubble. Remove from heat and stir in the vanilla extract.Look for The pudding thickens to a custard-like consistency and large bubbles pop on the surface.Safe temperature 160°F (71°C) internal temperature (egg dishes)Tip Whisk continuously to avoid lumps and prevent scorching on the bottom.
- Chill the PuddingPour the hot pudding into a bowl. Press plastic wrap directly onto the surface to prevent a skin from forming. Refrigerate for at least 2 hours, until completely chilled and set.Look for The pudding is firm, cold, and no longer warm to the touch.Tip Chilling thoroughly ensures clean layers when assembling.
- Whip the CreamIn a large bowl, whip the cold heavy cream with an electric mixer on medium-high speed until stiff peaks form. Gently fold the whipped cream into the chilled pudding until fully combined and cloud-like.Look for The mixture is light, airy, and smooth with no streaks of cream.Tip Use cold cream for best volume; fold gently to keep the air in.
The pudding has thickened to a smooth, glossy custard that coats the back of a spoon. It should be bubbling gently and have no lumps. After chilling, it’s firm and cold, with a set, sliceable texture. The whipped cream is folded in until the mixture is light and airy, with no streaks.
Layer and Chill the Dessert
- Layer the DessertSpread half of the cooled crispy kadayıf mixture evenly in the bottom of an 8x8-inch glass baking dish. Pour the pudding mixture over the kadayıf and smooth the top. Sprinkle the remaining kadayıf mixture evenly over the pudding.Look for The layers are even: crunchy base, creamy middle, crunchy top.Tip Press the bottom layer lightly to make it compact but not dense.
- Chill Before ServingRefrigerate the assembled dessert for at least 1 hour before serving. This allows the layers to set and the flavors to meld. Serve chilled, scooping through all layers for the full contrast.Look for The dessert is cold and holds its shape when scooped.Tip For clean squares, chill longer and cut with a sharp knife.
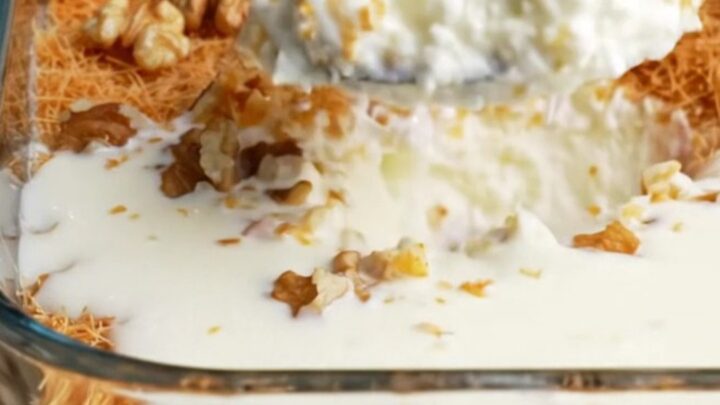
The dessert is assembled with an even bottom layer of kadayıf, a thick middle of pudding, and a generous top layer of kadayıf. After chilling, the top is crispy and the pudding is set. When you scoop, you’ll get a clean cross-section with distinct layers. The texture contrast is immediate: crunch, cream, crunch.
Common mistakes
One common mistake is under-toasting the kadayıf, which leaves it chewy instead of crisp. Another is stopping the pudding too early—it should be noticeably thick, as it will thin slightly when the cream is folded in.
Over-whipping the cream can make it grainy, and folding too vigorously deflates the mixture. Finally, assembling while the pudding is warm will cause the kadayıf to soften, so patience is key.
How to tell it’s done
The kadayıf is done when it’s deep golden brown and sounds crisp when stirred; it will harden as it cools. The pudding is done when it has thickened to a custard-like consistency and large bubbles break the surface; the egg yolk reaches 160°F (71°C) at this point, ensuring food safety.
The final dessert is ready after chilling at least 1 hour—it should be cold and hold its shape when scooped or sliced.
- Egg dishes: 160°F (71°C) in the thickest part
Up next · Part 3 of 3
4 variations · storage & make-ahead · 5 answers · printable card
Tips, FAQ & printable recipe (Part 3)← Back to the ingredients (Part 1)