Desserts · Part 2 of 3: Instructions
Triple Chocolate Fudge Salted Caramel Brownie Bars Step-by-step instructions
- Prep
- Cook
- Total
- Serves
- 12
Before you start
Before starting, make sure the eggs and butter are at room temperature for a smooth, even batter. Line a 9x13-inch baking pan with parchment paper, leaving overhang on two opposite sides to easily lift the finished slab.
Measure all ingredients and have them ready. If using a block of chocolate for curls, chill it in the freezer for about 10 minutes to make grating easier. Preheat the oven to 350°F (175°C).
Ingredients at a glance (12)
- 1 1/2 cups dark chocolate chips
- 1 1/2 cups milk chocolate chips
- 1 cup unsalted butter, melted
- 1 3/4 cups granulated sugar
- 3 large eggs
- 2 tsp vanilla extract
- 1 cup all-purpose flour
- 1/2 cup unsweetened cocoa powder
- 1/2 tsp kosher salt
- 1 cup salted caramel sauce
- 4 oz white chocolate, chopped
- 1/2 cup chocolate curls (dark and white)
Instructions
Prep and Fudge Base
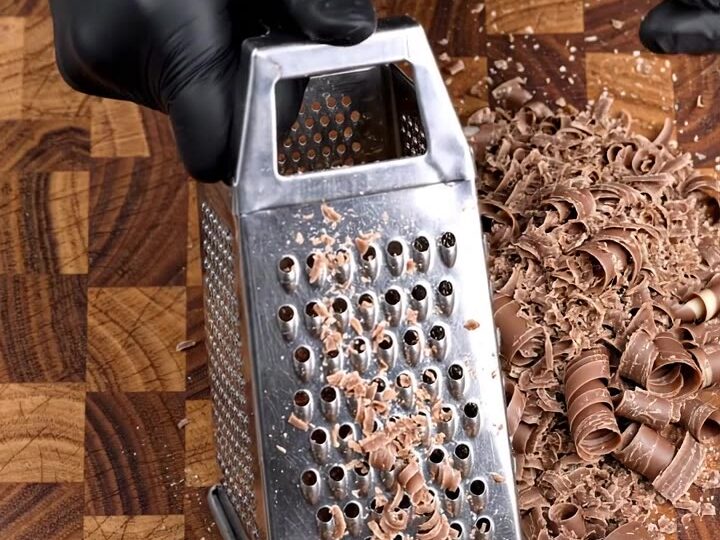
- Prepare the Pan and Chocolate CurlsLine a 9x13-inch baking pan with parchment paper, leaving overhang on two sides. Use a box grater to grate the solid blocks of dark and white chocolate into a bowl, creating a pile of two-tone chocolate curls. Set aside for topping.Look for The chocolate curls should be crisp and varied in size, with both dark and white pieces visible.Tip Chill the chocolate blocks for 10 minutes before grating to get cleaner, longer curls.
- Make the Fudge BaseIn a large mixing bowl, whisk together the melted butter, granulated sugar, eggs, and vanilla extract until smooth and glossy. Add the all-purpose flour, cocoa powder, and kosher salt, and stir until just combined. Fold in the dark chocolate chips and milk chocolate chips until evenly distributed.Look for The batter should be thick, glossy, and well-combined with no dry flour streaks.Tip Do not overmix once the flour is added; overmixing can make the bars tough.
- Pour Base into PanPour the fudge batter into the prepared pan and spread it into an even layer with an offset spatula. The batter should reach all corners and be level across the top.Look for The batter is evenly spread and covers the entire bottom of the pan.Tip Tap the pan gently on the counter to release any air bubbles.
At the end of this phase, the pan is lined, the chocolate curls are ready, and the fudge batter is smooth and glossy. The batter should be thick and evenly spread in the pan, with no dry spots. The kitchen smells richly of chocolate and vanilla.
Swirl and Bake
- Swirl in Caramel and White ChocolateDollop the salted caramel sauce over the fudge base in several spots. Sprinkle the chopped white chocolate over the caramel. Use a knife or skewer to gently swirl the caramel and white chocolate into the batter, creating marbled patterns without fully incorporating them.Look for The caramel and white chocolate form distinct swirls against the dark fudge batter.Tip Do not over-swirl; leaving pockets of caramel and white chocolate creates the best texture.
- Bake the BarsPlace the pan in the oven and bake at 350°F (175°C) for about 45 minutes, or until a toothpick inserted into the center comes out with a few moist crumbs. The edges should be set and slightly pulling away from the pan.Look for The top is glossy and slightly cracked, and the edges are firm.Safe temperature 160°F (71°C) internal temperature (egg dishes)Tip Start checking at 40 minutes; ovens vary and overbaking will dry out the fudgy center.
- Cool CompletelyLet the brownie slab cool in the pan on a wire rack for 30 minutes, then refrigerate for at least 2 hours until fully chilled. This allows the layers to set and makes slicing clean.Look for The slab is firm to the touch and completely cool.Tip Chilling is essential for clean, sharp slices; do not rush this step.
The caramel and white chocolate are swirled into the batter, creating distinct ribbons.
After baking, the top is set and slightly cracked, and the edges have pulled away from the pan. A toothpick inserted in the center comes out with moist crumbs.
Slice and Finish
- Slice into BarsLift the chilled brownie slab out of the pan using the parchment overhang. Place on a cutting board and use a serrated knife to slice into 12 thick bars, about 2 inches wide each. Wipe the knife clean between cuts for neat edges.Look for Each bar is a thick, uniform rectangle with clean sides.Tip For the cleanest cuts, dip the knife in hot water and dry it before each slice.
- Top with Chocolate Curls and ServePress the chocolate curls onto the top of each bar, or sprinkle them over the entire slab before slicing. Serve the bars at room temperature for the best texture, or slightly chilled for a firmer bite.Look for The chocolate curls stick to the top, creating a crunchy, decorative finish.Tip Add the curls just before serving to keep them crisp.
The chilled slab is lifted from the pan and sliced into thick bars. Each bar has clean edges and a visible layered cross-section. The chocolate curls are pressed onto the top, adding a crunchy, decorative finish.
Common mistakes
One common mistake is overmixing the batter after adding the flour, which can develop gluten and make the bars tough. Another is overbaking, which dries out the fudgy center; start checking for doneness at 40 minutes.
Additionally, not chilling the slab long enough before slicing can cause the bars to crumble and the layers to smear. Be patient and let the bars cool completely, then refrigerate for at least 2 hours.
How to tell it’s done
The brownie bars are done when the edges are set and slightly pulling away from the pan, and a toothpick inserted into the center comes out with a few moist crumbs, not wet batter.
The internal temperature of the eggs should reach 160°F (71°C) to ensure they are fully cooked. The top should look glossy and slightly cracked. Once cooled and chilled, the slab should be firm enough to slice cleanly without crumbling.
- Egg dishes: 160°F (71°C) in the thickest part
Up next · Part 3 of 3
4 variations · storage & make-ahead · 5 answers · printable card
Tips, FAQ & printable recipe (Part 3)← Back to the ingredients (Part 1)