Dinner · Part 2 of 3: Instructions
Tender Short Rib Lasagna Rolls for a Cozy Dinner Step-by-step instructions
- Prep
- Cook
- Total
- Serves
- 6
Before you start
Before beginning, ensure that the braised beef short ribs are shredded and kept cold. Cook the lasagna noodles in a large pot of boiling salted water until they are tender yet firm to the bite.
Drain the noodles and lay them out individually on a baking sheet or a clean kitchen towel to prevent them from sticking together while the filling is being prepared.
Preheating the oven to 375°F (190°C) ensures it is ready for immediate baking once the rolls are assembled.
Ingredients at a glance (6)
- 6 sheets lasagna noodles, cooked al dente
- 1 1/2 cups braised beef short ribs, shredded
- 1 cup ricotta cheese
- 1 1/2 cups marinara sauce
- 1 cup mozzarella cheese, shredded
- fresh parsley, for serving
Instructions
Filling Preparation
- Prepare the fillingIn a medium mixing bowl, combine the shredded braised beef short ribs with the ricotta cheese. Mix well until thoroughly combined and set aside. Keep the beef chilled in the refrigerator until ready to mix.Look for mixture is smooth and combinedTip Ensure the short ribs are kept chilled until just before mixing to maintain food safety.
The beef and ricotta mixture should be thick, uniform, and easy to spread onto the noodles. If the mixture appears too thin, add a bit more ricotta or drain excess fat from the beef to improve the consistency before rolling.
Assembly of Rolls
- Assemble the rollsLay each cooked lasagna noodle flat on a clean surface. Spoon a generous amount of the beef and ricotta mixture onto one end of each noodle. Roll tightly to form individual cylinders.Look for noodles are rolled into tight cylindersTip Pat the noodles dry slightly with a paper towel if they are too slippery to roll effectively.
Each roll should be tightly wrapped, ensuring the filling is completely contained. The rolls should fit snugly within the baking dish, which helps them maintain their structure and prevents them from unrolling during the cooking process.
Baking and Finishing
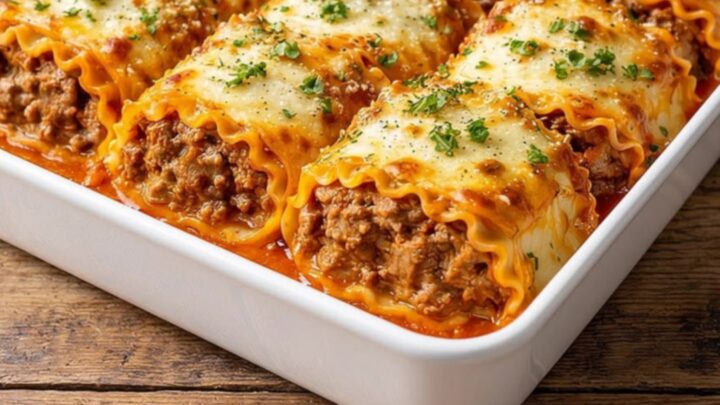
- Bake and serveSpread a layer of marinara sauce in the bottom of a baking dish. Place the lasagna rolls seam-side down in the dish. Top with the remaining marinara sauce and mozzarella cheese. Bake at 375°F (190°C) until the cheese is bubbling and golden brown. Ensure the internal temperature of the beef mixture reaches 145°F (63°C). Let the meat rest for 3 minutes before serving. Garnish with fresh parsley.Look for cheese is golden brown and bubblingSafe temperature 145°F (63°C) internal temperature (steaks, chops and roasts)Tip Let the dish rest for 5 minutes after the meat rest period before serving to allow the layers to set properly.
The dish is ready when the cheese is bubbly and the sauce is hot. The edges of the noodles might appear slightly crisp, and the entire dish should smell aromatic and savory. Ensure the internal temperature is verified before serving.
Common mistakes
Avoid overcooking the lasagna noodles during the initial boiling stage, as they will continue to soften significantly while baking in the sauce. Another common mistake is overfilling the noodles, which can cause them to burst or lose their shape during the rolling process.
Ensure that the rolls are placed seam-side down in the baking dish to keep them securely closed. Finally, do not skip the resting period after baking, as this is essential for the structure of the rolls to set before serving.
How to tell it’s done
The lasagna rolls are fully cooked when the cheese topping is melted, bubbling, and exhibits a deep golden-brown color. The internal temperature of the beef filling must reach 145°F (63°C) to ensure the meat is safely heated throughout.
The sauce should be simmering around the edges of the rolls, and the pasta should be tender when pierced with a fork. Allow the dish to rest for 5 minutes after removing it from the oven.
- Steaks, chops and roasts: 145°F (63°C) in the thickest part, then a 3-minute rest
Up next · Part 3 of 3
2 variations · storage & make-ahead · 3 answers · printable card
Tips, FAQ & printable recipe (Part 3)← Back to the ingredients (Part 1)