Desserts · Part 2 of 3: Instructions
Sugar-Free 2-Ingredient Chocolate Mousse in 20 Minutes Step-by-step instructions
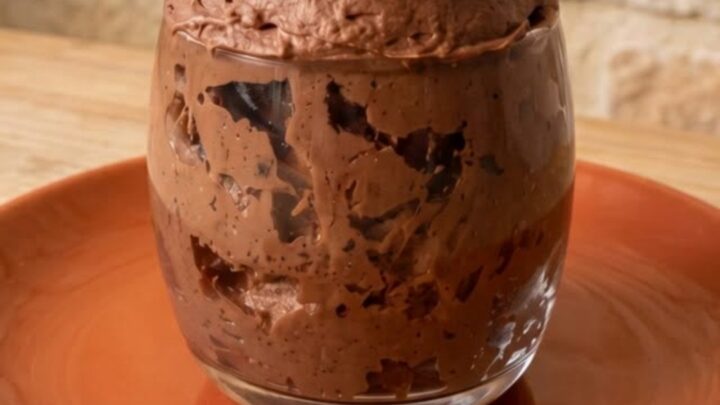
- Prep
- Cook
- Total
- Serves
- 4
Before you start
Set up everything before the first beat of the mixer, because the mousse moves fast once the chocolate is ready. Drain the chickpea liquid and get it into the refrigerator. Chop the chocolate finely and place it in the heatproof bowl.
Fill the saucepan with an inch of water and have it ready for a bare simmer. Wipe the mixing bowl, beaters and rubber spatula with a dry cloth to confirm there is no grease anywhere.
Ingredients at a glance (2)
- 1/2 cup aquafaba (chickpea liquid, from one 15-ounce can), cold
- 3.5 oz dairy-free dark chocolate (sugar-free), finely chopped
Instructions
Melt and prepare
- Chill the aquafabaOpen the can of chickpeas and drain the liquid into a small bowl, reserving the chickpeas for another use. Measure out 1/2 cup of aquafaba and place it in the refrigerator for 10 to 15 minutes. Cold aquafaba whips faster and holds its peaks far better than liquid straight from the can, so this short chill pays off.Look for The liquid should look pale, slightly cloudy and feel noticeably cold to the fingertip before whipping.Tip Save the chickpeas for salads or hummus; only the liquid is needed here.
- Chop the chocolateFinely chop the chocolate on a dry cutting board, aiming for pieces no bigger than a pea. Small, even pieces melt at the same rate, which prevents scorching and leaves no stray lumps in the finished mousse. Transfer the chopped chocolate to a heatproof glass bowl and set it beside the stove, ready to melt.Look for Every piece should be small and uniform; no chunk should be larger than a pea.Tip A serrated knife grips the chocolate better than a straight blade and gives cleaner pieces.
- Melt gentlyBring an inch of water to a bare simmer in a small saucepan and set the bowl of chocolate on top, making sure the bowl bottom does not touch the water. Stir slowly with a dry rubber spatula until the chocolate is almost fully smooth, then pull it off the heat and let the residual warmth finish the last bits.Look for The melted chocolate should be glossy and pour in a slow ribbon, with no visible flecks of solid chocolate.Tip One drop of water can seize chocolate, so every spoon and the spatula must be completely dry.
- Cool the chocolateSet the melted chocolate aside on the counter and let it cool for 5 to 8 minutes, stirring once or twice. It should feel barely warm, close to body temperature, before it meets the whipped aquafaba. Hot chocolate collapses the whipped foam instantly, so this pause is the difference between a fluffy mousse and a dense puddle.Look for A dab on the inside of the wrist should feel neutral, neither warm nor cool.Tip If the chocolate thickens too much while cooling, warm the bowl briefly over the water again for a few seconds.
At the end of this phase, the chocolate is melted, smooth and cooled to body temperature, and the aquafaba is cold and ready in the mixing bowl. The melted chocolate should pour in a slow, glossy ribbon with no solid flecks, and a dab on the wrist should feel neutral. If the chocolate has thickened during the cool-down, warm the bowl briefly over the simmering water again for a few seconds and stir.
Whip and fold
- Whip to stiff peaksPour the cold aquafaba into a clean, dry mixing bowl and beat with a hand mixer on medium-high speed. After about 2 minutes it turns frothy and pale; keep going 3 to 5 minutes more until it holds stiff, glossy peaks that stand straight up when the beaters lift out. Stop as soon as the peaks are firm rather than chasing extra volume.Look for The foam should look like whipped marshmallow cream and hold its shape with no soft droop at the tip.Tip A clean bowl is critical; any trace of oil keeps the foam from reaching stiff peaks.
- Fold in thirdsAdd one third of the cooled chocolate to the whipped aquafaba and fold with the rubber spatula, cutting down through the middle, sweeping along the bottom and turning the mixture over itself. Fold in the second third, then the last, working patiently until no streaks remain and the color is an even deep brown.Look for The final batter should be uniformly dark, thick and slightly billowy, with no pale foam or dark streaks left.Tip Folding in additions gradually keeps the foam from deflating under the weight of one heavy pour.
- Check the textureLift the spatula and watch how the mousse behaves. It should fall in thick ribbons that pile on themselves and hold a soft ridge for a few seconds. If it looks grainy or noticeably dense, the chocolate was probably still warm; fold quickly and move straight to the glasses so the mixture does not lose more air.Look for A ribbon of mousse should sit on the surface briefly before sinking back in.Tip Work briskly from here on; the foam is at its tallest right after the final fold.
This phase ends with a finished mousse batter. The whipped aquafaba should have reached stiff, glossy peaks that stand straight up, and after the final fold the mixture should be an even deep brown with no pale streaks or dark pockets.
Lift the spatula: the batter should fall in thick ribbons that pile on themselves and hold a soft ridge briefly. If it looks grainy, the chocolate was warm; if it looks pale and streaky, keep folding a few more turns.
Chill and serve
- Fill the glassesSpoon the mousse into four small serving glasses, using the spatula to scrape the bowl clean. Divide it evenly and smooth the tops with the back of a spoon, or leave a deliberate swirl for texture. Avoid tapping the glasses on the counter, which pushes precious air out of the mixture you just worked to build.Look for Each glass should be filled nearly to the rim, with a soft, textured surface that holds its shape.Tip Small glasses give neater portions than large ones; the mousse is rich and a modest serving satisfies.
- Chill until setPlace the filled glasses in the refrigerator and let the mousse chill for at least 2 hours, uncovered for the first 20 minutes so condensation does not drip onto the surface, then loosely covered. During chilling the chocolate firms up and the foam sets into a thick, spoonable texture that holds a clean scoop.Look for The surface should look matte and dry, and a spoon drawn through should leave a clean-walled channel.Tip Overnight chilling deepens the chocolate flavor; the mousse keeps beautifully for a day or two.
- Serve coldTake the glasses from the refrigerator a minute or two before serving so the texture relaxes slightly. Scoop straight through the top with a dessert spoon to show off the thick, airy interior, and serve immediately. The mousse is at its best within the first two days, while the whipped structure is still at its peak.Look for The scoop should lift as a clean, billowy mound that keeps its shape on the spoon.Tip Serve with cold spoons straight from the drawer; it keeps the first bite as firm as the last.
After at least two hours in the refrigerator, the mousse is ready. The surface should be matte and dry to the touch, and a spoon drawn through should leave a clean channel with defined walls. A lifted scoop holds its shape as a thick, textured mound. If the spoon slides too easily or the surface still looks wet, return the glasses to the refrigerator for another thirty to sixty minutes.
Common mistakes
The most common failure is folding chocolate that is still warm, which deflates the foam and leaves a dense, fudge-like result instead of a mousse — always test the chocolate on the inside of a wrist first.
Under-whipping is next: aquafaba needs several minutes longer than egg whites, so keep beating until the peaks are truly stiff and glossy. Over-whipping past stiff peaks causes the foam to grain and weep. Grease or water in the bowl prevents the foam from forming at all.
How to tell it’s done
The mousse is done when it has chilled at least two hours and the surface looks matte and dry rather than wet and glossy.
A dessert spoon drawn through the center should leave a clean-walled channel that holds, and a scoop should lift as a thick, billowy mound that keeps its shape without sliding. The interior should look uniform deep brown, with the fine bubble structure visible along the scoop walls.
Up next · Part 3 of 3
4 variations · storage & make-ahead · 5 answers · printable card
Tips, FAQ & printable recipe (Part 3)← Back to the ingredients (Part 1)