Desserts · Part 2 of 3: Instructions
Easy Strawberry Cheesecake Dump Cake with a Golden Crust Step-by-step instructions
- Prep
- Cook
- Total
- Serves
- 9
Before you start
Before you begin, gather all your ingredients and ensure your workspace is clean. Preheat your oven to 350°F (175°C) so it is ready when the assembly is complete.
Prepare your 9x9 inch baking dish by lightly greasing it if you prefer easier cleanup.
Having your strawberries washed, hulled, and sliced beforehand will streamline the assembly process significantly, allowing you to move quickly from preparation to baking without any unnecessary delays or interruptions.
Ingredients at a glance (3)
- 2 cups fresh strawberries, sliced
- 1 container prepared cheesecake filling
- 1 box yellow cake mix
Instructions
Fruit preparation
- Prepare the fruit baseSpread the sliced fresh strawberries into the bottom of a 9x9 inch glass baking dish to create an even layer of fruit.Look for The strawberries should cover the bottom of the dish completely.Tip Pat the strawberries dry if they are very juicy to prevent a soggy bottom.
The strawberries should be arranged in an even layer at the bottom of the dish. They should be uniform in size to ensure they cook at the same rate, providing a consistent fruit base for the creamy cheesecake layer that follows.
Layering the filling
- Add the creamy layersPour the prepared cheesecake filling over the strawberry layer, using a spatula to spread it gently so the fruit remains undisturbed beneath the creamy mixture.Look for The cheesecake filling should form a smooth, uniform layer over the strawberries.Tip Work slowly to ensure the layers do not mix prematurely.
The cheesecake filling must be spread carefully over the strawberries. Ensure it reaches the corners of the dish so that every serving has a balanced amount of fruit and cream. The surface should be level before adding the final dry topping.
Baking to perfection
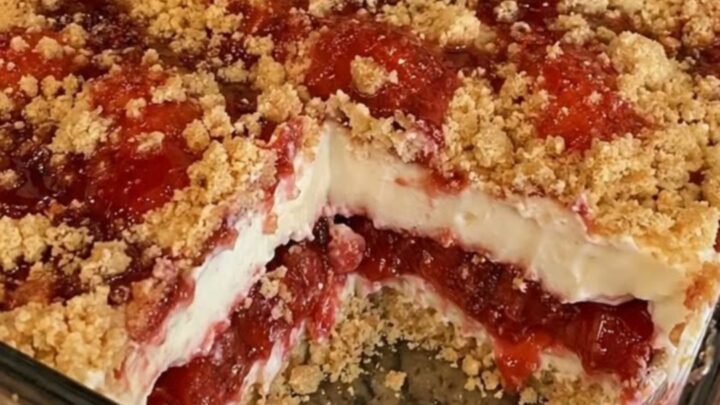
- Assemble and bakeSprinkle the dry yellow cake mix evenly over the top of the cheesecake filling. Place the dish in an oven preheated to 350°F (175°C). Bake for 45 minutes until the topping is golden brown and the filling reaches 160°F (71°C). Let the cake rest for 15 minutes before serving.Look for The top should be golden brown and crusty, while the edges should look bubbly and set.Safe temperature 160°F (71°C) internal temperature (egg dishes)Tip Serve warm to enjoy the contrast between the crispy topping and the creamy center.
The finished cake will be golden brown on top with a crusty texture. The filling should be hot and bubbly, indicating that the strawberries have released their juices and the cheesecake has fully cooked and set into a rich, decadent layer.
Common mistakes
Avoid over-mixing the layers during assembly, as this can break down the fruit too much and lead to a thinner filling. Do not press down on the cake mix layer; it should remain loose to ensure it bakes into a proper crust.
Finally, ensure you do not skip the resting time, as this allows the filling to set, making it much easier to scoop into perfect squares for serving.
How to tell it’s done
The cake is done when the top has achieved a uniform golden brown color and the fruit filling is visibly bubbling around the edges. When testing for doneness, ensure the center is set and not excessively liquid.
The internal temperature of the filling should reach 160°F (71°C) to ensure the ingredients are fully cooked and the texture is perfectly creamy and stable for serving.
- Egg dishes: 160°F (71°C) in the thickest part
Up next · Part 3 of 3
2 variations · storage & make-ahead · 3 answers · printable card
Tips, FAQ & printable recipe (Part 3)← Back to the ingredients (Part 1)