Dinner · Part 2 of 3: Instructions
Sticky Glazed Skillet Chicken and Potatoes Step-by-step instructions
- Prep
- Cook
- Total
- Serves
- 4
Before you start
Before starting, ensure all ingredients are measured and ready, as the cooking process moves quickly once the heat is on. Cut the potatoes into uniform wedges so they cook at the same rate as the chicken.
Pat the chicken dry with paper towels to ensure a better sear, and have your tongs and serving platter nearby to facilitate a smooth transition from the skillet to the table.
Ingredients at a glance (5)
- 4 pieces boneless skinless chicken thighs
- 1 lb gold potatoes, cut into wedges
- 1/4 cup honey
- 1/4 cup soy sauce
- fresh thyme, for serving
Instructions
Phase 1: Searing for Flavor
- Sear the Chicken and PotatoesHeat a large skillet over medium-high heat. Add the chicken thighs and potato wedges to the pan, searing them until the chicken is browned and the potatoes start to soften, turning occasionally with tongs to ensure even cooking.Look for The chicken should develop a nice golden-brown exterior and the potatoes should start to show a light crust.Tip Ensure the skillet is hot before adding the chicken to achieve a better sear.
The chicken and potatoes should be well-browned and visibly seared on all sides. The skillet should be hot, and you should hear a consistent sizzle when the ingredients make contact with the surface. Ensure the potatoes are starting to soften and the chicken has developed a golden color before proceeding to the glaze.
Phase 2: Developing the Sticky Glaze
- Glaze the IngredientsPour the honey and soy sauce mixture over the chicken and potatoes. Reduce the heat to medium and continue to cook, turning the chicken and potatoes frequently so they are evenly coated in the bubbling, thickening glaze.Look for The sauce should reduce into a thick, sticky, glossy syrup that clings to the chicken and potatoes.Tip Watch the heat closely during this stage, as honey can burn if the temperature is too high.
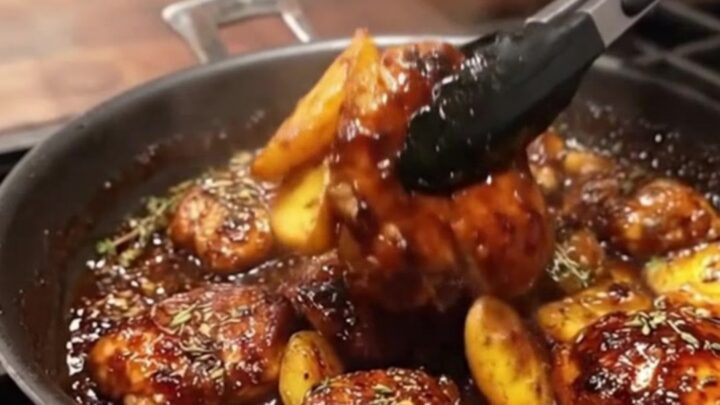
The honey and soy sauce should be bubbling vigorously and coating the chicken and potatoes in a glossy, dark syrup. The liquid should be reducing, becoming thicker and more concentrated as it cooks. Check that the glaze is adhering well to the surface of the chicken and potatoes and not just sitting as a thin, watery liquid.
Phase 3: Final Caramelization
- Finish and ServeContinue cooking until the chicken reaches an internal temperature of 165°F (74°C). Remove the pan from the heat, sprinkle with fresh thyme, and let the chicken rest for 5 minutes before serving.Look for The chicken should be tender and the glaze should be deeply caramelized and dark.Safe temperature 165°F (74°C) internal temperature (poultry)Tip Resting the chicken ensures the juices redistribute for the most tender bite possible.
The chicken should be fully cooked, tender, and beautifully glazed. The glaze should be sticky and deeply aromatic, having reduced to a rich consistency.
Before removing from the heat, verify the internal temperature of the chicken, sprinkle with fresh thyme, and allow the dish to rest briefly so the flavors can settle and the glaze can set.
Common mistakes
A common mistake is overcrowding the skillet, which leads to steaming rather than browning. Ensure there is enough space between the chicken and potatoes for heat to circulate.
Another error is adding the honey and soy sauce too early; the glaze should only be added once the chicken and potatoes have developed a good sear, otherwise the sugars will burn before the ingredients are fully cooked through.
How to tell it’s done
The chicken is perfectly cooked when it reaches an internal temperature of 165°F (74°C) as measured by a digital thermometer inserted into the thickest part of the meat.
The potatoes should be fork-tender, showing a golden, caramelized exterior. The glaze should be thick enough to coat the back of a spoon and should cling to the ingredients without pooling excessively at the bottom of the pan.
- Poultry: 165°F (74°C) in the thickest part
Up next · Part 3 of 3
2 variations · storage & make-ahead · 3 answers · printable card
Tips, FAQ & printable recipe (Part 3)← Back to the ingredients (Part 1)