Dinner · Part 2 of 3: Instructions
Slow Cooker Lasagna with Stretchy Mozzarella Step-by-step instructions
- Prep
- Cook
- Total
- Serves
- 8
Before you start
Before beginning the assembly process, gather all your ingredients and prep your workstation on a clean countertop. Ensure your slow cooker insert is clean and dry.
Have your pre-made meat sauce, seasoned ricotta, and shredded mozzarella cheese measured out and ready to go. Having these components prepared in advance makes layering the lasagna in the slow cooker a fast, seamless, and enjoyable process.
Ingredients at a glance (4)
- 4 cups meat sauce, store-bought or made ahead
- 10 lasagna noodles, uncooked
- 15 oz seasoned ricotta, store-bought or made ahead
- 3 cups shredded mozzarella cheese
Instructions
Base Preparation
- Prepare the Slow CookerLightly grease the inside of a 6-quart oval slow cooker with nonstick cooking spray to prevent the lasagna from sticking during the long cooking process.Look for The slow cooker insert is evenly coated.Tip A slow cooker liner can also be used for even easier cleanup.
- Spread the Base SauceSpread a thin layer of the prepared meat sauce over the bottom of the slow cooker insert to create a moist barrier for the pasta.Look for The bottom is completely covered with a thin layer of sauce.Tip Use about one cup of sauce for this initial base layer.
At the end of this initial preparation phase, the bottom of your slow cooker insert should be completely coated with a thin, even layer of rich meat sauce. This creates a moist barrier that prevents the first layer of pasta from sticking or burning. The sauce should smell savory and aromatic, ready to cook the noodles from below.
Layering the Components
- Layer the Noodles and RicottaBreak the uncooked lasagna noodles to fit the oval shape of the slow cooker, placing a layer of noodles over the base sauce. Spread a portion of the seasoned ricotta evenly over the noodles.Look for The noodles and ricotta form an even layer.Tip Breaking the noodles into smaller pieces helps them fit the curved edges perfectly.
- Add Sauce and MozzarellaSpoon a layer of meat sauce over the seasoned ricotta, then sprinkle with a generous handful of shredded mozzarella cheese.Look for The cheese and sauce are evenly distributed.Tip Keep some mozzarella aside for the final top layer.
- Repeat the LayersRepeat the layering process with the remaining lasagna noodles, seasoned ricotta, meat sauce, and mozzarella cheese, pressing down gently to compact the layers.Look for The slow cooker is filled with distinct, even layers.Tip Ensure the final layer of noodles is completely covered with sauce and cheese.
- Add the Top Cheese LayerSprinkle the remaining shredded mozzarella cheese over the very top of the lasagna to create a thick, even blanket that will melt into a golden crust.Look for The top is completely covered with a uniform layer of cheese.Tip Freshly grated mozzarella melts much better than pre-shredded varieties.
Once the layering is complete, the slow cooker should be filled with beautiful, distinct layers of red meat sauce, white seasoned ricotta, and pale yellow mozzarella cheese. The uncooked noodles should be completely covered by the sauce to ensure they cook evenly. The final top layer of shredded mozzarella should form a neat, even blanket of white cheese, ready to melt into a golden crust.
Slow Cooking and Resting
- Cook the LasagnaCover the slow cooker with the lid and cook on low for 4 hours, or until the noodles are completely tender and the cheese is bubbly.Look for The edges are bubbling and the cheese is fully melted.Tip Avoid lifting the lid during cooking to keep the heat and steam trapped inside.
- Rest and ServeTurn off the slow cooker and remove the lid. Let the lasagna rest uncovered for 15 minutes before slicing and serving.Look for The lasagna is slightly cooled and holds its shape when sliced.Tip Use a sharp spatula to cut clean, structured portions.
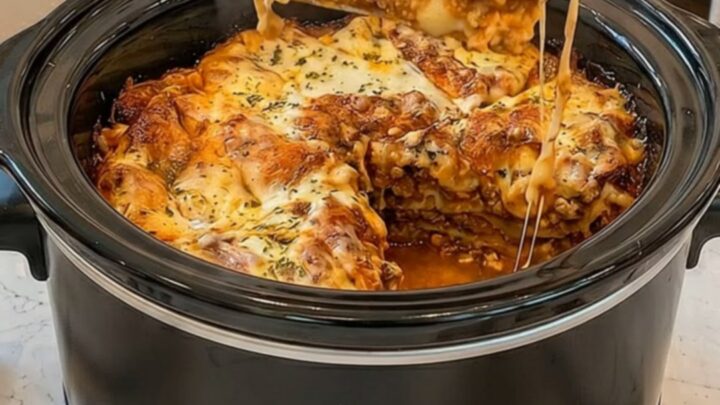
When the cooking time is complete, the lasagna will look absolutely spectacular. The cheese on top will be completely melted, bubbly, and slightly golden around the edges of the slow cooker bowl.
When you insert a butter knife into the center, it should slide through the pasta layers with absolutely no resistance, confirming the noodles are perfectly tender. Steam will rise from the dish, carrying a rich aroma of Italian herbs and melted cheese.
Common mistakes
One of the most common mistakes when making crockpot lasagna is adding too much extra liquid, which results in a watery, soupy finished dish. The moisture released from the ricotta and melting cheese is more than enough to cook the pasta sheets.
Another error is using no-boil noodles; these tend to turn mushy and lose their structure during the long cooking process. Finally, do not skip the resting period after cooking, as slicing the lasagna immediately will cause the layers to slide apart.
How to tell it’s done
To determine if the lasagna is fully cooked, insert a butter knife or fork into the very center of the slow cooker. The noodles must be completely tender and offer no resistance when pierced.
Additionally, the cheese around the edges should be vigorously bubbling and golden brown, and the entire dish should be piping hot throughout. Let the lasagna rest uncovered for fifteen minutes to firm up before slicing.
Up next · Part 3 of 3
2 variations · storage & make-ahead · 3 answers · printable card
Tips, FAQ & printable recipe (Part 3)← Back to the ingredients (Part 1)