Dinner · Part 2 of 3: Instructions
Slow Cooker Jack-O’-Lantern Stuffed Peppers Step-by-step instructions
- Prep
- Cook
- Total
- Serves
- 4
Before you start
Before starting, clear a clean workspace for carving the peppers. Ensure you have a sharp knife for the details and a sturdy cutting board. Have your slow cooker placed on a level, heat-safe surface with easy access to an outlet.
Gather all ingredients and measuring tools, ensuring the raw turkey is kept cold in the refrigerator until the very last moment before mixing the filling.
Ingredients at a glance (7)
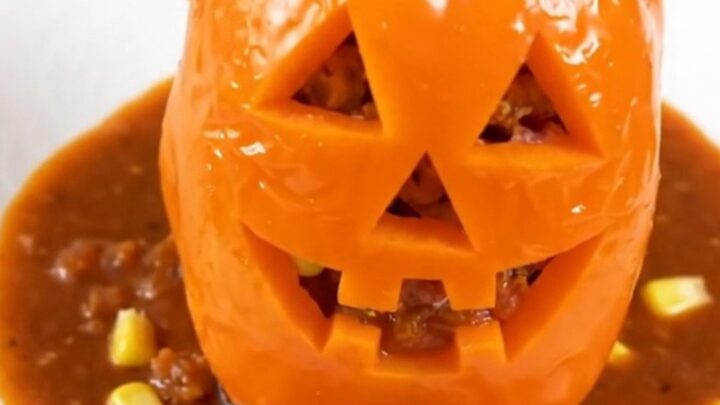
- 4 large orange bell peppers, tops removed and carved with jack-o'-lantern faces
- 1 lb ground turkey
- 1 cup corn kernels
- 1 cup diced tomatoes
- 1 tsp chili powder
- 1 tsp ground cumin
- 1 1/2 cups enchilada sauce
Instructions
Preparation and Filling
- Prepare and FillUsing a sharp pairing knife, carefully cut the tops off the bell peppers and remove the seeds and membranes. Carve simple eye holes into the peppers. In a mixing bowl, combine the ground turkey, corn, tomatoes, chili powder, and cumin. Mix until well combined, then stuff each pepper generously with the turkey mixture.Look for The peppers should be filled firmly but not packed so tightly that they burst.Tip Keep the carved faces simple so they do not lose their shape during the long cooking process.
The peppers should be clean, carved, and filled with the turkey mixture. Check that the turkey is thoroughly combined with the spices, corn, and tomatoes so that every portion of the filling is uniform in flavor and texture before placing them into the slow cooker.
Slow Cooking
- Slow CookPlace the stuffed peppers upright into the slow cooker. Pour the enchilada sauce evenly over and around the peppers. Cover and cook on low for 4 to 6 hours or on high for 2 to 3 hours until the turkey is fully cooked through to 165°F (74°C).Look for The peppers will become soft and the sauce will thicken slightly as it bubbles.Safe temperature 165°F (74°C) internal temperature (poultry)Tip Ensure the peppers are standing upright so the filling stays inside while they cook.
The peppers are cooking, and the sauce is bubbling. The kitchen should smell savory and slightly spicy.
Ensure the slow cooker is covered tightly to trap the moisture, which is vital for steaming the peppers to the correct level of tenderness without them becoming mushy.
Final Resting and Serving
- ServeCarefully remove the peppers from the slow cooker using a large spoon or spatula. Let them rest for 5 minutes before serving to ensure the filling sets and the juices redistribute. Serve warm with the extra sauce from the bottom of the slow cooker.Look for The turkey filling should reach an internal temperature of 165°F (74°C).Safe temperature 165°F (74°C) internal temperature (poultry)Tip Use a wide spatula to lift the peppers out to prevent the carved faces from tearing.
The peppers are removed from the heat. The filling is set, and the peppers are tender. Check that the faces are still intact and that the peppers are stable on the plate. The sauce should be rich and clinging to the peppers for a professional and appetizing presentation.
Common mistakes
Avoid over-carving the faces, as thin sections of pepper can collapse during the long, slow cook time. Do not crowd the slow cooker; if the peppers are packed too tightly, they will not cook evenly, and the steam circulation will be restricted.
Lastly, do not skip the resting period, as this allows the juices to settle and prevents the filling from falling apart when you lift the peppers out.
How to tell it’s done
The dish is ready when the bell peppers are tender to the touch and the turkey filling is completely cooked through.
Use a digital meat thermometer to check the center of the turkey filling; it must reach an internal temperature of 165°F (74°C) to be considered safe. The sauce should be bubbling and thick enough to coat the back of a spoon.
- Poultry: 165°F (74°C) in the thickest part
Up next · Part 3 of 3
2 variations · storage & make-ahead · 3 answers · printable card
Tips, FAQ & printable recipe (Part 3)← Back to the ingredients (Part 1)