Dinner · Part 2 of 3: Instructions
Sizzling Chicken Fajita Burrito with Warm Queso Step-by-step instructions
- Prep
- Cook
- Total
- Serves
- 4
Before you start
Slice the chicken breast into thin, even strips and pat them completely dry; moisture is the enemy of a hard sear.
Slice the bell peppers into ribbons and the white onion into slivers, keeping the pieces wide enough to char without slipping through the grill of the pan. Measure the fajita seasoning and oil, and set the queso, pinto beans, guacamole and pico de gallo within reach.
Ingredients at a glance (10)
- 1 lb boneless skinless chicken breast, sliced into thin strips
- 2 tbsp fajita seasoning
- 2 tbsp neutral oil
- 2 bell peppers, sliced into ribbons
- 1 white onion, sliced
- 4 large flour tortillas (12-inch), warmed
- 1/3 cup warm white queso per burrito
- 1/2 cup pinto beans, warmed and drained, per burrito
- Guacamole, for serving
- Pico de gallo, for serving
Instructions
Phase 1: Sear the fajita mix
- Heat the pan properlySet a large cast-iron skillet or griddle over high heat and let it preheat for 4 to 5 minutes. Add the oil and swirl to coat. The surface should shimmer and just barely smoke, around 450°F, before anything touches it. A properly hot pan is what builds the sizzle and the char that make fajitas taste like they came off a restaurant platter.Look for The oil thins out, ripples across the surface and releases a faint wisp of smoke.Tip Cast iron holds heat best; a heavy stainless skillet works too, but keep the burner on high the whole time.
- Season and sear the chickenPat the chicken strips dry, then toss them with the fajita seasoning until every piece is coated. Lay the strips in the pan in a single layer, leaving space between them, and sear undisturbed for 2 minutes so a browned crust forms. Flip and sear 1 to 2 minutes more. Work in two batches if needed; crowding steams the meat instead of searing it.Look for Deep golden-brown edges on the chicken and a loud, steady sizzle from the pan.Tip Dry chicken browns; wet chicken steams. Blot the strips with paper towels right before seasoning.
- Char the peppers and onionsPush the chicken to one side of the pan and add the bell pepper ribbons and sliced onion to the empty side. Let them sit against the hot surface for a full minute before stirring so they blister and char in spots. Toss everything together with tongs and cook 2 to 3 minutes more, until the peppers soften at the edges but still hold a little snap.Look for Blackened blisters on the pepper skins and onions turning translucent with browned tips.Safe temperature 165°F (74°C) internal temperature (poultry)Tip Resist constant stirring; the vegetables need direct contact with the hot pan to char instead of going limp.
- Check the chicken temperatureTake the pan off the heat and check the thickest chicken strip with an instant-read thermometer; it should read 165°F (74°C) at the center. If any piece falls short, return it to the hot side of the pan for another minute and test again. Transfer the whole fajita mix to a bowl, scraping up the caramelized bits with it, and let it rest while assembling.Look for Clear juices run from the thickest strip and the thermometer reads 165°F at the center.Tip Letting the fajita mix rest a few minutes keeps the juices inside the chicken instead of pooling in the burrito.
The pan should sound like rain on a hot roof the moment the chicken lands. After about six minutes total, the chicken is browned at the edges and cooked through to 165°F, the peppers wear blackened blisters and the onions have gone soft with caramelized tips. The whole pan smells like a fajita platter: toasted cumin, paprika and charred pepper.
Phase 2: Roll the burritos
- Warm the tortillas and fillingsWipe the skillet lightly if needed and return it to medium heat. Warm the tortillas 20 to 30 seconds per side until pliable and lightly blistered, stacking them under a clean towel. In a small saucepan, warm the pinto beans over low heat and stir the queso until it is smooth and pourable. Warm fillings keep the burrito steaming hot from the first bite.Look for Tortillas puff slightly and smell toasty; the queso flows in a slow ribbon off the spoon.Tip Cold tortillas crack when rolled. If one stiffens, pass it over the flame or pan again for a few seconds.
- Pile on the fillingsLay a warm tortilla flat and spoon the queso down the center first, spreading it into a wide strip. Top with the pinto beans, then a generous line of the sizzling fajita mix, keeping everything within the middle third of the tortilla. Leave at least 2 inches clear at both ends so the roll seals cleanly and nothing spills out the sides.Look for A neat, compact line of filling with the queso glistening around the edges of the pile.Tip Queso goes on first so it acts like glue, anchoring the beans and the fajita mix to the tortilla.
- Roll tight and sealFold the two ends of the tortilla over the filling, then pull the bottom edge up and over the pile, tucking it snugly as you roll forward. Keep steady, even pressure so the burrito holds a firm cylinder shape. Set each burrito seam-side down on a plate while the griddle comes back up to medium-high for toasting.Look for A tight, even cylinder with no visible gaps and the seam resting flat against the plate.Tip A snug roll is the difference between slices that stand up and slices that slump open on the board.
Each tortilla should be warm, pliable and lightly blistered, rolling without a single crack. The filling sits in a compact line down the middle third: queso against the tortilla, then beans, then the fajita mix, with 2 clear inches at both ends.
The finished burritos are tight cylinders, seam-side down, holding their shape with no visible gaps. If a burrito sags or the ends gape open, unroll it partway, push the filling tighter to the center and roll again before toasting.
Phase 3: Toast and serve
- Toast until crispPlace the burritos seam-side down on the hot griddle and press gently with a spatula. Toast 2 to 3 minutes per side, turning with tongs, until the tortilla is deeply golden and crisp on all sides and the filling inside is steaming. Listen for a quiet crackle; that is the tortilla turning into the crunchy shell the filling deserves.Look for Deep golden-brown blotches on the tortilla and a crisp, crackling sound when pressed.Tip A light press with the spatula flattens the burrito just enough to maximize contact with the griddle.
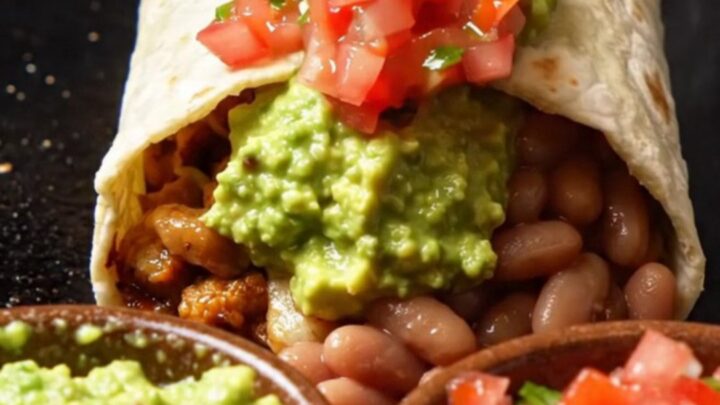
- Slice and serve with guacamole and picoMove each burrito to a cutting board and slice it in half on the diagonal with a serrated knife, showing off the steaming fajita core. Arrange on plates with the cut sides up, then top with fresh guacamole and pico de gallo. Serve immediately, while the shell is still crisp and the queso inside is molten.Look for Steam curls out of the cut core and the queso stretches as the halves are pulled apart.Tip A serrated knife saws gently through the crisp shell without crushing the filling inside.
The tortilla is deeply golden with dark blotches on every side and gives a crisp crackle under the spatula. When each burrito is cut on the diagonal, steam pours from the fajita core and the queso stretches between the halves.
The shell stays rigid enough to hold in one hand without folding. Top with cold guacamole and pico de gallo right before serving so the contrast between the hot, crisp shell and the cool toppings stays sharp until the last bite.
Common mistakes
The most common failure is a crowded pan: too much chicken at once drops the surface temperature and the strips steam gray instead of searing brown, so work in batches and keep the burner on high.
The second is over-stirring the vegetables, which prevents the blistered char that makes fajitas taste smoky; let them sit a full minute before tossing. Rolling cold or stiff tortillas leads to cracks and blowouts, so always warm them first.
How to tell it’s done
The fajita mix is done when the chicken reads 165°F (74°C) at the center of its thickest strip, the peppers carry dark blisters and the onions are translucent with browned tips; let the mix rest a few minutes off the heat. The burritos are done when the tortilla is deeply golden and crisp on all sides and the filling inside steams when cut.
- Poultry: 165°F (74°C) in the thickest part
Up next · Part 3 of 3
4 variations · storage & make-ahead · 5 answers · printable card
Tips, FAQ & printable recipe (Part 3)← Back to the ingredients (Part 1)