Dinner · Part 2 of 3: Instructions
Seared Swordfish with Burst Tomato Caper Sauce Step-by-step instructions
- Prep
- Cook
- Total
- Serves
- 4
Before you start
Before cooking, take the swordfish steaks out of the refrigerator and let them sit at room temperature for up to 30 minutes. Pat them dry with paper towels—this helps them sear properly. Grate the aged sheep milk cheese and set it aside. Slice the lemon into thin rounds.
Measure out the cherry tomatoes, capers, and kalamata olives so they're ready to add to the skillet. Have the garlic herb butter softened and ready. If using a cast iron skillet, place it over high heat to preheat while you prep the ingredients.
Ingredients at a glance (10)
- 4 swordfish steaks, about 1 inch thick
- 2 tbsp olive oil
- 2 tbsp butter
- 1 pint cherry tomatoes
- 2 tbsp capers, drained
- 1/2 cup kalamata olives, pitted
- 3 tbsp garlic herb butter, softened
- 1 lemon, thinly sliced into rounds
- 1/2 cup aged sheep milk cheese, grated (such as Manchego or Pecorino)
- 2 tbsp fresh oregano leaves
Instructions
Prep and Sear
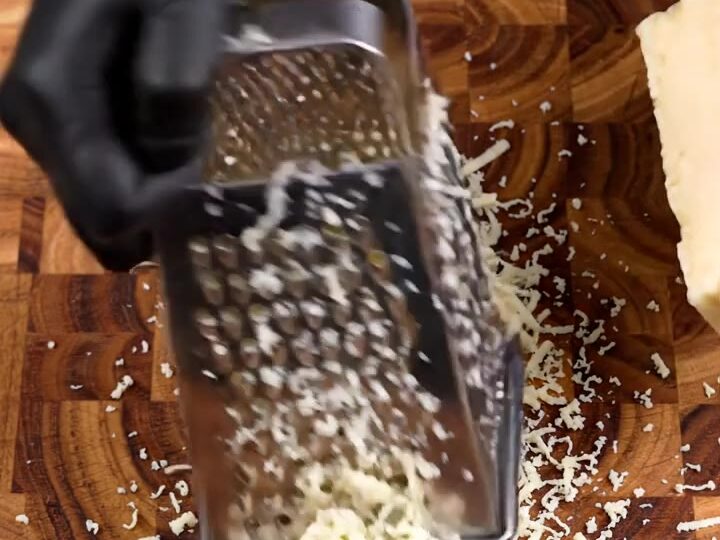
- Prep the IngredientsGrate the aged sheep milk cheese on a box grater into a fresh, fluffy pile. Slice the lemon into thin rounds. Have the cherry tomatoes, kalamata olives, and capers measured and ready.Look for The cheese is finely grated and fluffy; the lemon slices are thin and even.Tip Grate the cheese just before cooking so it stays light and doesn't clump.
- Heat the SkilletPlace a 12-inch cast iron skillet over high heat and add the olive oil and butter. Heat until the butter is melted and foamy but not browned.Look for The butter sizzles and foams; the oil shimmers.Tip A hot skillet ensures a good sear. If the butter browns too quickly, reduce the heat slightly.
At the end of this phase, the grated cheese is fluffy, the lemon slices are thin, and the swordfish has a deep golden-brown crust on both sides. The skillet is hot and the butter is foaming. The fish should release easily from the pan—if it sticks, give it another minute. The kitchen smells of seared butter and fish, and the fish is almost cooked through but still slightly translucent in the center.
Build the Sauce
- Sear the SwordfishPat the swordfish steaks dry with paper towels. Place them in the hot skillet in a single layer. Sear without moving for 3-4 minutes, until nicely browned on the bottom. Flip and sear the other side for 2-3 minutes.Look for The fish releases easily from the pan and has a deep golden-brown crust.Safe temperature 145°F (63°C) internal temperature (fish)Tip Don't overcrowd the pan—cook in batches if needed. Use tongs to flip gently.
- Add the Tomatoes, Capers, and OlivesReduce the heat to medium. Add the cherry tomatoes, capers, and kalamata olives to the skillet around the fish. Cook for 2-3 minutes, stirring occasionally, until the tomatoes begin to burst and release their juices.Look for Tomatoes are blistered and starting to collapse; the sauce is juicy and aromatic.Tip Use a wooden spoon to gently press a few tomatoes to encourage bursting.
- Finish with Garlic Herb ButterAdd the garlic herb butter to the skillet and stir it into the tomato mixture until melted and combined. Let the sauce bubble gently for 1-2 minutes, spooning it over the fish.Look for The sauce is glossy and aromatic with garlic and herbs.Tip Basting the fish with the sauce keeps it moist and adds flavor.
The cherry tomatoes have started to burst, releasing their juices into the pan. The capers and olives are scattered throughout, and the garlic herb butter has melted into a glossy, aromatic sauce.
The sauce is bubbling gently and coating the fish. The tomatoes should be soft but not completely disintegrated. The smell is intensely savory with garlic and herbs, and the sauce looks vibrant with red, green, and purple colors.
Finish and Serve
- Check Doneness and RestCheck the internal temperature of the thickest part of a swordfish steak with an instant-read thermometer; it should read at least 145°F (63°C). Remove the skillet from the heat and let the fish rest in the pan for 3 minutes.Look for The fish flakes easily with a fork and is opaque throughout.Safe temperature 145°F (63°C) internal temperature (fish)Tip Resting allows the juices to redistribute, keeping the fish moist.
- Serve with Lemon and CheeseSpoon the burst tomato olive pan sauce over the seared swordfish. Top with fresh oregano leaves. Serve immediately with the lemon rounds and grated sheep milk cheese on the side.Look for The fish is glistening with butter sauce, topped with bright oregano.Tip Let each person squeeze lemon over their portion and sprinkle cheese to taste.
The swordfish is cooked through and has rested for 3 minutes. The sauce is spooned over the top, and fresh oregano leaves add a bright green contrast. Lemon rounds and grated sheep milk cheese are arranged on the side. The fish is glistening with butter, and the sauce is thick and glossy. The dish looks colorful and inviting, with the cheese ready to be sprinkled on at the table.
Common mistakes
One common mistake is overcrowding the pan, which lowers the temperature and causes the fish to steam rather than sear. Cook in batches if needed. Another is moving the fish too soon—let it sear undisturbed for 3-4 minutes until a crust forms.
Overcooking is also easy with swordfish; use a thermometer to avoid dry, tough fish. Finally, don't skip the resting time—it helps the fish stay juicy. If the sauce seems too thick, add a splash of water or white wine to loosen it.
How to tell it’s done
The swordfish is done when it reaches an internal temperature of 145°F (63°C) in the thickest part, measured with an instant-read thermometer. The flesh should be opaque and flake easily with a fork, but still be moist and tender.
Be careful not to overcook—swordfish can become dry if left on the heat too long. The sauce should be thickened slightly and the tomatoes should have burst, releasing their juices. Let the fish rest for 3 minutes before serving to allow the juices to redistribute.
- Fish: 145°F (63°C) in the thickest part
Up next · Part 3 of 3
4 variations · storage & make-ahead · 5 answers · printable card
Tips, FAQ & printable recipe (Part 3)← Back to the ingredients (Part 1)