Dinner · Part 2 of 3: Instructions
Saucy Cheesy Tomato Pepper Pasta Skillet Step-by-step instructions
- Prep
- Cook
- Total
- Serves
- 4
Before you start
Before starting, bring a large pot of salted water to a boil and cook the pipe rigate pasta until al dente according to package directions. Drain and set aside; you can toss with a little olive oil to prevent sticking if not using immediately.
Prepare the vegetables: wash the tomatoes and peppers, quarter the onion, and peel the garlic cloves. Have the olive oil, cheese, and parsley measured and ready. The skillet should be large enough to hold all the vegetables in a single layer, and have a tight-fitting lid.
Ingredients at a glance (8)
- 1/4 cup olive oil
- 4 whole ripe tomatoes
- 2 sweet red peppers
- 1 onion, quartered
- 5 cloves garlic
- 300 g pipe rigate pasta, boiled al dente
- 1 1/2 cups shredded kaşar cheese
- 1/4 cup fresh chopped parsley
Instructions
Blister and Soften
- Blister the VegetablesHeat the olive oil in a wide skillet over medium-high heat. Add the whole tomatoes, sweet red peppers, quartered onion, and garlic cloves. Cover with a glass lid and let them steam and blister for 10 minutes, turning once halfway through, until the tomato skins are charred and the peppers are softened.Look for Tomato skins blistered and peppers tender, with a sweet aroma filling the kitchen.Tip Use a heavy-bottomed skillet for even heat and better blistering.
- Soften and Blend the Sauce BaseAfter 10 minutes, remove the lid. Using a wooden spoon, gently crush the tomatoes and peppers in the pan to release their juices. Continue cooking for 2-3 minutes until the mixture thickens slightly and becomes a chunky sauce. The onion and garlic should be soft and fragrant.Look for The sauce is bubbly and thick, with visible charred bits from the blistering.Tip Don't over-crush; leaving some texture adds rustic appeal.
After this phase, the vegetables should be blistered and softened, with the tomato skins charred in spots and the peppers tender. The onion and garlic will be fragrant and slightly caramelized. You should be able to crush the tomatoes easily with a spoon. The pan will have a rich, sweet aroma, and the oil will be tinted red from the released juices. Check that the vegetables are not burning—adjust the heat if needed.
Combine Pasta and Cheese
- Add the PastaAdd the boiled al dente pipe rigate pasta directly into the skillet with the sauce. Toss well with tongs or a wooden spoon to coat every shell with the tomato-pepper mixture. Ensure the pasta is evenly distributed and heated through.Look for Pasta shells are fully coated in the red sauce, no dry spots.Tip If the sauce seems too thick, add a splash of pasta water to loosen it.
- Melt the CheeseSprinkle the shredded kaşar cheese over the pasta and sauce. Stir continuously for 2-3 minutes until the cheese melts and creates a creamy, stretchy sauce that clings to the pasta. The cheese should be fully melted and glossy.Look for Cheese pulls into long strands as you stir, and the sauce turns silky.Tip Keep the heat medium-low so the cheese melts without clumping.
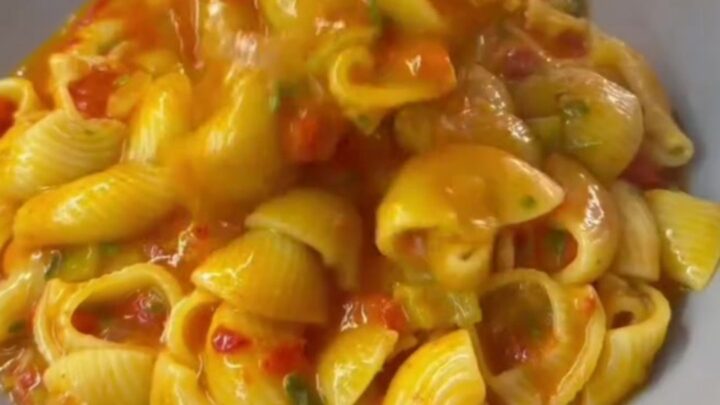
At this point, the pasta should be fully coated with the sauce, and the cheese should be melted into a creamy, stretchy mixture. The sauce will bubble gently, and you'll see long cheese strands when you lift the spoon.
The texture should be thick enough to coat the back of a spoon but still saucy. The color will be a vibrant red-orange. Make sure there are no dry pasta pieces and that the cheese is evenly distributed.
Finish and Serve
- Finish with ParsleyRemove the skillet from the heat. Stir in the fresh chopped parsley until just wilted. The parsley adds a fresh, herbal note that balances the richness of the cheese and tomatoes. Serve immediately while hot and creamy.Look for Parsley flecks are visible throughout, and the sauce is glossy and thick.Tip Reserve a bit of parsley for garnish if desired.
The final dish should look glossy and inviting, with the parsley adding fresh green flecks. The sauce should be thick and clingy, not runny. The cheese should be fully melted and smooth, with a slightly golden color from the caramelization. The pasta should be hot and steamy, ready to serve immediately. The aroma is rich and savory, with a hint of sweetness from the peppers and a fresh herbal note from the parsley.
Common mistakes
One common mistake is not letting the vegetables blister long enough; if you skip the covered cooking, they won't soften properly and may taste raw. Another is adding the cheese over high heat, which can cause it to clump or become stringy and rubbery.
Stir constantly and keep the heat moderate. Also, avoid overcooking the pasta before adding it to the sauce—it will continue to cook in the skillet, so slightly undercooking it initially is better. Finally, don't skip the parsley; it adds a necessary freshness.
How to tell it’s done
The dish is done when the pasta is heated through, the cheese is completely melted and forms a creamy sauce that coats each shell, and the sauce has thickened to a consistency that clings to the pasta without being watery.
The vegetables should be soft and easily crushed, and the overall color should be a deep red with glossy orange from the melted cheese. There should be no visible pools of oil, and the pasta should be tender but still have a slight bite.
Up next · Part 3 of 3
4 variations · storage & make-ahead · 5 answers · printable card
Tips, FAQ & printable recipe (Part 3)← Back to the ingredients (Part 1)