Desserts · Part 2 of 3: Instructions
Rich Strawberry Ding Dong Sheet Cake Step-by-step instructions
- Prep
- Cook
- Total
- Serves
- 12
Before you start
Prepare your workspace before beginning assembly by gathering a long serrated knife, an offset spatula, a piping bag with a star tip, and a flat wooden serving board. Ensure the chocolate sponge cake is completely cool to the touch, as lingering warmth will rapidly melt the cream filling.
Have the strawberry cream filling thoroughly chilled in the refrigerator, and bring the chocolate ganache to a lukewarm, glossy, pourable consistency before starting.
Ingredients at a glance (5)
- 1 recipe chocolate sponge cake, store-bought or made ahead
- 2 cups strawberry cream filling, store-bought or made ahead
- 1 cup chocolate ganache
- 1/2 cup white frosting
- 1 cup strawberry halves
Instructions
Layering the Base
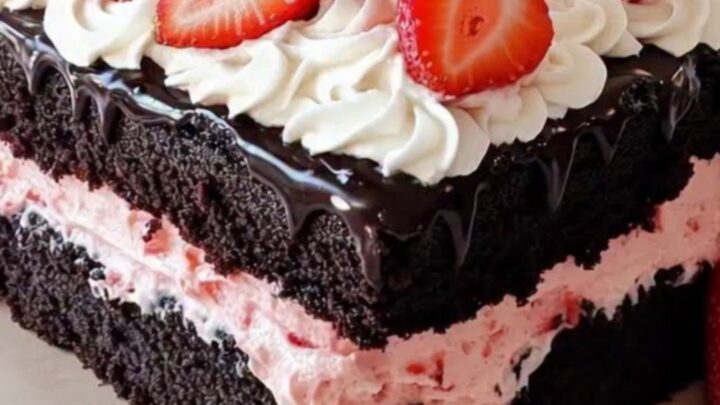
- Layer the Cake BaseSlice the chocolate sponge cake horizontally into two even flat layers using a long serrated knife. Set the bottom sponge layer directly onto a sturdy wooden board or serving platter. Spread the lush strawberry cream filling completely across the surface in a smooth, thick layer right up to the outer edges. Gently position the second chocolate sponge layer directly on top, pressing down very lightly to anchor it in place.Look for the pink filling sits level between the two dark sponge tiers without overflowingTip Keep the cream filling chilled before spreading so it maintains structural stability under the top layer.
The chocolate sponge must be sliced straight and even, resting firmly on the wooden board. The strawberry cream filling should appear thick, vibrant, and uniform, blanketing the bottom sponge completely to the borders.
The upper sponge layer must sit perfectly level on top without sliding or crushing the pink filling beneath it.
Glazing the Cake
- Apply Glossy GanacheSlowly drizzle the glossy chocolate ganache directly over the top dark sponge layer of the assembled sheet cake. Use an offset spatula to gently nudge the ganache across the entire surface so it coats the top evenly and drapes slightly toward the edges. Allow the ganache coating to settle naturally over the chocolate cake without disturbing the chilled cream layer underneath.Look for the chocolate ganache forms a smooth, glossy mirror sheen across the entire cake surfaceTip Ensure the ganache is pourable and warm to the touch, but never hot, to avoid melting the cream filling.
The chocolate ganache should coat the top surface in an unbroken, glossy sheet with no exposed cake showing through. It must look shiny, deep brown, and smooth, with clean edges that have settled neatly without overflowing excessively down the sides of the layered sheet.
Finishing and Setting
- Pipe Frosting and GarnishFill a piping bag fitted with a star tip with the white frosting. Pipe even, decorative white swirls in uniform rows across the top surface of the glossy ganache. Carefully press vibrant fresh strawberry halves directly into the center of each piped swirl. Chill the completed sheet cake thoroughly in the refrigerator for at least one hour before slicing into portions with a sharp knife.Look for frosting swirls hold their defined ridged shape and securely support the strawberry halvesTip Pat the cut fruit dry with a paper towel before placing on the frosting to prevent moisture weeping.
The white frosting swirls must stand upright with sharp, distinct ridges that support each fresh strawberry half securely. After chilling in the refrigerator, the ganache and cream should be sufficiently firm so that a test cut with a sharp blade reveals crisp, picture-perfect layers.
Common mistakes
A primary error is assembling the cake while the sponge is warm or the cream is soft, which causes the filling to squeeze out messily when placing the top tier.
Another frequent mistake is pouring ganache that is excessively hot, which melts the frosting and cream underneath. Finally, avoid cutting the cake immediately after glazing; neglecting the chilling period leads to messy, sliding layers instead of neat, bakery-style slices.
How to tell it’s done
Assembly doneness is verified visually and structurally once the cake is fully set in the refrigerator. The chocolate ganache should transition from a warm, fluid glaze to a glossy, soft-set layer that yields smoothly under gentle knife pressure without running off the cake.
The strawberry cream center should be firm and held securely between the sponge layers, showing distinct, straight pink margins when sliced into neat squares.
Up next · Part 3 of 3
2 variations · storage & make-ahead · 3 answers · printable card
Tips, FAQ & printable recipe (Part 3)← Back to the ingredients (Part 1)