Desserts · Part 2 of 3: Instructions
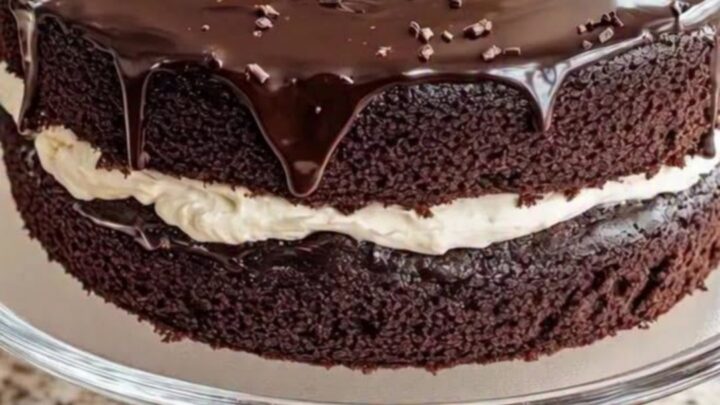
Rich Double-Layer Chocolate Cake with Cream Filling Step-by-step instructions
- Prep
- Cook
- Total
- Serves
- 8
Before you start
Before beginning the assembly, gather all components: two cooled chocolate sponge layers, fresh whipped cream, warm chocolate ganache, and decorative chocolate curls. Ensure the cake pedestal or serving plate is clean and ready.
Have an offset spatula available for smooth application of the cream and ganache. If the kitchen is warm, consider placing the sponge layers in the refrigerator briefly before starting to ensure the cream does not lose its volume upon contact with the cake.
Ingredients at a glance (4)
- 2 layers of chocolate sponge cake, store-bought or made ahead
- 1 cup whipped cream
- 1/2 cup chocolate ganache, warm
- 2 tbsp chocolate curls
Instructions
Layering the sponge
- Layering the cakePlace the first chocolate sponge cake layer on a flat surface or cake pedestal. Use an offset spatula to spread a thick, even layer of whipped cream over the top surface of the sponge. Carefully place the second sponge layer directly on top of the cream, pressing down lightly to ensure stability.Look for The cream should be spread to the very edge of the cake layer.Tip Ensure the cake layers are completely cooled before applying the cream to prevent it from melting.
The cream should be evenly distributed between the two layers, forming a distinct, fluffy white line that contrasts beautifully with the dark chocolate sponge.
Check that the top layer is perfectly aligned with the bottom layer to ensure the cake stands upright and does not lean during the ganache application phase.
Applying the ganache
- Adding the ganachePour the warm chocolate ganache over the center of the top cake layer. Using an offset spatula, gently push the ganache toward the edges of the cake, allowing it to cascade down the sides in a natural, glossy drip. Ensure the top is fully covered for a polished finish.Look for The ganache should be smooth and glossy as it drips down the sides.Tip If the ganache is too thick, warm it slightly in a microwave for a few seconds.
The ganache should cover the entire top surface, with smooth, consistent drips running down the sides. Check that there are no bare spots on the edges of the cake and that the drips are not running too far down the base, which could indicate that the ganache was slightly too thin.
Final setting
- Finishing touches and cooking eggsSprinkle the chocolate curls evenly over the top of the ganache while it is still slightly tacky to ensure they adhere. If using fresh eggs in the cream or ganache, ensure the mixture is heated to 160°F (71°C) to ensure safety. Transfer the cake to a glass pedestal if it was not assembled there already. Let the cake rest in the refrigerator for at least 30 minutes to set the ganache before slicing.Look for The ganache should look set and firm to the touch after resting.Safe temperature 160°F (71°C) internal temperature (egg dishes)Tip Use a warm, dry knife for clean, perfect slices through the layers.
The chocolate curls should be evenly distributed and firmly adhered to the ganache. The cake should appear polished and professional, with the ganache having lost its initial liquid shine to become a semi-firm, elegant coating that is ready for slicing and presentation on the glass pedestal.
Common mistakes
A common mistake is applying the ganache while it is too hot, which causes the cream filling to melt and the cake layers to become soggy.
Another frequent error is using a dull knife for slicing, which can crush the sponge and smear the cream filling. Always use a sharp, warm knife to cut through the layers, wiping the blade clean between each slice to maintain a neat appearance.
How to tell it’s done
The cake is ready to serve once the ganache has set and is no longer liquid to the touch. The structure should feel firm when gently pressed, and the layers should hold together without shifting.
If using eggs in the filling, ensure the mixture reaches 160°F (71°C) during the preparation phase. The visual cue of a set, glossy finish is the primary indicator that the cake is ready for slicing.
- Egg dishes: 160°F (71°C) in the thickest part
Up next · Part 3 of 3
2 variations · storage & make-ahead · 3 answers · printable card
Tips, FAQ & printable recipe (Part 3)← Back to the ingredients (Part 1)