Desserts · Part 2 of 3: Instructions
Rich Chocolate Biscuit Cake with Crunchy Texture Step-by-step instructions
- Prep
- Cook
- Total
- Serves
- 8
Before you start
Before beginning, ensure all ingredients are at room temperature to facilitate even melting. Prepare the workspace by lining the cake pan with parchment paper, ensuring it covers the bottom and sides completely.
Have a sharp knife ready for the final slicing stage, and ensure you have a clear space in the refrigerator where the cake can sit undisturbed for at least two hours to set properly. Accuracy in measuring the chocolate and liquid base will ensure the ganache has the correct consistency for setting.
Ingredients at a glance (4)
- 8 oz tea biscuits, broken into chunks
- 10 oz dark chocolate, chopped
- 1 cup liquid ganache base
- 1/4 cup white icing for piping
Instructions
Base Preparation
- Prepare the biscuit baseLine an 8-inch square cake pan with parchment paper. Break the tea biscuits into bite-sized pieces and place them into the prepared pan, spreading them out into an even layer.Look for The biscuits should be broken into uneven chunks, ensuring a mix of larger and smaller pieces for the best texture throughout the finished cake.Tip Avoid crushing the biscuits into crumbs, as the goal is to maintain distinct crunchy pieces that contrast with the smooth chocolate ganache.
At the end of this phase, the cake pan should be lined and the tea biscuits broken into appropriately sized chunks. Check that the biscuits are evenly distributed in the pan, as this ensures that every slice will have a consistent texture. Avoid packing the biscuits too tightly, as the ganache needs space to flow around them, binding the cake together into a cohesive structure while maintaining the signature crunch that defines this dessert.
Ganache Creation
- Create the ganachePlace the chopped dark chocolate in a heatproof bowl. In a small saucepan, warm the liquid ganache base over medium heat. Pour the warm liquid over the chocolate and let it sit for two minutes before whisking until the mixture is completely smooth, glossy, and uniform.Look for The ganache is ready when it is completely emulsified, thick, and has a mirror-like shine without any visible streaks of unmelted chocolate.Tip Ensure the liquid is warm but not boiling vigorously, as excessive heat can cause the chocolate to separate or become grainy.
The ganache should be completely smooth, glossy, and thick, with no lumps of unmelted chocolate remaining. It should look like a dark, liquid mirror. If any small lumps are visible, continue whisking gently until they dissolve. The temperature of the mixture should be warm to the touch, ensuring it flows easily over the biscuits, filling the gaps without needing excessive manipulation, which helps maintain the integrity of the biscuit pieces.
Final Assembly
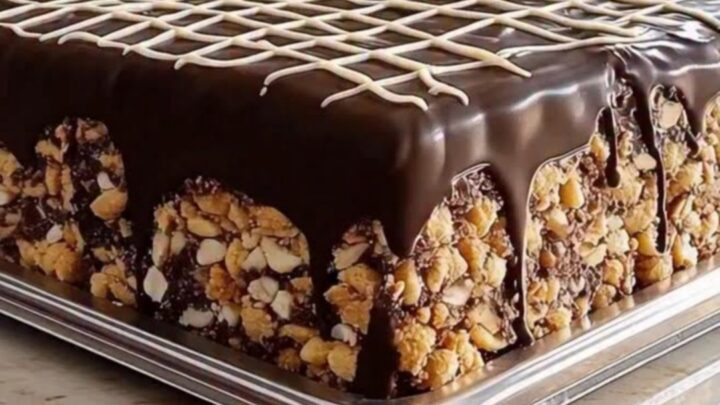
- Assemble and decoratePour the prepared chocolate ganache over the broken biscuits in the pan, using a spatula to ensure all crevices are filled. Smooth the surface. Once the cake has set slightly, pipe the white icing over the top in a lattice pattern. Refrigerate until firm, then slice with a sharp knife.Look for The lattice pattern should be piped while the ganache is firm enough to hold the lines but still tacky enough to adhere to the surface.Tip For clean slices, dip the knife into hot water and wipe it dry between each cut to ensure the ganache does not drag or crack.
Once assembled, the ganache should cover the biscuits, and the surface should be smooth. After piping the lattice pattern, the cake must look uniform and clean. Check that the ganache has reached the edges of the pan evenly.
Once refrigerated, the cake should be firm and stable, ready to be lifted out using the parchment paper handles for slicing. Ensure the final product is chilled thoroughly before attempting the first cut to maintain the structural integrity.
Common mistakes
A common mistake is using liquid that is either too cold or boiled too aggressively, which can cause the ganache to split or become grainy. Always monitor the liquid as it warms and pour it over the chocolate as soon as it reaches the right temperature.
Another error is failing to let the cake set for the full time; rushing the process will result in a cake that crumbles or smears when sliced. Patience during the chilling phase is essential for a clean, professional finish.
How to tell it’s done
The cake is considered done when it is firm to the touch and has chilled for at least two hours. The ganache should feel solid and stable, not tacky or soft. When sliced with a hot knife, the edges should be clean and sharp, revealing the distinct layers of biscuits and chocolate.
If the cake feels soft or the ganache appears runny, return it to the refrigerator for an additional thirty minutes to ensure it reaches the correct density before attempting to cut.
Up next · Part 3 of 3
2 variations · storage & make-ahead · 3 answers · printable card
Tips, FAQ & printable recipe (Part 3)← Back to the ingredients (Part 1)