Desserts · Part 2 of 3: Instructions
Raspberry Pistachio Ruby Chocolate Bark Step-by-step instructions
- Prep
- Cook
- Total
- Serves
- 12
Before you start
Before starting, gather all your ingredients and equipment. Chop the pistachios and crush the raspberries. Grate the ruby chocolate if you plan to use the curls.
Line a metal baking tray with parchment paper. Have a heatproof bowl and a saucepan ready for melting. Ensure your work surface is clean and dry.
Ingredients at a glance (5)
- 12 oz ruby chocolate, chopped
- 2 oz white chocolate, chopped
- 1/2 cup shelled pistachios, chopped
- 1/4 cup freeze-dried raspberries, crushed
- 2 tbsp dried edible rose petals
Instructions
Prep and Melt
- Prepare the ToppingsChop the shelled pistachios into small pieces with a sharp chef's knife. Crush the freeze-dried raspberries into small bits with your fingers or the flat side of the knife. Lightly chop the dried rose petals if they are large. Set all the toppings aside in separate small bowls.Look for Pistachios are roughly chopped, raspberries are crushed into small pieces, and rose petals are ready.Tip Keep the pistachio pieces fairly uniform so they toast evenly and adhere well to the chocolate.
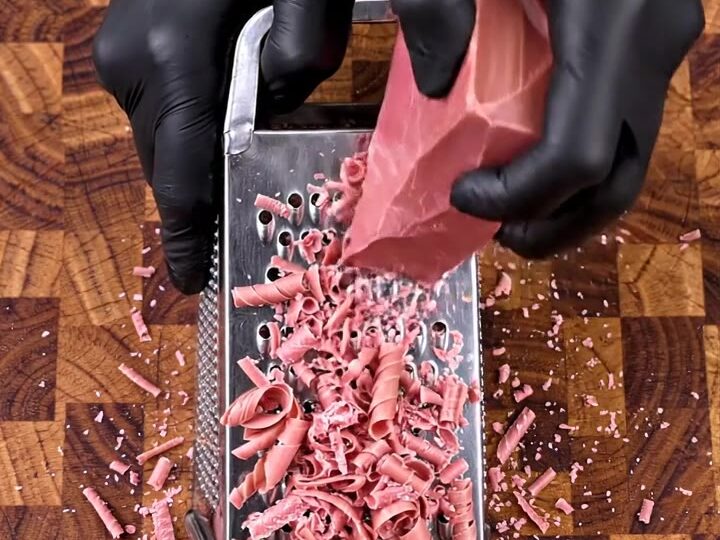
- Grate the Ruby ChocolateGrate the solid block of ruby chocolate on the large holes of a box grater into a fresh pile of pink curls. This step is optional but adds a lovely texture. If you prefer, simply chop the chocolate finely with a knife.Look for You have a pile of fine pink chocolate curls.Tip Chill the chocolate block for 10 minutes before grating to prevent it from melting.
You should have your toppings chopped, the chocolate grated (if using), and both chocolates melted and smooth. The ruby chocolate should be glossy and fluid, and the white chocolate should be pourable. Everything should be ready to assemble.
Assemble and Top
- Melt the Ruby ChocolatePlace the chopped ruby chocolate in a heatproof bowl set over a saucepan of barely simmering water. Stir gently until completely melted and smooth. Remove from heat and let cool slightly for 2 minutes.Look for The chocolate is glossy and smooth with no lumps.Tip Do not let any water splash into the chocolate, as it will seize.
- Melt the White ChocolateIn a separate small heatproof bowl, melt the white chocolate in the microwave in 15-second bursts, stirring between each, or over the same simmering water. Stir until smooth.Look for The white chocolate is fluid and pourable.Tip If using a microwave, use low power to avoid scorching.
- Spread the Ruby ChocolateLine a metal baking tray with parchment paper. Pour the melted ruby chocolate onto the tray and spread it evenly with a rubber spatula to about 1/4-inch thickness. Tap the tray lightly on the counter to release any air bubbles.Look for The chocolate layer is even and smooth.Tip Use an offset spatula for a perfectly even layer.
- Swirl the White ChocolateDrizzle the melted white chocolate in ribbons across the ruby chocolate. Use a knife or skewer to swirl the white chocolate gently into the pink base, creating a marbled pattern.Look for The surface shows pink and white swirls.Tip Do not over-swirl or the colors will blend into one.
- Scatter the ToppingsImmediately scatter the chopped pistachios, crushed raspberries, and rose petals evenly over the top. Gently press them into the chocolate with your fingers or a spatula so they stick.Look for The toppings cover the surface in an even layer.Tip Work quickly before the chocolate sets.
The ruby chocolate is spread evenly on the tray, the white chocolate is swirled in, and the toppings are scattered over the top. The surface should look marbled and colorful, with the pistachios, raspberries, and rose petals evenly distributed.
Chill and Serve
- Chill Until SetPlace the tray in the refrigerator for at least 30 minutes, or until the chocolate is completely firm and set.Look for The chocolate is hard and no longer sticky to the touch.Tip Chilling speeds up setting, but room temperature also works if you are patient.
- Slice into BarsOnce set, lift the chocolate slab from the tray using the parchment paper. Place on a cutting board and use a sharp chef's knife to slice into thick bars, about 2 inches wide.Look for Clean, even bars with crisp edges.Tip Cut with a sawing motion to avoid cracking the chocolate.
- Snap and ServeLift one bar and snap it cleanly in half to reveal the layered cross-section. Serve immediately or store in an airtight container.Look for The bark breaks with a clean snap, showing the crunchy topping against the smooth chocolate.Tip For a dramatic presentation, break into rustic shards instead of cutting.
The bark is fully set and firm. It lifts easily from the tray, and when sliced or snapped, it breaks with a clean, satisfying snap. The cross-section shows a smooth chocolate base topped with crunchy, colorful bits.
Common mistakes
One common mistake is overheating the chocolate, which can cause it to seize or become dull. Always melt gently and stir frequently.
Another is adding the toppings too late, after the chocolate has started to set, which prevents them from sticking.
Work quickly and press the toppings in gently. Finally, cutting the bark too soon can cause it to crack; make sure it is fully chilled.
How to tell it’s done
The bark is done when the chocolate is completely firm and holds its shape when you lift it. It should snap cleanly when broken, and the toppings should be firmly embedded.
If you press the surface, it should not leave an indentation. Once set, the bark will have a shiny, smooth appearance with a crisp texture.
Up next · Part 3 of 3
4 variations · storage & make-ahead · 5 answers · printable card
Tips, FAQ & printable recipe (Part 3)← Back to the ingredients (Part 1)