Desserts · Part 2 of 3: Instructions
Pistachio Rose Cardamom Milk Chocolate Bars for an Easy Make-Ahead Treat Step-by-step instructions
- Prep
- Cook
- Total
- Serves
- 12
Before you start
Gather everything before you melt the chocolate, because the working window is short once it is fluid. Line the rectangular baking tray with parchment paper and let the edges overhang so the set slab can be lifted out in one piece. Chill the block of milk chocolate for about 10 minutes so it grates cleanly without smearing, and set the grater over a bowl.
Chop the shelled pistachios on a wooden cutting board, keeping a small handful for decoration. Fill the squeeze bottle with the green pistachio paste and check that it flows without running. Put the dried rose petals and the reserved chopped pistachios in small bowls within reach of the tray, so you can scatter them the moment the chocolate is spread.
Ingredients at a glance (4)
- 12 oz milk chocolate, finely grated or melted
- 1 cup shelled pistachios, roughly chopped, plus extra for decorating
- 1/3 cup green pistachio paste, in a squeeze bottle
- dried rose petals, for decorating (optional)
Instructions
Prepare the chocolate and tray
- Chop the pistachiosPlace the shelled pistachios on a wooden cutting board. Chop them with a long chef's knife into rough pieces, with some fine bits and some larger chunks, and set aside a small handful for decorating.Look for Pieces should range from fine grit to small chunks with no whole nuts left.Tip Rock the knife over the nuts instead of pressing straight down to get an even chop.
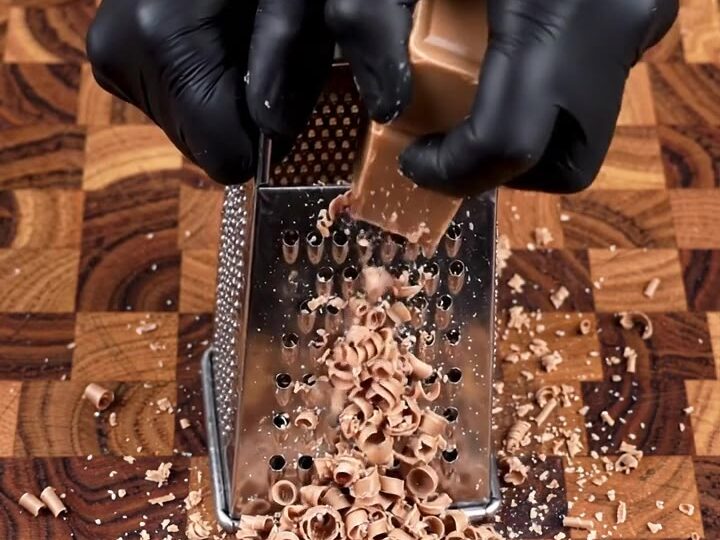
- Grate the milk chocolateHold the block of milk chocolate against the coarse side of a box grater and grate it so it falls as fine curls and shavings. Let the shavings collect in a bowl while you prepare the tray.Look for Fine curls and shavings fall loosely into the bowl.Tip Chill the chocolate for 10 minutes first so it grates cleanly without smearing.
- Line the baking trayCover the rectangular baking tray with parchment paper, pressing it into the corners and letting the edges overhang so the set slab can be lifted out later.Look for The parchment lies flat with no creases on the base.Tip A dab of melted chocolate under the corners keeps the paper from sliding.
The chocolate is grated into fine curls and shavings and the tray is lined with flat parchment. Check that the squeeze bottle moves freely and the bowls of nuts and petals are within reach before you melt anything. The chocolate should be ready to melt in small bursts so it stays glossy and never scorches, and the tray should sit level on the counter so the layer spreads evenly across the parchment.
Spread and swirl the chocolate
- Melt and spread the chocolateMelt the grated milk chocolate in a microwave-safe bowl in 20-second bursts, stirring between each, or over barely simmering water. Pour it onto the parchment and spread it evenly across the tray with a heatproof spatula.Look for The chocolate is smooth, glossy and fluid enough to spread evenly.Tip Stop heating when a few pieces remain unmelted and stir them in off the heat.
- Pipe the pistachio paste swirlsWhile the chocolate is still glossy and fluid, squeeze the green pistachio paste from the squeeze bottle in swirling lines across the surface. Drag a skewer or the tip of a knife gently through the lines to blend them slightly.Look for Green swirls stand out clearly against the glossy chocolate.Tip Work quickly, because the chocolate starts to thicken and the swirls will drag.
- Scatter the decorationsSprinkle the chopped pistachios over the wet chocolate, then add the scattered pistachio pieces and dried rose petals. Press them lightly so they stick as the chocolate sets.Look for Nuts and petals sit evenly across the surface, with no bare patches.Tip Add the petals last so their color stays bright and visible.
The melted milk chocolate is smooth, glossy and fluid across the whole tray, with no lumps or streaks. The green pistachio swirls should sit clearly on top, their lines distinct and not yet blended into a green haze.
Before you move on, check that the chocolate still looks wet and shiny in every corner, because that is the signal that the decorations will stick. If it has begun to thicken, work faster and skip any extra blending of the swirls.
Scatter and set the slab
- Let the chocolate setLeave the tray at cool room temperature, or in the refrigerator for a faster set, until the chocolate is firm all the way through with no soft spots when pressed.Look for The surface is matte and firm, and the slab does not dent under light pressure.Tip Refrigerate for about 1 hour if your kitchen is warm, then let the slab rest 10 minutes before cutting.
- Lift and break into barsLift the parchment overhang to remove the set slab from the tray. Break it into rectangular bars along natural lines, or cut it with a long knife for even pieces, and serve.Look for The slab lifts cleanly and snaps into pieces along the cut lines.Tip Warm the knife under hot water and dry it before each cut for neat edges.
The surface is covered with chopped pistachios, scattered pistachio pieces and rose petals, evenly placed with no bare patches. Once the tray is left to set, the chocolate should turn matte and firm all the way through, with no soft spots when pressed gently with a fingertip. Check the center of the slab in particular, since thicker spots take longer to set. When the slab feels firm and cool, it is ready to be lifted and broken into bars.
Common mistakes
The most common mistake is working with chocolate that has cooled too far. Once it stops being glossy, the pistachio paste sits on top in lumps instead of blending into clean swirls, and the chopped nuts and petals do not stick. Melt the chocolate in short bursts and stir well instead of blasting it, because overheated chocolate can seize or turn dull.
Another mistake is piping too much pistachio paste at once, which can make the slab greasy and soft in spots. Keep the swirls light and spaced apart. Cutting the slab too early is also a problem: if the chocolate is still soft, it smears and the decorations slide off. Let it set fully, then lift it carefully. Finally, do not skip the parchment, because chocolate stuck to the tray is difficult to remove without breaking the bars.
How to tell it’s done
The bars are done when the chocolate is set all the way through. Press the center of the slab gently with a fingertip: it should feel firm and cool, with no tackiness or soft spots, and the surface should look matte rather than wet. A knife cut should produce a clean edge without dragging.
The pistachio swirls should still be visible and bright green, and the rose petals should sit firmly on top. If any area gives under pressure or feels soft, return the tray to the refrigerator for another 20 to 30 minutes and check again before breaking it into bars. The bars are ready to serve at cool room temperature once they are firm and easy to lift.
Up next · Part 3 of 3
4 variations · storage & make-ahead · 5 answers · printable card
Tips, FAQ & printable recipe (Part 3)← Back to the ingredients (Part 1)