Desserts · Part 1 of 3: Ingredients
Pistachio Rose Cardamom Milk Chocolate Bars for an Easy Make-Ahead Treat
- Prep
- Cook
- Total
- Serves
- 12
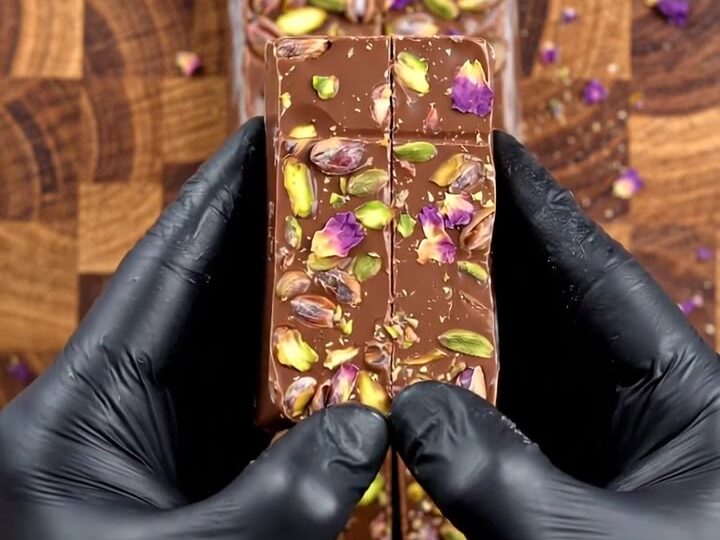
Milk chocolate, green pistachio swirls and crunchy chopped nuts set into one glossy slab. Break it into bars for a no-bake dessert with a fragrant rose finish, ready to serve once the chocolate is firm and cool to the touch.
These bars start from a simple idea: melt milk chocolate, spread it across a lined tray, and decorate it while it is still fluid. The decoration is what makes them look special. Green pistachio paste is squeezed in swirls across the surface, chopped pistachios and rose petals are scattered over the top, and the whole slab sets firm before you break it into rectangles.
You need only a few ingredients and no oven, so the work is mostly chopping, grating and waiting. The result has a glossy milk chocolate base, a nutty green marbling and pink-purple petals on top, which makes them a practical choice for a dessert plate, a gift box or a platter at a gathering. Plan for about two hours from start to finish, most of it spent setting.
Ingredients
Chocolate base
- 12 oz milk chocolate, finely grated or melted
Pistachios
- 1 cup shelled pistachios, roughly chopped, plus extra for decorating
- 1/3 cup green pistachio paste, in a squeeze bottle
Decoration
- dried rose petals, for decorating (optional)
Why this recipe works
The method depends on timing. Chocolate that is melted and glossy accepts the pistachio paste and the garnish without sinking into the surface, and as it cools it locks everything in place.
Working in that short window is what keeps the swirls crisp and the petals on top instead of sliding into the chocolate. Grating the milk chocolate before melting also helps, because small shavings melt quickly and evenly, which avoids scorching and gives a smooth, shiny base.
Setting at a cool room temperature or in the refrigerator is what gives the bars their clean snap. Chocolate that is fully firm breaks along straight lines and keeps its gloss, while chocolate that is still soft smears under the knife. Because the slab is one thin layer, it sets quickly, and once it is firm it can be lifted off the parchment in one piece and cut into even bars without crumbling the decorations.
Notes and substitutions
Milk chocolate is the base the recipe is built on, and it gives these bars their sweet, creamy flavor. Choose a good-quality bar with a high cocoa butter content, since it melts more smoothly and sets with a glossier finish.
Chocolate chips are formulated to hold their shape when baked and may thicken less smoothly, so a bar or block is the better choice here. Green pistachio paste is the swirl ingredient and should be thick enough to pipe from a squeeze bottle without running. If your paste is stiff, warm the bottle briefly in your hands before piping.
A long, sharp chef's knife and a wooden cutting board make chopping the pistachios easy and keep the pieces even. A box grater with a coarse side gives the fine curls and shavings that melt quickly. A rectangular tray with parchment paper is essential, because the paper lets the set slab lift out cleanly.
A squeeze bottle gives you control over the swirls, and a heatproof spatula helps spread the chocolate evenly. Dried rose petals are an optional finish, and you can leave them off if you prefer a simpler look.
- milk chocolate: dark chocolate, though the bars will taste less sweet and the swirls will look more contrasting
- green pistachio paste: smooth almond butter tinted with a little green food coloring
- dried rose petals: finely chopped dried raspberries or freeze-dried strawberry pieces for color
Equipment
- Long chef's knife
- Wooden cutting board
- Box grater
- Rectangular baking tray, about 9 by 13 inches
- Parchment paper
- Squeeze bottle
- Microwave-safe bowl or double boiler
- Heatproof spatula
Up next · Part 2 of 3
8 steps · 10 min of cooking · what to look for at each stage
Step-by-step instructions (Part 2)