Dinner · Part 2 of 3: Instructions
Pepperoncini Ranch Chuck Roast: 10-Minute Crockpot Dinner Step-by-step instructions
- Prep
- Cook
- Total
- Serves
- 8
Before you start
Before you start, make sure your slow cooker is clean and dry. Pat the chuck roast dry with paper towels—this helps the seasonings adhere. Measure out the gravy and have the butter ready.
If you're using store-bought brown gravy, warm it slightly so it pours easily. Set out the pepperoncini and the seasoning packets. No need to chop anything; this is a true dump-and-go recipe. If you want to toast the buns later, have them ready on the counter.
Ingredients at a glance (7)
- 3 1/2 lb beef chuck roast
- 1 oz dry ranch mix
- 1 oz au jus gravy mix
- 10 whole pepperoncini peppers
- 1 cup rich brown gravy
- 2 tbsp unsalted butter
- 8 toasted brioche slider buns
Instructions
Layer and Season
- Layer the RoastPlace the beef chuck roast in the center of the slow cooker. Sprinkle the dry ranch mix and au jus gravy mix evenly over the top of the roast. Scatter the whole pepperoncini peppers over and around the roast.Look for The roast is fully coated with seasoning and peppers are distributed.Tip No need to trim fat—it adds flavor and moisture during slow cooking.
- Add Gravy and ButterPour the rich brown gravy over the roast and seasonings. Dot the top with the unsalted butter. Do not stir—layering helps the flavors meld as it cooks.Look for The roast is covered with gravy and butter pats are visible.Tip Use a high-quality store-bought gravy or homemade bone broth gravy.
At this stage, you'll see the raw roast in the center of the slow cooker, dusted with the ranch and au jus powders. The pepperoncini are scattered around, and the gravy and butter are on top. The scene looks rustic and promising—the seasonings are dry, but you can already smell the tangy herbs. Before moving on, make sure the roast is evenly coated and the butter is distributed.
Slow Cook and Rest
- Slow Cook Until TenderCover the slow cooker and cook on low for 8 to 10 hours, or on high for 4 to 5 hours, until the roast is fork-tender and easily shreds. The internal temperature should reach at least 145°F (63°C) for food safety, but for shredding, cook until it exceeds 200°F (93°C). Let it rest for 3 minutes before slicing.Look for The meat pulls apart easily with a fork and the gravy is bubbling.Safe temperature 145°F (63°C) internal temperature (steaks, chops and roasts)Tip Low and slow yields the most tender results—resist the urge to peek too often.
- Rest the MeatTurn off the slow cooker. Remove the roast to a cutting board and let it rest for at least 10 minutes. This allows the juices to redistribute, making the meat more tender.Look for The meat rests on the board, steaming slightly.Tip Resting is essential—don't skip it or the meat may dry out.
After hours of cooking, the slow cooker is filled with bubbling, fragrant gravy. The meat is visibly tender, and you can see it starting to fall apart at the edges. The peppers have softened and released their brine into the sauce.
When you poke the roast with a fork, it yields easily. The kitchen smells of savory beef and tangy pepperoncini. Before shredding, let the roast rest to keep it juicy.
Shred and Serve
- Shred the BeefUsing two forks, shred the beef into bite-sized pieces. Return the shredded meat to the slow cooker with the gravy and peppers, stirring gently to coat.Look for The beef is shredded and mixed into the glossy gravy.Tip For chunkier pieces, shred less; for finer, use a fork to pull apart more.
- Toast the BunsWhile the beef rests, toast the brioche slider buns in a toaster or under a broiler until golden brown. Set them aside on a plate.Look for The buns are lightly toasted and warm.Tip Toasting prevents sogginess and adds a pleasant crunch.
- Serve and EnjoySpoon the shredded beef and peppers onto the toasted buns or onto a plate. Drizzle with extra gravy from the slow cooker. Serve hot.Look for The beef is piled high on the buns, glistening with gravy.Tip Add a few pepperoncini on top for extra tang.
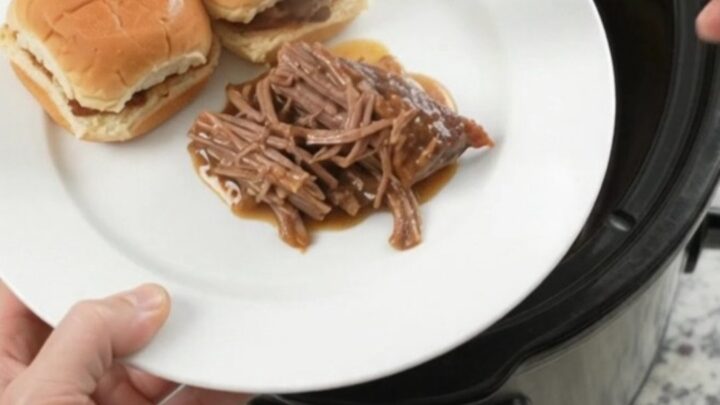
The shredded beef is glossy and coated in the rich mahogany gravy, with softened pepperoncini throughout. The toasted brioche buns are golden and ready. When you spoon the beef onto the buns, the gravy soaks into the bread, and the meat is tender enough to melt in your mouth. The dish is ready to serve, and the aroma is irresistible.
Common mistakes
One common mistake is lifting the lid too often during cooking, which lets heat escape and extends the cooking time. Resist the urge to peek. Another is using a lean cut like round roast—it will dry out.
Stick with chuck. Also, don't skip the resting step; shredding too soon can make the meat dry. Finally, don't overcrowd the slow cooker; if the roast is too large, cut it in half to ensure even cooking.
How to tell it’s done
The roast is done when it's fork-tender—insert a fork into the thickest part, and it should twist easily with no resistance.
For safety, the internal temperature must reach at least 145°F (63°C), but for shredding, you'll want it to exceed 200°F (93°C), which breaks down all the collagen. The meat should pull apart into long, juicy strands. If it still feels tough, cook for another 30 to 60 minutes and check again.
- Steaks, chops and roasts: 145°F (63°C) in the thickest part, then a 3-minute rest
Up next · Part 3 of 3
4 variations · storage & make-ahead · 5 answers · printable card
Tips, FAQ & printable recipe (Part 3)← Back to the ingredients (Part 1)