Dinner · Part 2 of 3: Instructions
One-Pan Coconut Curry Halibut with Crisp Snap Peas Step-by-step instructions
- Prep
- Cook
- Total
- Serves
- 4
Before you start
Before starting, gather all ingredients and equipment. Trim the sugar snap peas and slice the red chilies. Grate the galangal and fresh coconut using a box grater. Pat the halibut fillets dry and season with salt.
Heat a large cast iron skillet over medium-high heat. Have the curry sauce, lime, and herbs ready to add at the end. This is a quick-cooking dish, so having everything prepped and within reach is essential.
Ingredients at a glance (11)
- 4 halibut fillets (6 oz each), skinless
- 8 oz sugar snap peas, trimmed
- 2 red chilies, thinly sliced (seeded if desired)
- 2 tbsp fresh galangal (or ginger), grated
- 1/2 cup fresh coconut block, grated
- 1 1/2 cups Thai coconut red curry sauce
- 1 lime, juiced
- 1/2 cup Thai basil leaves
- 1/2 cup cilantro leaves
- 2 tbsp neutral oil (such as grapeseed or canola)
- Kosher salt, to taste
Instructions
Prep and Sear
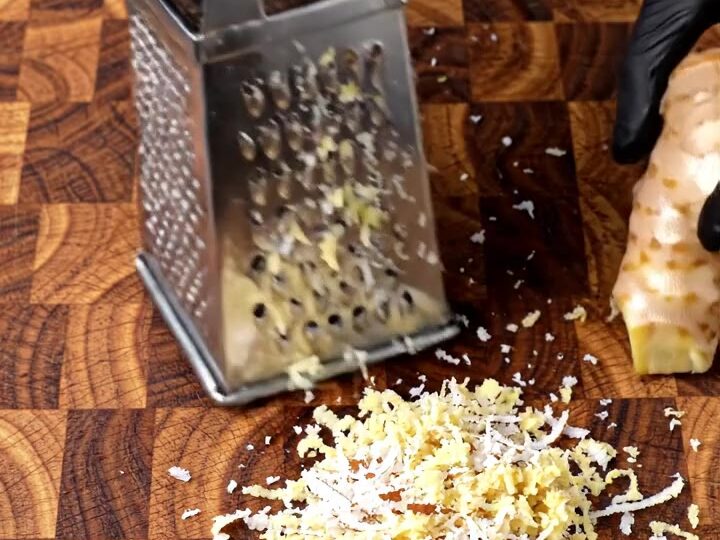
- Prep the Vegetables and AromaticsTrim the sugar snap peas by snapping off the stem end and pulling the string along the seam. Thinly slice the red chilies, removing the seeds if less heat is desired. Grate the galangal and the fresh coconut block on the large holes of a box grater into a small bowl; set aside.Look for Snap peas are trimmed and strings removed; chilies and aromatics are prepped and ready.Tip Wear gloves when handling chilies, and avoid touching the eyes.
- Season the HalibutPat the halibut fillets dry with paper towels. Season both sides generously with kosher salt. Let sit at room temperature for 10 minutes while the skillet heats.Look for The fillets are dry and lightly seasoned; they will sear better when not wet.Tip Drying the fish well is key to a golden crust.
The snap peas are trimmed and the chilies sliced. The galangal and coconut are grated into a fragrant pile. The halibut is seasoned and ready. The skillet is hot, and the oil shimmers.
The fish goes in with a satisfying sizzle and sears undisturbed until a golden crust forms on the first side. The aroma is toasty and inviting.
Simmer in Curry
- Sear the HalibutHeat a large cast iron skillet over medium-high heat until very hot. Add the neutral oil and swirl to coat. Carefully place the halibut fillets in the skillet, presentation side down. Sear without moving for 3–4 minutes, until the underside is golden and releases easily. Flip and sear for 1 minute more.Look for The fish is golden and crusty on one side; it releases easily from the pan.Safe temperature 145°F (63°C) internal temperature (fish)Tip Resist moving the fish; let the crust form before flipping.
- Add the Curry Sauce and Snap PeasPour the Thai coconut red curry sauce around the fish, not directly over the crust. Add the trimmed snap peas to the sauce in a single layer. Bring to a gentle simmer. Spoon some sauce over the fish, then cover and cook for 3–4 minutes, until the fish is opaque and flakes easily and the snap peas are crisp-tender.Look for The sauce is gently bubbling; the fish is opaque and the peas are bright green.Safe temperature 145°F (63°C) internal temperature (fish)Tip Keep the heat low so the sauce doesn't break and the fish stays moist.
The curry sauce is poured around the fish, and the snap peas are nestled in. The sauce comes to a gentle simmer, and the fish is spooned with sauce. The kitchen fills with the scent of coconut and red curry. The fish becomes opaque and flakes easily, while the peas turn bright green. The sauce is glossy and slightly thickened.
Finish and Serve
- Finish with Lime and HerbsRemove the skillet from the heat. Squeeze the fresh lime juice over the fish and sauce. Scatter the Thai basil and cilantro leaves over the top. Let rest for 2 minutes to allow the flavors to meld.Look for The herbs are bright and fragrant; the sauce is glossy and aromatic.Tip Add herbs off the heat to keep their freshness.
- Serve the CurryUsing a spatula, lift each halibut fillet onto a plate or shallow bowl. Spoon the curry sauce and snap peas over the fish. Serve hot, with additional lime wedges if desired.Look for The fillets are intact and glistening; the sauce coats the fish and peas.Tip Serve with jasmine rice to soak up the sauce.
The lime juice is squeezed over the fish, and the Thai basil and cilantro are scattered on top. The herbs brighten the dish with color and fragrance. The sauce is vibrant and aromatic. The fish is lifted onto plates, and the sauce and peas are spooned over. Each bite is a balance of rich, spicy, and fresh flavors.
Common mistakes
Overcooking the halibut is the most common mistake; watch the time carefully and check for flakiness. Moving the fish too soon during searing will cause it to stick; wait until it releases easily.
Adding the sauce directly over the fish can wash away the crust; pour it around the fish instead. Using low-fat coconut milk can make the sauce thin; choose full-fat for a richer texture.
How to tell it’s done
The halibut is done when it flakes easily with a fork and is opaque throughout. The internal temperature should reach 145°F (63°C) when checked with an instant-read thermometer.
The snap peas should be bright green and crisp-tender. The sauce should be slightly thickened and glossy. Let the fish rest for 2 minutes before serving to allow the juices to redistribute.
- Fish: 145°F (63°C) in the thickest part
Up next · Part 3 of 3
4 variations · storage & make-ahead · 5 answers · printable card
Tips, FAQ & printable recipe (Part 3)← Back to the ingredients (Part 1)