Desserts · Part 2 of 3: Instructions
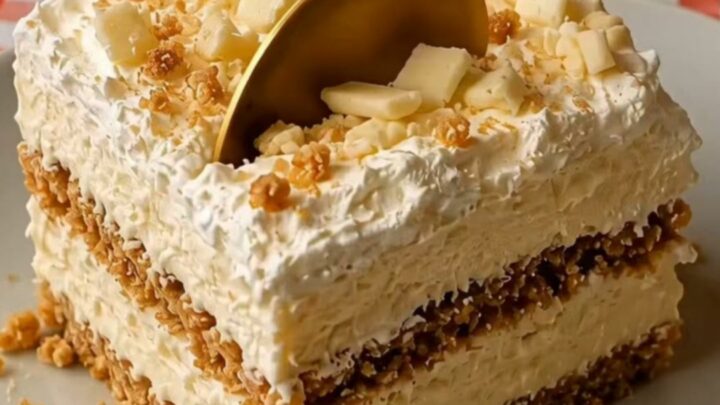
No-Bake White Chocolate Biscuit Cream Cake Step-by-step instructions
- Prep
- Cook
- Total
- Serves
- 8
Before you start
Before beginning, ensure all ingredients are properly measured and ready. The white chocolate should be melted and allowed to cool to room temperature; if it is too hot, it will deflate the whipped cream.
The heavy cream must be very cold, straight from the refrigerator, to achieve the necessary volume during whipping. Have the glass dish clean and dry on your workspace.
Prepare the biscuits by placing them in a sealed bag and crushing them with a rolling pin until they reach the desired coarse, chunky consistency.
Ingredients at a glance (4)
- 2 cups heavy cream, chilled
- 8 oz white chocolate, melted
- 10 oz biscuits, crushed
- 1 oz white chocolate, shaved
Instructions
Whipping the Cream Base
- Prepare the White Chocolate CreamIn a large mixing bowl, whip the chilled heavy cream until soft peaks form. Gently fold in the melted white chocolate until the mixture is completely smooth and silky. Be careful not to overmix, as this can cause the cream to separate or become grainy.Look for The mixture should be thick, smooth, and hold its shape well.Tip Ensure the melted white chocolate has cooled slightly to room temperature before folding it into the whipped cream to prevent melting the cream.
At the end of this phase, the cream should be thick and airy with soft, stable peaks. The mixture should look glossy from the white chocolate and feel light when lifted with a spatula. Check that no streaks of unmixed chocolate remain at the bottom of the bowl before moving to the assembly stage.
Layering the Dish
- Assemble the LayersSpread a thin layer of the white chocolate cream at the bottom of an 8-inch glass dish. Sprinkle a layer of crushed biscuits over the cream. Repeat these layers until all ingredients are used, finishing with a generous layer of the cream on top.Look for The dish should be evenly layered with clear distinctions between the cream and biscuit sections.Tip Press the biscuit crumbs down lightly with the back of a spoon to ensure a compact structure that slices cleanly later.
The dish should now feature distinct, alternating bands of white cream and biscuit crumbs. The top layer should be a smooth, even spread of the remaining cream. Ensure the edges are clean and the layers are compacted enough to avoid large air pockets that could cause the cake to crumble when sliced.
Final Chilling and Garnish
- Chill and GarnishPlace the glass dish in the refrigerator for at least 2 hours to allow the cream to set and the biscuits to soften slightly. Once set, use a vegetable peeler to shave additional white chocolate over the top of the cake before serving.Look for The surface should feel firm to the touch and the cream should not slide when the dish is tilted.Tip Serving chilled directly from the refrigerator ensures the best texture for the cream layers.
After chilling, the dessert should be completely set and cold. The surface should feel firm, and the biscuit layers should have softened just enough to be tender. The final garnish of white chocolate shavings should be applied evenly across the top to provide a delicate, elegant finish before presentation.
Common mistakes
A common mistake is incorporating the melted white chocolate while it is still hot, which causes the whipped cream to lose its air and turn runny. Another error is over-whipping the cream, which can lead to a grainy texture or even the start of butter formation.
Ensure the biscuits are not crushed into a fine powder, as this will result in a dense, paste-like layer rather than a textural contrast. Finally, ensure the chilling time is respected, as rushing this step will make the cake difficult to slice cleanly.
How to tell it’s done
The cake is considered done once it has been chilled for at least two hours. The cream layer should feel firm and set to the touch, showing no signs of liquid movement when the dish is gently nudged.
The white chocolate shavings on top should be added immediately before serving to maintain their crisp, fresh appearance. When sliced, the layers should remain distinct and stable, with the biscuit crumbs holding their shape against the cream. No internal temperature is needed as no raw proteins are used.
Up next · Part 3 of 3
2 variations · storage & make-ahead · 3 answers · printable card
Tips, FAQ & printable recipe (Part 3)← Back to the ingredients (Part 1)