Desserts · Part 2 of 3: Instructions
No-Bake Pineapple Cream Cheesecake with a Crisp Cookie Crust Step-by-step instructions
- Prep
- Cook
- Total
- Serves
- 10
Before you start
Set the filling up for success before the first beaters switch on. Take the cream cheese out of the refrigerator 30 to 45 minutes ahead so it softens to room temperature; cold cream cheese is the main cause of lumpy filling. Drain the crushed pineapple in a fine sieve, pressing gently with a spoon, for at least 20 minutes — overnight in the refrigerator is even better. Melt the butter and let it sit a moment so it pours hot but does not spatter.
Ingredients at a glance (9)
- 1 1/2 cups graham cracker crumbs (about 12 full sheets)
- 6 tbsp unsalted butter, melted
- 1/4 cup granulated sugar
- 16 oz full-fat brick-style cream cheese, softened
- 3/4 cup confectioners' sugar
- 1 tsp vanilla extract
- 1 tbsp fresh lemon juice
- 1 cup cold heavy cream
- 1 1/2 cups crushed pineapple, very well drained
Instructions
Build the crust
- Mix the crumb crustStir the graham cracker crumbs, granulated sugar and melted butter together in a medium bowl until every crumb is evenly moistened and the mixture looks like wet sand. Pinch a small amount between two fingers; it should clump and hold its shape rather than crumble apart.Look for The crumbs darken slightly and clump when pinched, with no dry, powdery patches left at the bottom of the bowl.Tip Melt the butter in short microwave bursts and pour it in hot, so it coats every crumb evenly before it starts to firm up.
- Press and chill the crustTip the crumb mixture into a 9-inch pie dish and press it firmly across the bottom and partway up the sides, using the flat bottom of a measuring cup. Work from the center outward so the crust is an even thickness, then place the dish in the freezer for 15 minutes while the filling is started.Look for The crust looks compact and evenly thick, and no loose crumbs shift when the dish is tilted gently from side to side.Tip Press with the flat bottom of a measuring cup for a smooth, tidy finish; a firm press now keeps slices intact later.
At the end of this phase the crust should look and feel finished even though it has not been baked. The mixture should resemble wet sand — every crumb darkened and moistened by butter, with no dry powder at the bottom of the bowl — and a pinch should clump between two fingers.
Once pressed, the crust should be compact and evenly thick from center to edge, with no loose crumbs shifting when the dish is tilted. It should smell of toasted grain and butter. If the bottom of the bowl still holds dry crumbs, add another teaspoon of melted butter before pressing.
Whip the fluffy filling
- Beat the cream cheese baseBeat the softened cream cheese, confectioners' sugar, vanilla and lemon juice in a large bowl with an electric mixer on medium speed for about 2 minutes, scraping the bowl once halfway through. Stop when the mixture is completely smooth and glossy, with no visible lumps of cream cheese anywhere.Look for The mixture turns silky and glossy, falls from the beaters in thick ribbons, and no cream cheese lumps remain anywhere in the bowl.Tip Scrape the bottom and sides of the bowl once halfway through; unmixed cream cheese hiding there is the usual cause of lumps.
- Whip the cream stiffIn a separate chilled bowl, whip the cold heavy cream on medium-high speed until it holds stiff, stable peaks, about 2 to 3 minutes. Watch closely near the end; the cream should look thick and satiny, never grainy, and the peaks should stand straight up when the beaters lift.Look for The peaks stand straight and glossy when the beaters lift, and the cream looks thick and satiny rather than dry or grainy.Tip Chill the bowl and beaters in the freezer for 10 minutes first; cold cream whips faster and holds stiff peaks more reliably.
- Fold in cream and pineappleFold the whipped cream into the cream cheese base in two additions, using a spatula and a gentle turn-and-fold motion. Stop as soon as no white streaks remain. Add the drained crushed pineapple and fold just until the fruit is evenly distributed through the fluffy filling.Look for The filling is uniformly pale and thick, with no white streaks left, and a piece of pineapple appears in every scoop of the spatula.Tip Fold in two additions and stop as soon as it comes together; heavy-handed stirring deflates the air that keeps the filling fluffy.
This phase ends when the filling is complete and thick. The cream cheese base should be completely smooth and glossy, falling from the beaters in thick ribbons with no lumps anywhere. The whipped cream should hold stiff, satiny peaks that stand straight up, and after folding, the filling should be uniformly pale and thick, with no white streaks and a piece of pineapple in every scoop of the spatula. Taste a small spoonful: it should taste creamy and lightly tangy, with clear sweetness and a bright lemon note.
Chill, slice and serve
- Fill the chilled crustSpoon the filling into the chilled crust and spread it to the edges with an offset spatula or the back of a spoon, smoothing the top in broad strokes. Give the dish a gentle tap on the counter to settle the filling and release any air pockets trapped during folding.Look for The top looks smooth and even, holds small soft peaks, and a gentle tap on the counter releases any trapped air bubbles.Tip Spread to the very edge of the crust so every slice shows filling; a small offset spatula makes this quick and tidy.
- Chill until fully setCover the pie dish without touching the surface and refrigerate for at least 6 hours, preferably overnight, until the filling is fully set and firm to a light touch in the center. Keep it level in the refrigerator so the top chills flat and even.Look for The center feels firm, not sticky, under a light fingertip press, and the filling no longer shifts when the dish is moved.Tip Chill overnight when time allows; the flavor melds and the filling sets edge to edge, giving the cleanest possible slices.
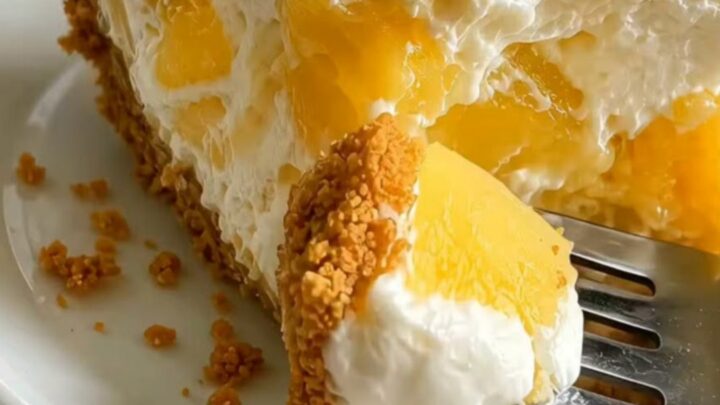
- Slice and serve coldSlice with a sharp knife run under hot water and wiped dry between cuts, lifting each piece out with a pie server. Serve the cheesecake straight from the refrigerator, one thick slice at a time, so the crust stays crisp and the filling stays cold and creamy.Look for Each slice lifts cleanly on the pie server, showing a distinct crust line, fluffy filling and bright pineapple pieces all the way through.Tip Dip the knife in hot water and wipe it dry between cuts; warm steel glides through the chilled filling without dragging.
The final phase is patience, and the checkpoint is firmness. After at least 6 hours in the refrigerator, the filling should feel firm to a light touch in the center and stay put when the dish is gently moved. Slices should lift cleanly on a pie server, hold a straight edge, and show a clear crust line beneath smooth, creamy filling dotted with pineapple.
The surface should look smooth and matte, never shifting or weeping. If the center still yields under a light press, chill another hour and test again. Only when the slice holds its shape completely should the pie be cut and served.
Common mistakes
Four mistakes account for nearly every failed no-bake cheesecake. First, under-drained pineapple: excess juice thins the filling and keeps it from setting, so press the fruit firmly in a sieve. Second, cold cream cheese: it beats into lumps that no amount of mixing will smooth, so let it soften fully.
Third, overwhipped cream: cream whipped past stiff peaks turns grainy and folds in badly, so stop the mixer as soon as the peaks stand. Fourth, impatience: slicing before the filling has chilled at least 6 hours gives slumped, ragged pieces. Avoid these four and the recipe is very hard to get wrong.
How to tell it’s done
Done is a matter of chill, not heat. The cheesecake is ready when the filling feels firm to a light fingertip press in the center and no longer shifts when the dish is moved. A finished slice comes away cleanly on a pie server, holds a straight edge, and shows three distinct layers: a compact crust, a smooth creamy filling and bright pineapple pieces suspended throughout.
The minimum chilling time is 6 hours, but overnight chilling gives noticeably cleaner slices. There is no internal temperature to check; if the center is firm and the slice holds its shape, the cheesecake is done.
Up next · Part 3 of 3
4 variations · storage & make-ahead · 5 answers · printable card
Tips, FAQ & printable recipe (Part 3)← Back to the ingredients (Part 1)