Dinner · Part 2 of 3: Instructions
Mushroom, Leek & Gruyere Buckwheat Galette with Crispy Crust Step-by-step instructions
- Prep
- Cook
- Total
- Serves
- 4
Before you start
Before anything touches the stove, get the cold work done. Cube 10 tablespoons of butter and put it back in the refrigerator so it stays firm.
Shred the gruyere from the block and set it aside. Slice the leeks, drop them in a bowl of cold water, and swish to release the grit between the layers, then lift them out and pat dry.
Ingredients at a glance (9)
- 1 1/2 cups all-purpose flour
- 1/2 cup buckwheat flour
- 10 tbsp cold unsalted butter, cubed
- 12 oz cremini mushrooms, sliced
- 2 medium leeks, white and light green parts, sliced
- 2 tbsp unsalted butter
- 2 tsp fresh thyme leaves, plus more for serving
- 1 1/2 cups shredded gruyere
- 4 quail eggs
Instructions
Make and Chill the Dough
- Mix the Buckwheat DoughWhisk the all-purpose flour and buckwheat flour together in a large bowl. Add the cold cubed butter and rub or cut it in until the pieces range from oat flakes to pea size. Sprinkle ice-cold water over the mixture one tablespoon at a time, tossing with a fork until the dough holds together when squeezed.Look for The crumbs should look shaggy and dry, with visible butter patches and no wet pockets at the bottom of the bowl.Tip Work fast and keep the butter cold; visible butter chunks are what turn into the flaky pockets in the baked crust.
- Chill the DoughTurn the shaggy dough onto the counter and press it into a compact disk, folding it over once or twice to build layers without working it smooth. Wrap it tightly in plastic and refrigerate for at least 45 minutes so the butter firms up and the flour fully hydrates.Look for The chilled dough should feel firm to the touch and give slightly at the edges when pressed with a knuckle.Tip The dough rests happily up to two days in the refrigerator; colder dough means cleaner folds and a taller, flakier crust.
At the end of this phase the dough is a firm, wrapped disk in the refrigerator, and it should feel cold and pliable rather than greasy. Press a knuckle into the edge: it should give slightly and hold the dent. If it feels soft or buttery to the touch, give it another 15 minutes.
Cook the Filling and Shape
- Soften the LeeksMelt 1 tablespoon of the butter in a wide skillet over medium heat. Add the sliced leeks and cook, stirring often, for 6 to 8 minutes until they slump, turn silky, and smell sweet. Scrape them into a bowl and set aside so they keep their color and tenderness.Look for The leeks should be fully collapsed and glossy, with no crunchy white ribs left and no browning on the edges.Tip Wash sliced leeks in a bowl of cold water and lift them out; grit hides between the layers and ruins an otherwise silky filling.
- Brown the MushroomsAdd the remaining tablespoon of butter to the same skillet over medium-high heat. Add the cremini mushrooms in a single layer and leave them undisturbed for 3 minutes so they sear, then stir and cook 4 to 5 minutes more until deeply browned. Stir in the fresh thyme.Look for The mushrooms should be nut-brown with crisp edges, the pan nearly dry, and the kitchen smelling roasted and savory.Tip Crowding steams mushrooms gray and watery; give them room and let a dark fond form on the pan for maximum flavor.
- Combine and Cool the FillingReturn the leeks to the skillet and toss with the mushrooms. Spread the mixture on a plate and let it cool to room temperature, at least 15 minutes, so it will not melt the butter in the pastry. Taste before assembling the galette and adjust anything that needs it.Look for The filling should feel barely warm, clump together when gathered, and release no visible liquid into the plate.Tip A cool filling keeps the dough firm under your fingers, which is the difference between crisp pleats and soggy ones.
- Roll and Fill the GaletteRoll the chilled dough on lightly floured parchment into a rough 12-inch circle about 1/8 inch thick. Scatter half the gruyere over the center, leaving a 2-inch border, pile the cooled mushroom and leek filling on top, and finish with the remaining gruyere.Look for The dough should lift cleanly from the parchment, and the border should stay clear of filling all the way around.Tip Roll from the center outward, rotating the dough a quarter turn with each pass, to keep the circle even and easy to fold.
- Fold the Rustic PleatsFold the bare border up and over the filling, pleating it every 2 inches and pressing each fold gently so it holds. The center stays open to show the filling. Slide the parchment onto a sheet pan and chill the shaped galette for 15 minutes while the oven heats to 400°F (200°C).Look for The pleats should stand uneven and proud, the dough cold and firm to a light fingertip press before it goes in the oven.Tip Uneven pleats are the point of a galette; a short chill resets the butter so the folds bake into separate crisp layers.
The filling is done when the mushrooms are nut-brown with crisp edges, the leeks are fully collapsed and sweet, and the pan is nearly dry with no pooling liquid. After it cools, the mixture should clump together on the plate.
The shaped galette should sit on its sheet pan with proud, uneven pleats, a clear 2-inch border of pastry visible, and the dough cold and firm again after its 15-minute rest.
Bake, Top, and Serve
- Bake Until GoldenBake the galette on the center rack at 400°F (200°C) for 30 to 35 minutes, rotating the pan once halfway through, until the crust is deep golden brown and the cheese blisters and bubbles at the edges. Transfer the pan to a rack and let the galette rest for 10 minutes before slicing.Look for Look for a bronzed, puffed crust, cheese bubbling at the open center, and a thin line of steam rising from the filling.Tip A preheated sheet pan or cast-iron pan under the parchment crisps the underside while the top browns.
- Fry the Quail EggsHeat a small nonstick skillet over medium heat with a thin film of butter. Crack the quail eggs into the pan and fry for 1 to 2 minutes, spooning the butter over the whites, until the whites are completely set and the eggs reach 160°F (71°C) throughout, with the yolks still creamy.Look for The whites should be opaque and firm edge to edge, with no translucent patches, and slide freely around the pan.Safe temperature 160°F (71°C) internal temperature (egg dishes)Tip Crack each quail egg into a small cup first; the shells are delicate and a cup keeps the yolk intact on its way to the pan.
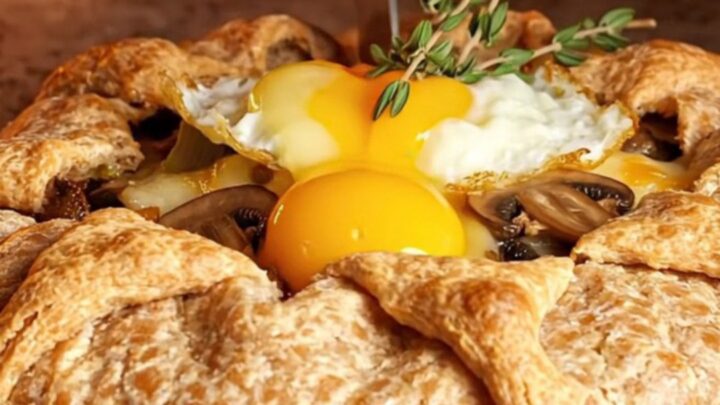
- Top, Slice, and ServeNestle the fried quail eggs over the warm galette, one per slice, and scatter fresh thyme leaves over everything. Cut straight through the shattering crust into generous wedges and serve immediately, while the underside is still crisp and the cheese is glossy and molten.Look for The first cut should crackle audibly through the crust, releasing a puff of steam and revealing the golden filling.Tip Use a sharp chef's knife with a single confident press rather than a sawing motion to keep the flaky edges intact.
The finished galette comes out of the oven deeply bronzed, puffed along the pleats, with cheese bubbling at the open center and a thin ribbon of steam rising.
The underside should sound hollow and crisp when tapped. After a 10-minute rest it slices with an audible crackle. The quail eggs go on last, whites fully set and opaque, yolks glossy and creamy.
Common mistakes
The most common fault is a soggy bottom, and it always traces back to one of two causes: a filling that was still warm or wet when it met the dough, or an oven rack that was too high. Cook the mushrooms until the pan is dry, cool the filling fully, and bake on the center rack — or over a preheated pan — for a crisp base.
How to tell it’s done
The galette is done when the crust is deep golden brown — not pale beige — on the pleats, the underside, and along the open center, and the gruyere blisters and bubbles at the edges.
The crust should smell toasty and nutty, and the first cut should crackle. Let it rest 10 minutes so the filling sets enough to slice cleanly.
- Egg dishes: 160°F (71°C) in the thickest part
Up next · Part 3 of 3
4 variations · storage & make-ahead · 5 answers · printable card
Tips, FAQ & printable recipe (Part 3)← Back to the ingredients (Part 1)