Desserts · Part 2 of 3: Instructions
Molten Chocolate Peanut Butter Lava Mug Cake Step-by-step instructions
- Prep
- Cook
- Total
- Serves
- 1
Before you start
Before starting, gather all ingredients and measure them out. Ensure the butter is melted and slightly cooled. Have a microwave-safe mug ready, along with a small whisk or fork for mixing.
The entire preparation takes about 5 minutes, and the cooking time is just over a minute. There's no need to preheat an oven or prepare any special equipment, making this an incredibly convenient dessert.
Ingredients at a glance (10)
- 4 tbsp all-purpose flour
- 2 tbsp granulated sugar
- 2 tbsp unsweetened cocoa powder
- 1/2 tsp baking powder
- 4 tbsp milk
- 2 tbsp unsalted butter, melted
- 1/2 tsp vanilla extract
- 2 tbsp creamy peanut butter
- Powdered sugar, for dusting, to taste
- Whipped cream, for serving
Instructions
Mix the Batter
- Mix the BatterIn a microwave-safe mug, combine the flour, sugar, cocoa powder, and baking powder. Add the milk, melted butter, and vanilla extract. Whisk with a small whisk or fork until the batter is smooth and glossy, with no dry streaks. Make sure to scrape the bottom and sides of the mug to fully incorporate all the dry ingredients.Look for The batter should be thick but pourable, like a brownie batter.Tip Use a fork if a whisk is not available; just make sure to break up any lumps.
- Add the Peanut Butter CoreSpoon the creamy peanut butter into the center of the batter. Do not stir it in; let it sit on top and sink slightly into the middle. This creates the molten lava center as the cake bakes around it.Look for The peanut butter should be a distinct dollop in the center, not mixed in.Tip For a more intense peanut butter flavor, use a generous spoonful.
The batter should be smooth, glossy, and free of lumps. The peanut butter should sit in the center, not mixed in. At this stage, the mug is ready for the microwave, with the batter filling about half the mug.
Microwave and Bake
- Microwave the CakePlace the mug in the microwave and cook on high for 70 seconds. The cake will puff up around the edges and look set on the surface while the center remains molten. The exact time may vary depending on the microwave wattage, so adjust by a few seconds if needed.Look for The cake should be springy to the touch on top and slightly pulling away from the mug edges.Tip If the cake looks too wet after 70 seconds, add 10 more seconds, but be careful not to overcook or the center will set.
After microwaving, the cake should be puffed up around the edges, with a springy top. The center should look slightly soft, and the kitchen will smell of warm chocolate and peanut butter. The cake should be pulling away from the mug sides slightly.
Garnish and Serve
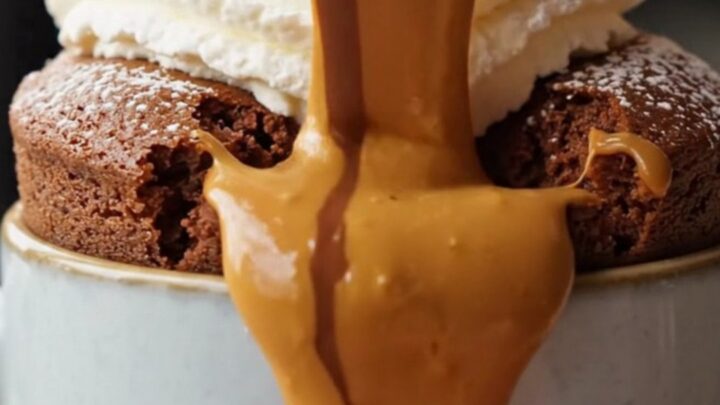
- Garnish and ServeCarefully remove the mug from the microwave (it will be hot). Dust the top generously with powdered sugar. Optionally, top with a dollop of whipped cream. Dig a spoon straight into the center to reveal the molten peanut butter lava and enjoy immediately.Look for The center should flow out like warm peanut butter sauce when the spoon breaks through.Tip Serve right away for the best lava effect; the center will thicken as it cools.
Once dusted with powdered sugar and topped with whipped cream, the cake is ready to eat. When the spoon breaks through the top, the molten peanut butter should flow out, creating a dramatic lava effect. The cake should be enjoyed immediately while warm.
Common mistakes
One common mistake is overcooking the mug cake, which results in a dry, tough texture and a fully set center. To avoid this, keep a close eye on the microwave time and start with 70 seconds, then add 5-10 seconds only if needed.
Another mistake is stirring the peanut butter into the batter; it should remain in a distinct dollop in the center to create the lava effect. Also, be sure to mix the batter thoroughly to avoid lumps of flour or cocoa powder. Finally, use a mug that is large enough to prevent overflow as the cake rises.
How to tell it’s done
The mug cake is done when the top is set and springs back lightly when touched, and the edges have pulled away from the mug slightly.
The center should still look slightly soft, but not liquid. To check for doneness, insert a toothpick into the edge of the cake; it should come out with a few moist crumbs, but not wet batter.
The center will continue to cook slightly from residual heat, so it's better to undercook slightly than to overcook. The internal temperature of the cake should reach at least 160°F (71°C) to ensure it's fully cooked, but the peanut butter center will remain molten.
Up next · Part 3 of 3
4 variations · storage & make-ahead · 5 answers · printable card
Tips, FAQ & printable recipe (Part 3)← Back to the ingredients (Part 1)