Dinner · Part 2 of 3: Instructions
Mississippi Chicken Casserole with Cheesy Pasta in One Dish Step-by-step instructions
- Prep
- Cook
- Total
- Serves
- 8
Before you start
Set up the kitchen before the first pan goes on the heat, because the recipe moves quickly once the chicken is cooked. Take the cream cheese and sour cream out of the refrigerator first so they soften while everything else happens — cold cream cheese resists melting and leaves lumps in the sauce.
Shred both cheeses now and keep them covered. Pat the chicken dry, measure the seasonings into a small bowl, and set out the butter, broth, pepperoncini and brine. Fill the large pot for the pasta and place it over high heat so it reaches a boil while the chicken bakes.
Ingredients at a glance (15)
- 1 1/2 lb boneless skinless chicken breasts
- 1 tsp kosher salt, plus more for the pasta water
- 1/2 tsp black pepper
- 1 tsp smoked paprika
- 1 tbsp olive oil
- 12 oz elbow pasta
- 1/4 cup unsalted butter, cut into pieces
- 1 tbsp ranch seasoning
- 1/3 cup sliced pepperoncini peppers
- 2 tbsp pepperoncini brine
- 4 oz cream cheese, softened
- 1/2 cup sour cream
- 1 cup chicken broth
- 2 cups shredded cheddar cheese
- 1 cup shredded mozzarella cheese
Instructions
Sear, roast and shred the chicken
- Season the chickenPat the chicken breasts dry with paper towels, then season both sides with the kosher salt, black pepper and smoked paprika. Let them sit at the counter for no more than 30 minutes while the oven heats, or season them right before cooking and keep them refrigerated until the pan is ready.Look for The surface of the chicken looks evenly coated and barely moist, so the spices cling instead of sliding off.Tip Drying the chicken first is what gives you a real sear instead of steamed, pale meat.
- Sear and bake the chickenHeat the oven to 400°F (200°C). Warm the olive oil in a large skillet over medium-high heat and sear the chicken 2 to 3 minutes per side until deeply golden. Transfer the skillet to the oven and bake 15 to 20 minutes, until the thickest piece registers 165°F (74°C) on an instant-read thermometer.Look for The edges of the chicken turn opaque and the crust is deep golden brown with no pink at the surface.Safe temperature 165°F (74°C) internal temperature (poultry)Tip Searing first builds the browned bits that season the whole casserole.
- Rest and shredMove the chicken to a cutting board and let it rest 5 minutes so the juices settle. Shred it with two forks into bite-size pieces — chunky shreds hold their texture better than fine ones. Taste a shred and add a pinch of salt only if it needs it.Look for The meat pulls apart with light pressure and the shreds look moist and fibrous, not dry.Tip Resting first keeps the shreds juicy; shredding hot chicken squeezes the moisture out.
The chicken is out of the oven and resting on the board, its crust deep golden and its interior reading a verified 165°F (74°C). After 5 minutes it shreds with almost no pressure, the strands moist and fibrous rather than dry or powdery.
The skillet below holds a thin sheen of browned bits — exactly what the sauce will need. Before moving on, confirm no pink remains at the thickest point and that the shreds taste properly seasoned; a bland base cannot be fixed later.
Boil pasta and build the sauce
- Boil the pastaBring a large pot of well-salted water to a rolling boil and cook the elbow pasta 1 minute short of the package time. It should be tender with a firm center, because it finishes in the oven. Reserve 1/2 cup of the pasta water, then drain the pasta and set it aside.Look for A piece of pasta cut in half shows a thin pale line at the center — cooked through but still holding shape.Tip Undercooking by one minute keeps the pasta from going mushy during the bake.
- Build the sauceIn the same skillet over medium heat, melt the butter, then stir in the ranch seasoning, pepperoncini, brine, chicken broth, cream cheese and sour cream. Whisk until the cream cheese melts completely and the sauce is smooth and glossy, 3 to 4 minutes. Loosen with the reserved pasta water if it thickens too much.Look for The sauce coats the back of a spoon and no streaks of cream cheese remain.Tip Keep the heat at medium so the dairy melts into a smooth sauce instead of separating.
- Fold in chicken and cheddarStir the shredded chicken and 1 cup of the cheddar into the sauce until every shred is coated and the cheese has melted in. The mixture should be thick and creamy, hugging the spoon. Remove the skillet from the heat so the cheese does not tighten.Look for The sauce turns pale golden and pulls away from the pan in slow ribbons.Tip Melting some cheese into the sauce means every bite is cheesy, not just the top.
The pasta is drained and standing by, each piece tender with a firm center. In the skillet, the sauce has come together completely: smooth, glossy and thick enough to coat a spoon, with the pepperoncini slices distributed evenly and no white streaks of unmelted cream cheese anywhere.
The chicken and a cup of cheddar are folded in, and the mixture pulls away from the pan in slow ribbons. Taste it now — this is the last moment the sauce can be seasoned before the pasta dilutes it.
Assemble, bake and rest
- Assemble the casseroleFold the drained pasta into the chicken mixture until it is evenly coated, then scrape everything into the glass baking dish and level the surface with a spatula. Scatter the remaining cheddar and all of the mozzarella evenly over the top, edge to edge.Look for No pasta peeks through the cheese layer, and the surface is flat so it browns evenly.Tip An even cheese layer melts into one connected blanket instead of separate patches.
- Bake until bubblingBake at 400°F (200°C) for 18 to 22 minutes, until the edges bubble actively and the cheese on top is melted with golden spots. If the top colors too quickly, lay a piece of foil loosely over the dish for the last few minutes.Look for Bubbles break at the edges of the dish and the cheese shows even light-brown patches.Tip Bubbling at the edges, not just melted cheese, tells you the center is hot all the way through.
- Rest and serveLet the casserole stand 5 minutes before scooping — the sauce thickens to a spoonable consistency and the portions hold together. Scoop with a spatula onto plates and serve hot, while the cheese still stretches with each bite.Look for A scoop lifts cleanly from the dish with a long cheese pull and no watery pooling.Tip Those 5 minutes of rest are the difference between tidy squares and a loose scoop.
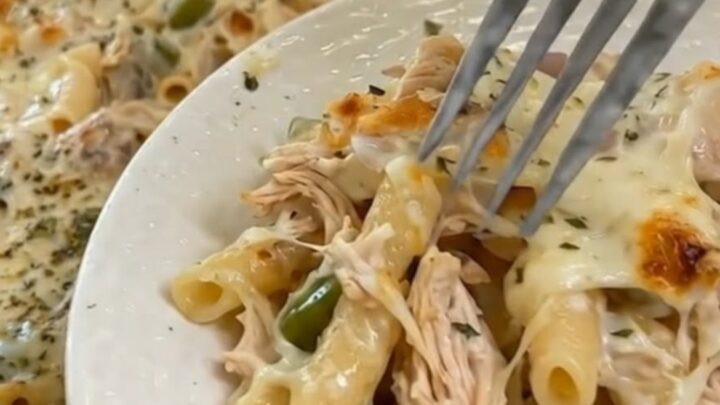
The casserole comes out of the oven bubbling actively at the edges, the cheese melted into one even blanket with light-golden spots across the top. A spatula pressed to the corner meets resistance from a thick, cohesive sauce, and a scoop from the center steams. After the 5-minute rest, portions lift cleanly and the cheese stretches when the fork pulls away. If the middle is not steaming hot, give the dish a few more minutes before serving.
Common mistakes
The most common trouble is overcooked pasta, and it happens when the noodles are boiled fully before baking — they keep absorbing sauce in the oven and turn soft. Pull them a minute early and the texture holds. A second issue is a broken or grainy sauce, usually caused by rushing the cream cheese over high heat; medium heat and constant whisking keep it glossy.
Shredding the chicken while it is piping hot squeezes out its juices, so give it the full 5-minute rest first. Underseasoning is easy to miss because pasta dilutes flavor — taste the sauce after the chicken goes in and adjust before assembling.
How to tell it’s done
The casserole is done on three checks. First, the top: the cheese is fully melted with even light-golden patches, never leathery or dark brown. Second, the edges: you can see and hear active bubbling around the rim of the dish, which confirms the center has heated all the way through — melted cheese alone is not proof. Third, the center: a scoop from the middle steams and the sauce coats the pasta thickly, with no thin liquid pooling in its wake.
- Poultry: 165°F (74°C) in the thickest part
Up next · Part 3 of 3
4 variations · storage & make-ahead · 5 answers · printable card
Tips, FAQ & printable recipe (Part 3)← Back to the ingredients (Part 1)