Desserts · Part 2 of 3: Instructions
Matcha Black Sesame Burnt Basque Cheesecake with Green Tea Chocolate Step-by-step instructions
- Prep
- Cook
- Total
- Serves
- 10
Before you start
Gather all ingredients at room temperature, especially the cream cheese and eggs, so the batter blends smoothly. Line an 8-inch springform pan with parchment paper, letting it rise above the rim. Preheat the oven to 400°F (200°C) and set a rack in the lower-middle position. Have the grater, the pitcher and the sieve ready.
Break the green matcha white chocolate and grate it onto the board before you start the batter, so the garnish is ready when the cake comes out. Keep the grated curls chilled. Measure the flour and matcha, and sift them together so they are ready to fold in. Setting everything out first keeps the process calm and prevents overmixing.
Ingredients at a glance (8)
- 4 oz green matcha white chocolate, for grating and garnish
- 2 tbsp black sesame seeds, toasted lightly
- 24 oz cream cheese, softened to room temperature
- 3/4 cup granulated sugar
- 4 large eggs, at room temperature
- 1 1/4 cups heavy cream
- 2 tbsp all-purpose flour, sifted
- 2 tbsp matcha powder, sifted
Instructions
Batter and sesame ring ready
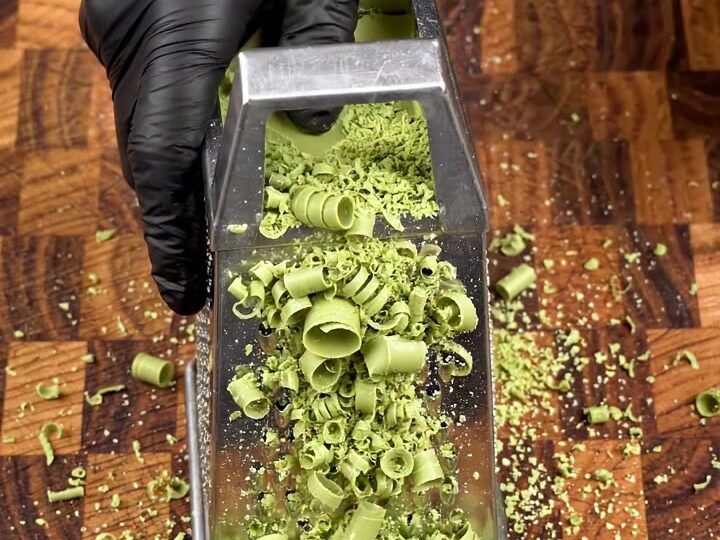
- Grate the matcha white chocolateBreak the green matcha white chocolate into pieces and set them on the wooden end-grain board. Grate the block with the stainless steel box grater to produce thin curls and fine shavings. Collect the curls in a small bowl and keep them chilled until serving.Look for Thin green curls and fine shavings collect on the board.Tip Keep the chocolate cool so the curls hold their shape instead of smearing on the grater.
- Prepare the pan and sesame ringPreheat the oven to 400°F (200°C). Line the 8-inch springform pan with parchment paper, letting it rise above the rim. Scatter the black sesame seeds in a ring along the inside base of the pan.Look for A dark sesame ring lies flat along the bottom edge of the pan.Tip Press the parchment against the sides so the batter cannot seep out during baking.
The pan is lined and the black sesame seeds form an even ring along the base. The cream cheese mixture is smooth and free of lumps, and the eggs and cream are fully incorporated into a pale green, pourable batter. Check the texture by lifting the spatula: the batter should fall in a smooth ribbon without any cheese lumps or dry flour specks.
If you see lumps, beat for another 30 seconds before pouring. The surface should look glossy and even, with no visible streaks of matcha or unmixed flour. Once the sesame ring is set and the batter is smooth, you are ready to pour and swirl into the pan.
Swirled and baked to deep brown
- Beat the cream cheese baseBeat the softened cream cheese and sugar in a large bowl until smooth and free of lumps. Scrape down the sides of the bowl so no pockets of cheese remain. Keep the mixture at room temperature.Look for The mixture looks smooth, pale and free of lumps.Tip Soft cream cheese blends faster and avoids small lumps in the finished batter.
- Add eggs, cream and dry ingredientsBeat in the eggs one at a time, mixing until each is absorbed. Pour in the heavy cream and mix gently. Sift the flour and matcha powder over the bowl and fold them in until no streaks remain.Look for The batter is smooth, pale green and pourable.Safe temperature 160°F (71°C) internal temperature (egg dishes)Tip Sift the matcha to prevent clumps and bitter specks in the custard.
- Pour and swirl the batterPour the matcha batter into the pitcher, then fill the lined pan slowly over the sesame ring. Swirl the surface gently with a spoon to create a marbled pattern on top of the sesame ring.Look for Pale green batter sits over the dark sesame ring with soft swirls.Tip Tap the pan lightly on the counter to release any trapped air bubbles.
The batter has been poured and swirled over the sesame ring, and the surface shows a soft marbled pattern. After baking, the top should be a deep, dark caramelized brown and the edges should be golden green with a slight set.
The center should still jiggle a little when the pan is gently nudged, which means it will finish setting as it cools. Smell for a toasty, slightly sweet aroma of caramel without any sharp burnt odor. If the top looks pale, leave it in for another few minutes; if it darkens too fast, cover it loosely with foil.
Chilled, sliced and garnished
- Bake until deeply burntBake the cheesecake for 45 to 50 minutes, until the top turns deep dark brown and caramelized and the edges are golden green. The center should still jiggle slightly. Cover with foil only if the top darkens faster than the edges set.Look for Top is deep brown, edges are golden green, center jiggles slightly.Safe temperature 160°F (71°C) internal temperature (egg dishes)Tip Do not chase a pale top; the dark caramelized surface is the signature of this style.
- Cool and release the cakeCool the cheesecake on a rack for 1 hour, then refrigerate it for at least 3 hours. Release the springform ring and lift the cake off the base using the parchment.Look for The cake holds its shape and the surface feels firm to the touch.Tip Chilling overnight gives the cleanest slices and the smoothest texture.
- Slice and garnishUsing a long, sharp knife dipped in hot water and wiped dry, cut clean slices through the dark top and green custard. Dust the top with crushed matcha white chocolate and black sesame, then arrange the chocolate curls around the top edge.Look for Clean slices reveal the green custard and black sesame base.Tip Wipe the knife between cuts to keep each slice neat and the layers sharp.
After cooling on a rack and chilling for at least 3 hours, the cake should feel firm at the edges and hold its shape when lifted from the pan. The dark top should look dry and glossy, and the sesame ring should be clearly visible along the base. Slice with a long, sharp knife wiped clean between cuts, and check that each slice shows a clean green custard interior with a dark sesame layer underneath. The garnish of crushed chocolate and sesame should sit neatly on top, with the curls arranged around the edge without slipping.
Common mistakes
The most frequent error is overmixing once the eggs and cream are added, which traps air and makes the cake puff and then sink or crack. Mix only until each ingredient is just combined. Another common mistake is using cold cream cheese, which leaves lumps that do not disappear during baking.
Bring it to room temperature first and beat it until fully smooth. Skipping the parchment or leaving it too low on the pan can cause the sides to stick or the batter to leak. Finally, cutting the cake before it has chilled will smear the layers. Give it at least three hours in the refrigerator for clean slices and a silky center.
How to tell it’s done
The cheesecake is done when the top has turned deep, dark brown and caramelized, the edges are golden green and set, and only the center jiggles slightly when the pan is gently shaken. The interior should reach about 160°F (71°C) for the eggs to be cooked through. The center will firm up as it cools and chills, so do not bake it until fully firm, which would make the texture dry. If the top darkens before the center has the right jiggle, cover it loosely with foil and continue baking until the center is almost set.
- Egg dishes: 160°F (71°C) in the thickest part
Up next · Part 3 of 3
4 variations · storage & make-ahead · 5 answers · printable card
Tips, FAQ & printable recipe (Part 3)← Back to the ingredients (Part 1)