Desserts · Part 1 of 3: Ingredients
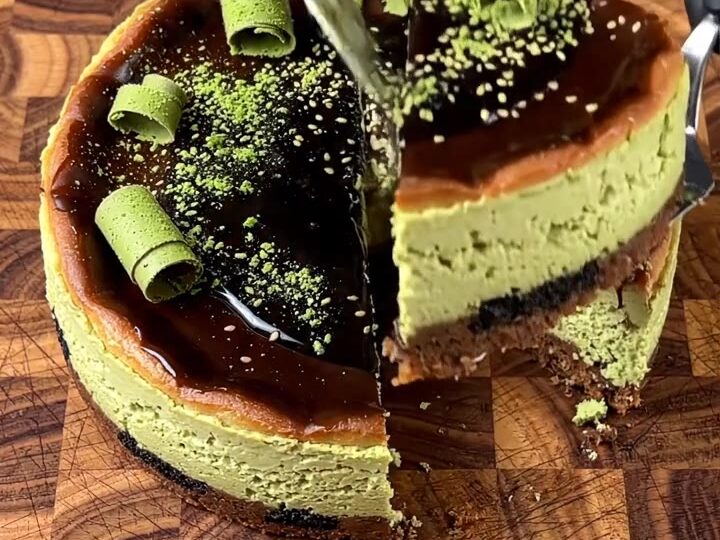
Matcha Black Sesame Burnt Basque Cheesecake with Green Tea Chocolate
- Prep
- Cook
- Total
- Serves
- 10
A dark, caramelized top, a creamy green matcha custard and a crunchy ring of black sesame at the base. This Basque-style cheesecake is built for a dessert table that wants something striking without a crust or complicated decoration. Every slice shows both layers at once.
This matcha black sesame burnt Basque cheesecake is a no-crust cake baked in an 8-inch springform pan lined with parchment. The batter starts with softened cream cheese, sugar, eggs, heavy cream, a little flour and matcha powder. Before pouring, a ring of black sesame seeds goes along the base of the pan.
The batter is poured and swirled into a marbled pattern, then baked until the top turns deep brown and caramelized while the center stays soft and creamy.
Once chilled, it slices cleanly and finishes with grated matcha white chocolate. The result is an elegant dessert that comes together with simple equipment and a short list of pantry ingredients.
Ingredients
Garnish
- 4 oz green matcha white chocolate, for grating and garnish
Base
- 2 tbsp black sesame seeds, toasted lightly
Batter
- 24 oz cream cheese, softened to room temperature
- 3/4 cup granulated sugar
- 4 large eggs, at room temperature
- 1 1/4 cups heavy cream
- 2 tbsp all-purpose flour, sifted
- 2 tbsp matcha powder, sifted
Why this recipe works
The high oven temperature is the secret to the burnt top. The sugar in the batter caramelizes and darkens on the surface while the interior sets gently.
That contrast between the blistered dark crust and the custardy center defines the style, and it is achieved by baking hot without a water bath or a crust to protect the top.
Flour and eggs give the batter enough structure to hold its shape once cooled, while the heavy cream keeps the texture silky rather than dense.
Matcha adds its grassy, slightly bitter note, which balances the sweetness of the cream cheese and the white chocolate garnish. The black sesame ring adds a nutty, toasty layer that contrasts with the pale green custard.
Notes and substitutions
Use full-fat block cream cheese and heavy cream for the richest texture. Low-fat versions tend to weep and set softer. Sift the matcha powder before adding it to the batter so it blends evenly and avoids bitter clumps. Choose a good ceremonial-grade matcha if you want a brighter green color and smoother flavor.
You will need an 8-inch springform pan, parchment paper and a stainless steel box grater for the white chocolate. A pitcher makes pouring the batter over the sesame ring neater. If you prefer, toast the black sesame seeds lightly in a dry pan for a deeper aroma, and use white sesame seeds as a milder substitute if needed.
- green matcha white chocolate: white chocolate with 1 tsp matcha stirred in for color and flavor
- all-purpose flour: cake flour for a slightly softer crumb
- black sesame seeds: toasted white sesame seeds, with a milder flavor
Equipment
- 8-inch springform pan
- Parchment paper
- Stainless steel box grater
- Wooden end-grain cutting board
- Chef's knife
- Mixing bowls
- Electric mixer or whisk
- Fine-mesh sieve
- Pitcher
Up next · Part 2 of 3
8 steps · 50 min of cooking · what to look for at each stage
Step-by-step instructions (Part 2)