Dinner · Part 2 of 3: Instructions
Juicy Mini Meatloaves with Sweet Glaze in 45 Minutes Step-by-step instructions
- Prep
- Cook
- Total
- Serves
- 6
Before you start
Start by taking the ground beef out of the refrigerator only when the mixing bowl is ready — cold meat handles better and smears less. Chop half a medium yellow onion finely, mince two cloves of garlic, and measure the breadcrumbs, milk, ketchup, Worcestershire sauce, salt, pepper and egg so everything is within reach. Line a rimmed baking sheet with parchment paper and set it beside the work area.
Ingredients at a glance (14)
- 1 1/2 lb ground beef (85% lean)
- 3/4 cup plain breadcrumbs
- 1/4 cup whole milk
- 1 large egg, lightly beaten
- 1/2 cup finely chopped yellow onion (about half a medium onion)
- 2 cloves garlic, minced
- 1 tbsp Worcestershire sauce
- 1/4 cup ketchup
- 1 tsp kosher salt
- 1/2 tsp freshly ground black pepper
- 1/3 cup ketchup
- 2 tbsp light brown sugar, packed
- 1 tsp yellow mustard
- 1 tsp Worcestershire sauce
Instructions
Prep and mix
- Heat the oven and line the panPosition a rack in the center of the oven and heat it to 400°F (200°C). Line a rimmed baking sheet with parchment paper, leaving a little overhang so the loaves release cleanly later. The high heat browns the glaze quickly without drying out the small portions, so give the oven the full time to come to temperature before anything goes in.Look for The oven reads 400°F (200°C) on the dial or thermometer and cycles on steadily.Tip Parchment beats foil here: the sugary glaze can weld itself to foil and tear off the crust when lifted.
- Soak the breadcrumbsIn a large mixing bowl, stir the breadcrumbs into the milk and let them sit for 5 minutes until the crumbs swell into a thick, damp paste. This panade is the quiet secret of a tender meatloaf: the hydrated starch coats the protein strands and keeps them from tightening into a dense, rubbery crumb as the loaves bake.Look for The mixture looks like wet sand with no dry crumbs left at the bottom of the bowl.Tip Mix the panade first, then prep the onion and garlic while it hydrates — nothing is wasted.
- Build the meatloaf mixtureAdd the egg, onion, garlic, Worcestershire sauce, ketchup, salt and pepper to the soaked breadcrumbs and stir until evenly combined. Crumble the ground beef over the bowl, then mix with clean hands or a fork just until no streaks of seasoning remain. Stop the moment it comes together; overworking the mixture is the fastest route to a tough, tight crumb.Look for The mixture holds together when squeezed, with visible flecks of onion, and no dry pockets.Tip Keep the beef cold until this moment — cold fat smears less and the loaves hold their shape better.
By the end of the first phase, the oven is fully at 400°F (200°C), the sheet pan is lined and waiting, and the breadcrumb-and-milk panade has swollen into a thick, damp paste with no dry crumbs left.
The meat mixture should come together as a cohesive mass that holds its shape when squeezed, flecked evenly with onion and garlic, with no streaks of unseasoned meat and no dry pockets. It should feel cold, slightly sticky but manageable.
Shape, glaze and bake
- Shape six mini loavesDivide the mixture into six equal portions, about 4 oz each, and shape each one into a small oval loaf roughly 3 by 2 inches on the prepared baking sheet. Space them at least an inch apart so hot air circulates and every side browns. Smooth any deep cracks with the back of a spoon; a tight surface holds the glaze better.Look for Six evenly sized ovals sit on the sheet without slumping or leaning.Tip Wet your hands lightly between loaves — the mixture won't stick and the edges stay smooth.
- Stir the glazeIn a small bowl, whisk the ketchup, brown sugar, mustard and Worcestershire sauce until the sugar dissolves and the glaze looks uniform and glossy. Taste and adjust: more mustard for tang, more sugar for candy-dark sweetness. Set aside about a third of the glaze in a separate spot for serving, so a spoon that touched raw beef never dips back in.Look for The glaze pours in a slow ribbon and no grains of sugar sit at the bottom.Tip Reserving a clean portion for the table is a food-safety habit worth keeping with any raw-meat glaze.
- First bakeBake the loaves for 15 minutes uncovered. At this stage the outside sets, fat begins to render onto the pan, and the tops lose their raw red color. Starting the bake before glazing lets the crust firm up, so the glaze sits on the loaf instead of sliding off and pooling around the base.Look for The edges are browned, the tops are dull and firm, and fat has pooled around the loaves.Tip If the loaves lean as they bake, nudge them upright with a spoon at the 10-minute mark.
- Glaze and finish to temperatureSpoon the glaze generously over each loaf, letting it drip down the sides. Return the pan to the oven for 10 to 15 minutes more, until the glaze is bubbling at the edges and an instant-read thermometer in the center of the thickest loaf reads 160°F (71°C). Because the loaves are small, check early — they climb from done to dry fast.Look for The glaze is dark, sticky and bubbling, and the thermometer reads 160°F (71°C) in the center.Safe temperature 160°F (71°C) internal temperature (ground meat)Tip Test two or three loaves, not just one — the smallest loaf on the pan finishes first.
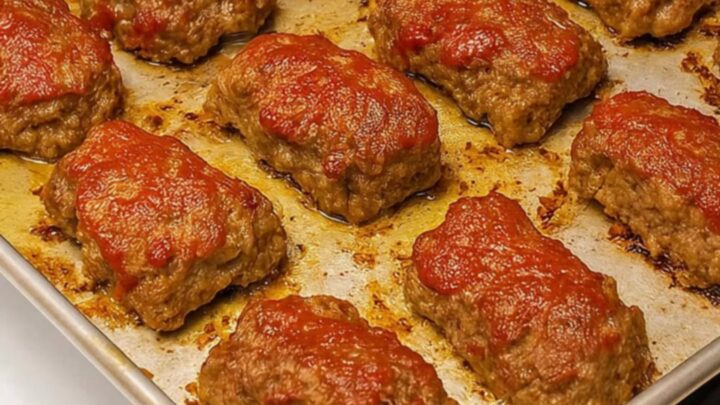
The second phase ends when the loaves come out glazed and fully cooked. The glaze should be dark, glossy and bubbling at the edges, caramelized where it has dripped down the sides onto the pan.
The loaves hold firm ovals with browned sides, and fat has rendered onto the parchment around them. An instant-read thermometer in the center of the thickest loaf reads 160°F (71°C), and the juices around it run clear with no pink.
Rest and serve
- Rest the loavesPull the pan from the oven and let the loaves rest on the sheet for 5 minutes. The juices, driven to the center by the heat, redistribute through the crumb during this pause, which is the difference between a moist bite and a puddle on the plate. The glaze also thickens slightly as it cools, turning from glossy to lacquered.Look for The glaze no longer wobbles when the pan is nudged, and steam rises gently from the loaves.Tip Resting on the pan, not a plate, keeps the bottoms from steaming soft.
- ServeSlide a thin metal spatula under each loaf and lift it to a warm plate, keeping the glaze intact. Serve with the reserved glaze on the side for anyone who wants extra. Mini meatloaves pair naturally with mashed potatoes, buttered egg noodles or a simple green salad, and every portion arrives with its own caramelized edges.Look for Each loaf lifts cleanly, leaving only a little glaze behind on the parchment.Tip Warm the plates briefly in the turned-off oven — a cold plate steals the heat from a small loaf fast.
After 5 minutes of rest on the sheet pan, the glaze has thickened from glossy to lacquered and no longer wobbles when the pan is nudged. Steam still rises when a loaf is lifted, and the crumb inside is moist and tender, holding together in neat slices rather than crumbling.
Each loaf transfers cleanly to a plate with a thin metal spatula, leaving only a little glaze behind on the parchment. The reserved glaze goes to the table in a small dish for anyone who wants extra.
Common mistakes
The three most common failures are overmixing, under-seasoning and glazing too early. Squeeze the meat mixture just until it holds together; kneading it like dough develops the proteins and turns the crumb tight and chewy.
Salt the mixture properly — a full teaspoon of kosher salt for a pound and a half of meat — because undersalted meatloaf tastes flat no matter how good the glaze is. If the glaze goes on before the surface sets, it slides into the pan and burns instead of clinging.
How to tell it’s done
The reliable test is internal temperature, not color: an instant-read thermometer inserted into the center of the thickest loaf must read 160°F (71°C) for ground meat. Because the loaves are small, the temperature climbs quickly in the final minutes, so start checking at 10 minutes after glazing and test two or three loaves rather than one.
- Ground meat: 160°F (71°C) in the thickest part
Up next · Part 3 of 3
4 variations · storage & make-ahead · 5 answers · printable card
Tips, FAQ & printable recipe (Part 3)← Back to the ingredients (Part 1)