Dinner · Part 2 of 3: Instructions
Japanese Crispy Karaage Rice Bowl with Kewpie & Pickled Ginger Step-by-step instructions
- Prep
- Cook
- Total
- Serves
- 4
Before you start
Before starting, gather all ingredients and equipment. Cut the chicken into uniform bite-sized pieces. Grate the ginger and mince the garlic. Measure the soy sauce and sake.
Set up a wire rack over a baking sheet for resting the fried chicken. Have a deep-fry thermometer ready to monitor oil temperature. Cook the rice ahead or start it so it's warm when the chicken is ready.
Ingredients at a glance (11)
- 1 lb boneless, skinless chicken thighs, cut into bite-sized pieces
- 2 tbsp soy sauce
- 1 tbsp sake
- 1 tbsp fresh ginger, grated
- 2 cloves garlic, minced
- 1/2 cup katakuriko (potato starch)
- 2 cups neutral oil (such as canola or vegetable), for frying
- 4 cups cooked Japanese short-grain rice, warm
- 1/4 cup Kewpie mayonnaise
- 1/4 cup pickled ginger (gari)
- 1 lemon, cut into wedges
Instructions
Marinate and Coat
- Marinate the ChickenIn a large mixing bowl, combine the bite-sized chicken thighs, soy sauce, sake, grated ginger, and minced garlic. Toss well to coat every piece evenly. Cover the bowl and refrigerate for 20 minutes to let the flavors penetrate the chicken.Look for The marinade should be absorbed, and the chicken should look glossy and fragrant.Tip Cut the chicken into uniform 1-inch pieces so they cook evenly and stay juicy.
- Dredge in Potato StarchPlace the katakuriko in a shallow dish. Working in batches, add the marinated chicken pieces and toss to coat thoroughly, pressing the starch onto each piece. Shake off any excess and transfer the coated chicken to a wire rack. Let sit for 5 minutes so the starch adheres.Look for Each piece should have a dry, powdery coating with no bare spots.Tip Do not skip the rest on the wire rack; it helps the coating cling during frying.
After marinating, the chicken should be fragrant with ginger and garlic, and the liquid should be mostly absorbed. The coating should completely cover each piece in a dry, powdery layer. When you touch it, the starch should feel like fine sand, not paste. The chicken should be arranged in a single layer on the wire rack, ready for the oil.
Double-Fry to Crisp Perfection
- First Fry at 170°CHeat the neutral oil in a deep pot to 340°F (170°C). Carefully add the chicken pieces in batches without overcrowding. Fry for 4 minutes, turning occasionally, until the coating is pale golden and the chicken is cooked through. Transfer to a wire rack and let rest for 5 minutes.Look for The chicken should be light golden and float; the interior should be just cooked through.Safe temperature 165°F (74°C) internal temperature (poultry)Tip Maintain the oil temperature; use a thermometer and adjust the heat as needed.
- Second Fry at 190°CIncrease the oil temperature to 375°F (190°C). Return the chicken to the hot oil in batches and fry for 60 seconds, until the coating is deep golden brown and blistered. Remove with tongs and drain on a wire rack or paper towels.Look for The crust should look craggy and shatteringly crisp, with a rich golden-brown color.Safe temperature 165°F (74°C) internal temperature (poultry)Tip The second fry is quick; watch closely to avoid burning.
After the first fry, the chicken should be pale golden and cooked through, with a tender interior. After the second fry, the crust should be deep golden brown, blistered, and very crisp.
The pieces should feel light and airy, not heavy or greasy. The kitchen should smell of savory fried chicken, and the sound of the crust cracking should be audible.
Assemble and Serve
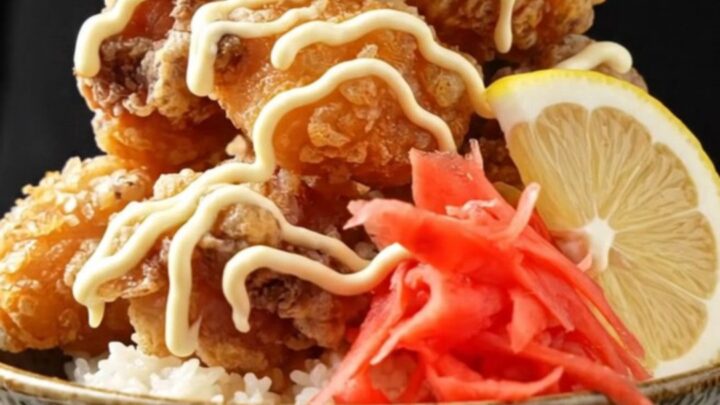
- Assemble the Rice BowlsDivide the warm cooked rice among four bowls. Pile the crispy karaage chicken on top of the rice. Drizzle with Kewpie mayonnaise in a zigzag pattern, then scatter the pickled ginger over the top.Look for The rice should be steaming, the chicken glossy with mayo, and the ginger bright red.Tip Use warm rice so the contrast between hot crispy chicken and cool mayo is perfect.
- Serve with Lemon WedgesServe the bowls immediately with lemon wedges on the side. Squeeze fresh lemon juice over the chicken just before eating to brighten the flavors.Look for The lemon adds a fresh citrus aroma and a tangy pop to each bite.Tip A squeeze of lemon cuts through the rich mayo and fried coating beautifully.
The rice bowls should look vibrant: steaming white rice, golden crispy chicken, creamy white mayo zigzags, and bright red pickled ginger. The lemon wedges add a fresh yellow accent. When you take a bite, the crust shatters loudly, the chicken is juicy, and the mayo and ginger balance the richness.
Common mistakes
One common mistake is overcrowding the pot, which drops the oil temperature and leads to soggy, greasy chicken. Fry in small batches and allow the oil to return to temperature between batches.
Another pitfall is skipping the rest on the wire rack after dredging; this allows the starch to hydrate and adhere, preventing the coating from falling off in the oil. Finally, don't skip the double fry—the second high-heat blast is essential for creating that ultra-crispy, blistered crust.
How to tell it’s done
The chicken is done when it reaches an internal temperature of 165°F (74°C) and the coating is deep golden brown and blistered. After the second fry, the crust should sound hollow when tapped and shatter when bitten.
The meat should be moist and juicy, with no pink remaining. Use an instant-read thermometer to verify the temperature in the thickest piece.
- Poultry: 165°F (74°C) in the thickest part
Up next · Part 3 of 3
4 variations · storage & make-ahead · 5 answers · printable card
Tips, FAQ & printable recipe (Part 3)← Back to the ingredients (Part 1)