Desserts · Part 2 of 3: Instructions
Honeycomb Sesame Dark Chocolate Bars: Crispy, Crunchy Treat Step-by-step instructions
- Prep
- Cook
- Total
- Serves
- 12
Before you start
Before starting, gather all ingredients and equipment. If your honeycomb candy is very sticky, chill it for 10 minutes to make slicing easier. Toast the sesame seeds in a dry skillet over medium heat, stirring constantly, until they turn golden and fragrant—this takes about 3 minutes.
Set them aside to cool completely. Line an 8x8-inch metal tray with parchment paper, leaving overhang on two opposite sides. Grate the chocolate using a box grater and set the curls aside. Have a double boiler or microwave-safe bowl ready for melting.
Ingredients at a glance (3)
- 8 oz honeycomb sponge candy
- 1/4 cup sesame seeds
- 12 oz 72% dark chocolate
Instructions
Prep and Grate
- Prepare the IngredientsSlice the honeycomb sponge candy into crisp, golden pieces about 1/2 inch across. Set aside. Toast the sesame seeds in a dry skillet over medium heat, stirring frequently, until fragrant and lightly golden, about 3 minutes. Remove from heat and let cool.Look for Honeycomb pieces are bite-size; sesame seeds are golden and smell nutty.Tip Work quickly with the honeycomb—it can soften if left in a warm kitchen.
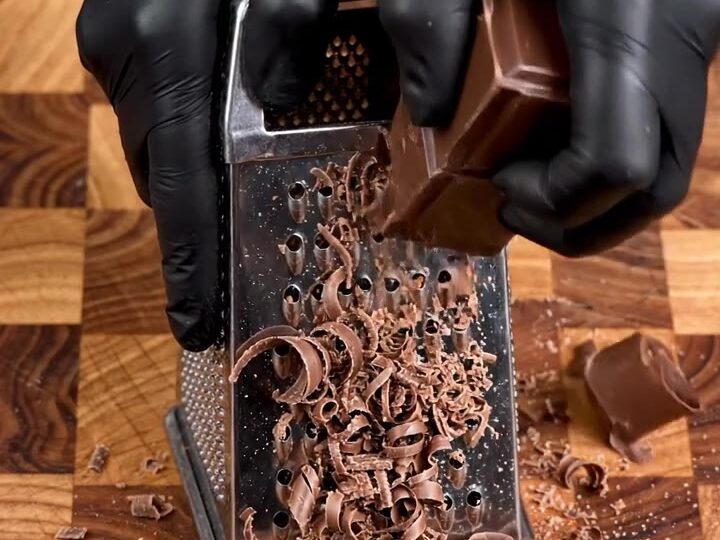
- Grate the ChocolateGrate the solid block of 72% dark chocolate on the large holes of a box grater into a fresh pile of dark chocolate curls. You will use these curls for garnish and texture.Look for You have a fluffy pile of chocolate curls, about 1 cup.Tip Chill the chocolate for 10 minutes before grating for cleaner curls.
At the end of this phase, you should have honeycomb pieces cut into even, bite-size chunks and a bowl of toasted sesame seeds. The grated chocolate curls should be fluffy and ready to use. The kitchen will smell of toasted sesame and rich chocolate, setting the stage for the assembly.
Melt and Assemble
- Melt the ChocolateMelt the remaining chocolate (after grating) in a double boiler or in the microwave in 30-second bursts, stirring until smooth and glossy. Be careful not to overheat.Look for Chocolate is completely smooth and pourable.Tip If using a microwave, stir after each burst to prevent burning.
- Line and PourLine a metal tray (about 8x8 inches) with parchment paper, leaving overhang on two sides. Pour the melted chocolate into the tray and spread evenly with an offset spatula to about 1/4-inch thickness.Look for Chocolate layer is even and reaches the edges.Tip Tap the tray gently on the counter to release air bubbles.
- Add the Honeycomb and SesamePress the golden honeycomb sponge candy chunks into the surface of the chocolate, distributing them evenly. Sprinkle the toasted sesame seeds over the top, pressing lightly so they adhere.Look for Honeycomb pieces are nestled in chocolate; sesame seeds are scattered.Tip Work before the chocolate sets so the toppings stick.
The melted chocolate should be glossy and smooth, poured into the lined tray. The honeycomb pieces are pressed into the surface, and sesame seeds are scattered evenly.
The tray looks inviting with golden chunks nestled in dark chocolate. Before chilling, ensure the toppings are well distributed and the chocolate layer is even.
Chill and Slice
- Chill and SliceRefrigerate the tray for at least 30 minutes, or until the chocolate is fully set and firm. Once set, lift the slab out using the parchment overhang and place on a cutting board. Slice into thick bars, about 1 1/2 inches wide.Look for Chocolate is firm and snaps when cut.Tip Use a sharp chef's knife and cut in one firm motion to avoid crumbling.
- Finish and ServeLift one thick bar and snap it cleanly in half to reveal the layered cross section, showing the crisp honeycomb and chocolate layers. Serve immediately or store in an airtight container.Look for The snap is clean; cross-section shows honeycomb and chocolate layers.Tip For the best snap, keep bars refrigerated until serving.
After chilling, the chocolate is firm and the slab lifts easily from the tray. Slicing produces clean, thick bars with a visible honeycomb pattern. When you snap a bar, it breaks with a crisp sound, revealing a layered cross-section. The bars are ready to serve or store.
Common mistakes
One common mistake is overheating the chocolate, which can cause it to seize or become grainy. Always melt slowly and stir frequently. Another issue is using honeycomb that is too large, making it difficult to press into the chocolate and creating uneven bars.
Aim for bite-size pieces. Also, be sure to press the honeycomb gently but firmly so it adheres to the chocolate; otherwise, it may fall off when slicing. Finally, do not skip the chilling time—if the chocolate isn't fully set, the bars will be messy to cut.
How to tell it’s done
The bars are done when the chocolate is fully set and firm to the touch. If you press gently, the surface should not give. The chocolate will have a glossy finish and a clean snap when you break a piece. If the chocolate is still soft, refrigerate for additional 10-minute intervals until firm.
The honeycomb pieces should be visible on the surface and slightly embedded in the chocolate. When you slice the slab, the edges should be clean and the cross-section should show distinct layers of chocolate and honeycomb.
Up next · Part 3 of 3
4 variations · storage & make-ahead · 5 answers · printable card
Tips, FAQ & printable recipe (Part 3)← Back to the ingredients (Part 1)