Desserts · Part 2 of 3: Instructions
Honeycomb Dark Chocolate Bark Bars for Easy Make-Ahead Treats Step-by-step instructions
- Prep
- Cook
- Total
- Serves
- 12
Before you start
Gather every component before you start, because the chocolate sets quickly once it is melted and you need to press the toppings in while it is still soft. Line the rectangular baking tray with parchment paper so it reaches over the sides, which will let you lift the finished slab out easily. Clear and dry the wooden board, then put on black food-safe gloves.
Chill the block of dark chocolate for about ten minutes so it grates cleanly on the stainless steel box grater. Break the honeycomb toffee and sesame bark into bite-size pieces, roughly chop the whole almonds, and set out the crushed nuts and sesame seeds in small bowls. Keep the toffee away from steam and moisture, since it can turn sticky.
Ingredients at a glance (6)
- 8 oz dark chocolate, grated on a box grater
- 3 oz golden honeycomb toffee, store-bought or made ahead, broken into pieces
- 2 oz sesame bark, store-bought or made ahead, broken into pieces
- 1/3 cup whole almonds, roughly chopped
- 2 tbsp crushed nuts, such as hazelnuts or pistachios
- 1 tbsp sesame seeds, plus more for sprinkling
Instructions
Grate and melt the chocolate
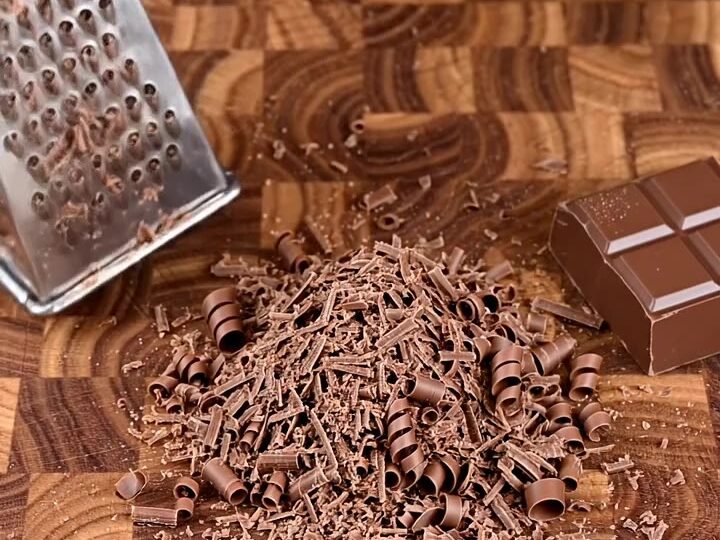
- Grate the dark chocolateSet the wooden board on the counter and put on black food-safe gloves. Grate the dark chocolate block over a stainless steel box grater so fine curls and shavings fall onto the board. Keep the grated chocolate in a separate pile.Look for Fine curls and shavings collect on the board, with no large chunks left.Tip Chill the chocolate block for 10 minutes first so it grates cleanly and does not smear.
- Prepare the toppingsBreak the honeycomb toffee and sesame bark into bite-size pieces. Roughly chop the whole almonds and set them out with the crushed nuts and sesame seeds, so every topping is ready before the chocolate melts.Look for Golden toffee pieces and nuts sit in separate piles, ready to use.Tip Keep the toffee in a dry bowl, since moisture makes it sticky and dull.
The grated chocolate forms fine curls and shavings on the board, with no large chunks left. Once melted, the chocolate should look smooth, glossy and free of lumps, with no grainy streaks. Check that no water has touched the bowl, since even a few drops can make the chocolate seize and turn thick and dull. If you see lumps, stir gently off the heat until they disappear. Only move on when the chocolate pours in a smooth, even ribbon and spreads easily across the parchment without tearing or leaving streaks, because a lumpy base will show on the surface of every bar you cut later.
Press the toppings in
- Melt the chocolateLine the rectangular baking tray with parchment paper. Scatter the grated dark chocolate in a heatproof bowl and melt it over barely simmering water, stirring gently, or in short bursts in the microwave. Stop heating when the chocolate is nearly melted and finish stirring off the heat until smooth.Look for The chocolate is smooth, glossy and free of lumps.Tip Keep the bowl dry and avoid steam, which can make the chocolate seize.
- Pour and press the toppingsPour the melted dark chocolate into the parchment-lined tray and spread it evenly. While it is still molten, press the honeycomb and sesame bark pieces into the surface with gloved hands so they sit evenly across the slab. Add the almonds and crushed nuts between them.Look for The toppings stay anchored in the chocolate and the surface looks even.Tip Press firmly but gently so the toffee does not crack into dust.
Once the chocolate is spread evenly in the tray, press the honeycomb, sesame bark, almonds and crushed nuts into the surface while it is still molten. The toppings should sit evenly across the slab, with the golden toffee flecks visible and anchored in the chocolate. Check that no large bare patches of plain chocolate remain and that the toppings are not sinking all the way through to the parchment. Press gently so the toffee stays in clear pieces rather than cracking into dust. Only move to setting once the surface looks balanced and every topping is held firmly, so that each bar will carry its share of nuts and toffee when it is cut and served.
Set, sprinkle and cut
- Set and sprinkleLeave the slab at cool room temperature until it is firm to the touch, about 1 hour. Sprinkle the remaining sesame seeds over the top, pressing them lightly so they stick.Look for The chocolate is firm, matte-free and no longer tacky when touched.Tip A cool kitchen sets the chocolate faster and keeps it glossy.
- Cut into barsLift the slab out of the tray by the parchment paper. Cut it with a chef's knife into neat rectangular bars, wiping the blade clean between cuts for sharp edges. Serve at once or store the bars as described.Look for The bars have clean edges and show golden toffee flecks, nuts and sesame on top.Tip Warm the knife briefly under hot water and dry it before each cut for cleaner edges.
Leave the slab at a cool room temperature until the chocolate is firm to the touch and no longer tacky. Sprinkle the remaining sesame seeds across the top and press them lightly so they stick. When you lift the slab out by its parchment, it should hold its shape without bending.
Cut it with a clean chef's knife into neat rectangular bars, wiping the blade between cuts for sharp edges. The bars should show a glossy chocolate base, with golden toffee, nuts and sesame clearly visible on top. If the chocolate is still soft in the centre, wait longer before cutting, since pressing too early will tear the surface and push the toppings out of place.
Common mistakes
The most common mistake is overheating the chocolate. Dark chocolate that gets too hot turns grainy and thick, and it will not set with the smooth snap you want. Melt it gently, in short bursts or over barely simmering water, and stop heating when it is nearly melted, then finish stirring off the heat. Another frequent problem is water.
A single drop or a steamy bowl can make the chocolate seize into a stiff, dull mass, so keep the bowl and spoon completely dry. Pressing the toppings in too late is also a problem: once the chocolate sets, the toffee and nuts will not stick, and they will fall off when you cut. Work quickly while the chocolate is still molten.
How to tell it’s done
The bark is done when the chocolate is fully set, firm to the touch and no longer tacky, and the slab holds its shape when lifted out by the parchment. The surface should look glossy and even, with the honeycomb toffee, sesame bark and nuts firmly embedded. You can test a small corner with a fingertip: it should feel dry and cool, without any soft or sticky patch.
Because this is a no-bake chocolate treat with no protein, there is no cooking temperature to reach. The main sign of readiness is a clean, firm break when you cut the first bar. If the chocolate still feels soft or leaves a mark on your gloves, leave the slab to set for a little longer before cutting.
Up next · Part 3 of 3
4 variations · storage & make-ahead · 5 answers · printable card
Tips, FAQ & printable recipe (Part 3)← Back to the ingredients (Part 1)