Appetizers · Part 2 of 3: Instructions
Honey Garlic Pork Belly Burnt Ends: Crispy Meat Candy Step-by-step instructions
- Prep
- Cook
- Total
- Serves
- 6
Before you start
Before you begin, remove the pork belly from the refrigerator and let it sit at room temperature for up to 30 minutes. This helps it cook more evenly. Preheat the oven to 375°F (190°C) and position a rack in the center.
Line a rimmed baking sheet with aluminum foil for easy cleanup, and place a wire rack on top. Have all your ingredients measured and ready: the pork cut into 1.5-inch cubes, the spices mixed, and the glaze ingredients combined. Mince the garlic and slice the scallions for garnish.
Ingredients at a glance (10)
- 3 lb skinless pork belly
- 3 tbsp brown sugar
- 1 tbsp smoked paprika
- 1 tbsp garlic powder
- 1/2 cup honey
- 6 cloves garlic, minced
- 1/4 cup soy sauce
- 3 tbsp butter
- 1 tbsp toasted sesame seeds
- 2 tbsp sliced scallions
Instructions
Crisp and Render
- Cube and Coat the Pork BellyHeat the oven to 375°F (190°C). Cut the pork belly into 1.5-inch cubes. In a large bowl, toss the pork cubes with the brown sugar, smoked paprika, and garlic powder until every piece is evenly coated.Look for The pork is thoroughly coated with the spice mixture, looking like caramel-colored cubes.Tip For even cooking, keep the cubes as uniform as possible—about 1.5 inches on each side.
- Roast the Pork BellyPlace a wire rack over a rimmed baking sheet. Arrange the pork cubes in a single layer on the rack. Roast for 45 minutes, until the exterior is crispy and the fat has rendered. The pork should be deeply browned and sizzling.Look for The edges are browned and crisp, and the fat has rendered, leaving the cubes shrunken slightly.Tip The wire rack allows air to circulate, helping the pork get crispy on all sides.
After roasting, the pork cubes should be browned and crispy on the outside, with rendered fat. The edges will be slightly darker, and the meat will have shrunk a bit. The kitchen will smell of smoked paprika and roasted pork. Before moving on, check that the cubes are firm to the touch and release easily from the rack. If they stick, they need a few more minutes.
Glaze and Caramelize
- Make the Honey Garlic GlazeWhile the pork roasts, prepare the glaze. In a small bowl, stir together the honey, minced garlic, soy sauce, and butter. Set aside.Look for The glaze is smooth and well combined, with the butter softened into the mixture.Tip If the butter is cold, microwave the glaze briefly to melt it, then stir again.
- Caramelize in the SkilletIncrease the oven temperature to 400°F (200°C). Transfer the roasted pork belly cubes to a cast-iron skillet. Pour the honey garlic glaze over the pork and toss to coat. Roast uncovered for 10 minutes, until the glaze is bubbling and caramelized. Let it rest for 3 minutes before slicing.Look for The glaze is thick, sticky, and bubbling around the pork, with deep caramelization at the edges.Safe temperature 145°F (63°C) internal temperature (steaks, chops and roasts)Tip Use a cast-iron skillet for even heat and a beautiful caramelized crust.
The glaze should be bubbling and thickened after the final roast. The pork will be coated in a sticky, glossy sauce that clings to each cube. The aroma will be intensely sweet and savory, with notes of honey and garlic.
The edges of the pork should look slightly charred and caramelized. If the glaze is too thin, return the skillet to the oven for a couple more minutes.
Finish and Serve
- Garnish and ServeRemove the skillet from the oven. Let the pork belly rest for at least 3 minutes. Sprinkle with toasted sesame seeds and sliced scallions. Serve warm, ensuring each piece is coated with the sticky glaze.Look for The pork is glossy with glaze, topped with sesame seeds and green scallions.Tip Resting allows the juices to redistribute, keeping the meat tender.
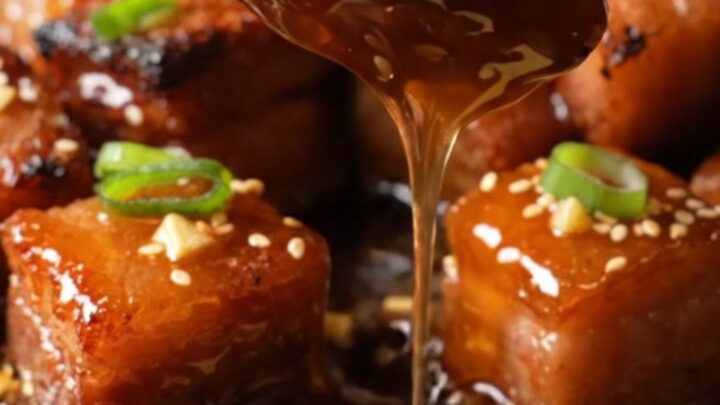
The finished burnt ends are sticky, glossy, and garnished with sesame seeds and scallions. The pork should be tender enough to cut with a fork, with a crispy exterior. The glaze should be thick and cling to the meat, not runny. The dish looks beautifully presented, with the green scallions and white sesame seeds contrasting against the deep amber glaze.
Common mistakes
One common mistake is overcrowding the baking sheet during the initial roast. If the cubes are stacked or touching, they will steam rather than crisp, resulting in soggy meat. Use a large enough sheet and keep the cubes in a single layer.
Another mistake is skipping the resting time after roasting—this allows the juices to settle, so don't rush to the glaze step. Also, be careful not to burn the glaze—watch the skillet during the last few minutes, as the sugar can go from caramelized to burnt quickly.
How to tell it’s done
The pork belly is done when the internal temperature reaches at least 145°F (63°C) for food safety, but because it's pork belly, you'll want it to be much more tender—almost falling apart. The glaze should be thick and sticky, coating the pork like a candy shell.
The cubes should be deeply caramelized, with a dark amber color and slightly charred edges. Let the pork rest for at least 3 minutes before serving to allow the juices to redistribute, ensuring each bite is moist and flavorful.
- Steaks, chops and roasts: 145°F (63°C) in the thickest part, then a 3-minute rest
Up next · Part 3 of 3
4 variations · storage & make-ahead · 5 answers · printable card
Tips, FAQ & printable recipe (Part 3)← Back to the ingredients (Part 1)