Desserts · Part 1 of 3: Ingredients
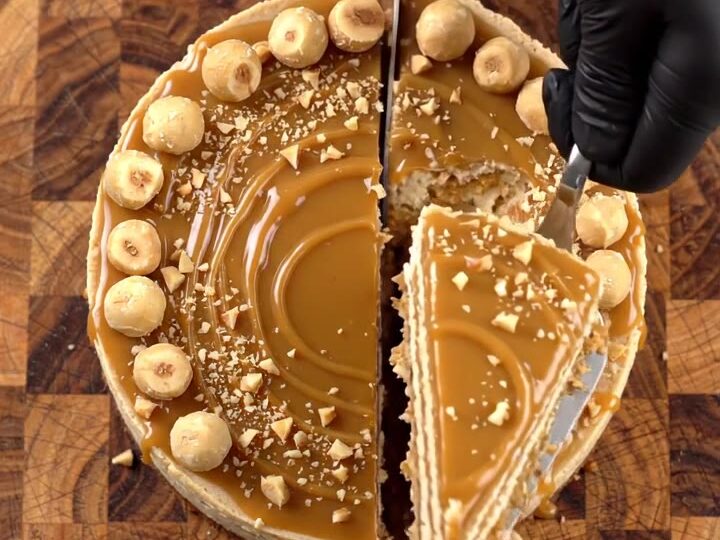
Hazelnut Praline Chocolate Cheesecake with Caramel Swirl
- Prep
- Cook
- Total
- Serves
- 12
Crunchy chopped hazelnuts, feathery milk chocolate curls and a glossy chocolate hazelnut ganache make this cheesecake a dessert with real layers of texture and flavor. Every slice shows a crisp biscuit base, a smooth filling and a praline topping.
It is a dessert for a special dinner, a holiday table or a weekend gathering, and the prep is simpler than the finished look suggests. Plan a long chill so the cheesecake sets cleanly and cuts into sharp wedges.
This hazelnut praline chocolate cheesecake builds on a biscuit crust, a silky cream cheese filling and a top layer of chocolate hazelnut ganache. Roasted hazelnuts are chopped by hand into coarse pieces and crumbs, which give the praline its crunch, while milk chocolate is grated over a box grater into fine curls that are scattered among the nuts. The filling is spread evenly over the crust and finished with the ganache.
Once baked and chilled, the cheesecake is topped with more praline and chocolate, unmolded, decorated with a caramel swirl and whole hazelnuts, and sliced in half to show the layers. The steps follow the order of the video: chop and grate, build the crust and filling, then top and decorate. The result is a rich, layered dessert that cuts cleanly and holds its shape on the plate.
Ingredients
Praline
- 1 cup whole roasted hazelnuts, finely chopped in coarse pieces and crumbs
- 4 oz milk chocolate bars, broken into chunks
Garnish
- 2 oz milk chocolate block, for grating into fine curls
Crust
- 8 oz graham cracker or biscuit crumbs
- 5 tbsp unsalted butter, melted
Filling
- 32 oz cream cheese, softened to room temperature
- 3/4 cup granulated sugar
- 3 large eggs, at room temperature
- 1/2 cup sour cream
- 1 tsp vanilla extract
Ganache
- 1/2 cup chocolate hazelnut spread
- 1/3 cup heavy cream
Decoration
- caramel sauce, store-bought or made ahead, for swirling, to taste
Why this recipe works
The biscuit crust holds the cheesecake while it bakes, and pressing the crumbs firmly with melted butter keeps the base crisp rather than crumbly. Baking the cheesecake in a water bath, a larger pan of hot water around the springform, keeps the oven heat gentle so the filling sets evenly with a smooth, creamy texture and fewer cracks on the surface.
Chopping the hazelnuts by hand keeps some pieces coarse and others fine, so the praline has both crunch and a sandy texture that spreads through each bite. Grating the milk chocolate instead of chopping it makes delicate curls that melt slightly on contact with the warm ganache and give a soft, clean chocolate note on top, without heavy pieces that would tear the surface when sliced.
Notes and substitutions
Choose a 9-inch springform pan with a tight latch, and wrap the outside of the base in two layers of heavy-duty aluminum foil before baking. This keeps water out of the crust during the bath.
A large chef's knife and a wooden cutting board make chopping the hazelnuts fast and safe. A box grater with a fine side gives the best chocolate curls, and a thin knife is useful both for loosening the cheesecake from the pan and for the final slice that reveals the layers.
Use full-fat cream cheese and sour cream, and bring the cream cheese and eggs to room temperature before mixing, so the filling is smooth without overbeating. Whole roasted hazelnuts give the most flavor, and you can toast raw nuts yourself if needed.
Graham crackers or any plain biscuit crumbs work for the crust, and gingersnaps add a warm spice note. Store-bought or homemade caramel sauce can be used, as long as it is pourable enough to swirl. Chocolate hazelnut spread should be smooth and thick, not oily, for the ganache layer.
- graham cracker or biscuit crumbs: gingersnap or vanilla wafer crumbs, same weight
- chocolate hazelnut spread: melted milk chocolate mixed with a spoonful of hazelnut butter
- sour cream: full-fat plain yogurt, same amount
Equipment
- 9-inch springform pan
- Large chef's knife
- Cutting board
- Box grater
- Stand or hand mixer
- Thin knife
- Aluminum foil
Up next · Part 2 of 3
9 steps · 1 h of cooking · what to look for at each stage
Step-by-step instructions (Part 2)